
Christmas decorating is the perfect opportunity to let your creativity shine, especially when it comes to the centerpiece of your holiday home. Unique DIY Christmas trees offer a fresh alternative to traditional evergreens, turning simple materials and unexpected objects into eye-catching seasonal displays. From minimalist wall-mounted designs to imaginative creations made with branches, ornaments, books, or recycled materials, there are countless ways to make your holiday decor stand out. I love how these creative projects bring personality to a space while allowing you to customize every detail to match your style. Whether you are decorating a small apartment, refreshing your living room, or looking for a fun family craft, these ideas can inspire a tree that feels truly one of a kind. Get ready to explore beautiful handmade Christmas trees that make a statement and bring a little extra magic to your holiday celebrations.
Moss-Covered Christmas Tree With Colorful Ornaments
This miniature Christmas tree immediately catches my attention with its rich combination of green moss, pinecones, small branches, and colorful ornaments. The tree has a full, conical silhouette, with layers of textured greenery creating a wonderfully organic appearance. Red, gold, cream, and muted blue-green accents add variety, while the pinecone at the top provides a natural finishing touch. I also love the small winter scene surrounding the tree, complete with a white deer figurine, a little angel, candlelight, and artificial snow arranged inside a round blue tray.
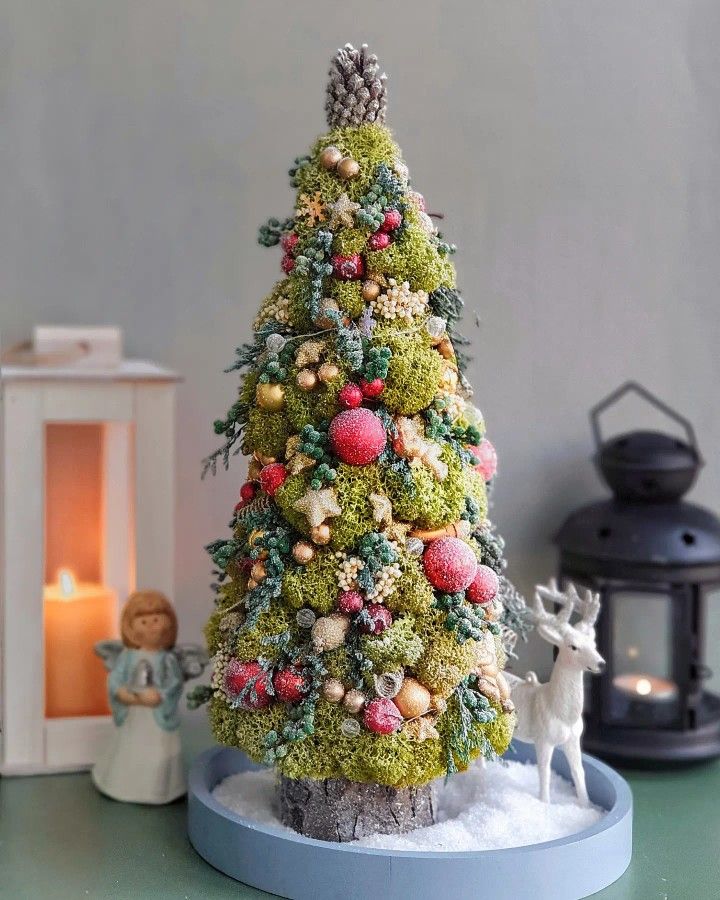
What makes this design so appealing is the contrast between the irregular natural textures and the carefully arranged tree shape. The moss creates a soft, almost forest-like appearance, while the ornaments bring just enough color to make the display feel festive. Because the arrangement is compact, it can sit on a table, shelf, or console without requiring the space of a full-sized Christmas tree. The surrounding figurines and candleholders help turn a single craft into a complete miniature holiday scene.
To recreate this look, I would start with a cone-shaped base and attach preserved moss or suitable artificial greenery until the surface looks full. Small pinecones, miniature ornaments, and tiny decorative branches can then be added in layers. I recommend distributing the red and gold details throughout the tree rather than concentrating them in one area. A simple tray with artificial snow creates a defined base and makes the entire arrangement easier to move.
For my finishing touch, I would keep the surrounding decorations relatively simple so the richly textured tree remains the main attraction. A few miniature winter figures and a warm candle-style light source are enough to create a charming seasonal vignette. If using real candles nearby, I would keep them safely separated from dried moss and other flammable craft materials.
Burgundy Crochet Christmas Tree With Pearl Details
This handmade Christmas tree has a distinctive layered silhouette created from burgundy crochet fabric and scalloped cream-colored edging. Each tier forms a ruffled skirt, giving the decoration a soft, almost theatrical appearance. Small white pearl-like beads are attached along the edges, while a large burgundy bow and a crocheted white star complete the top. The deep red color contrasts beautifully with the pale trim, and the close-up composition highlights the detailed stitches and tactile quality of the yarn.
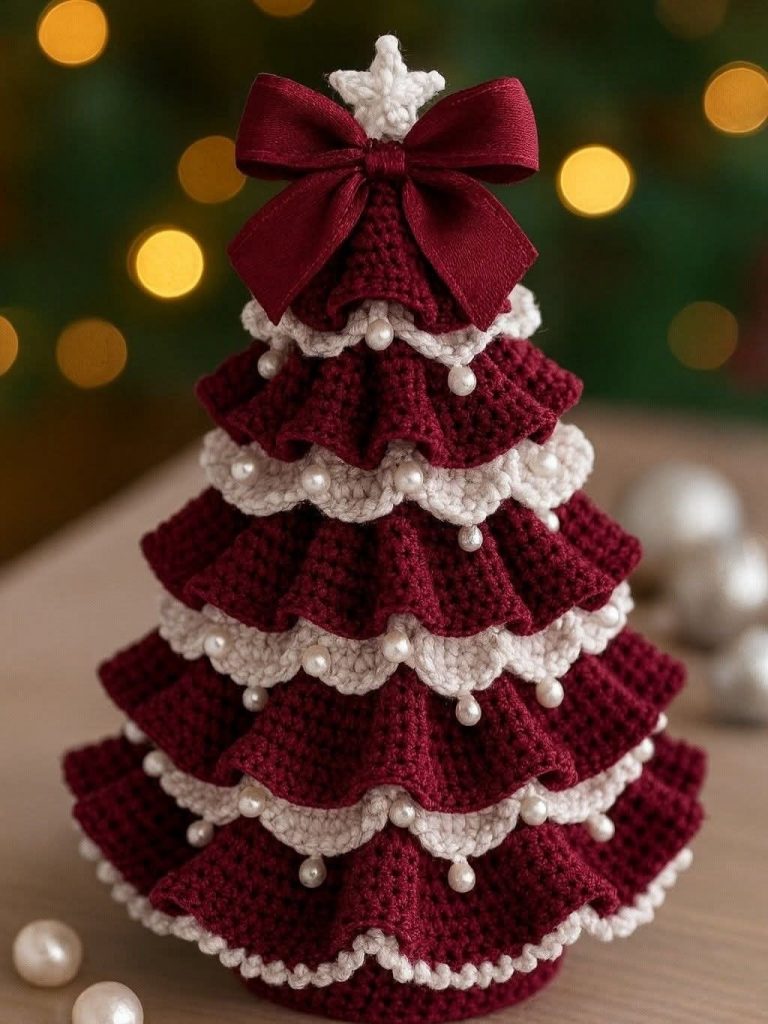
I find this design particularly effective because it uses texture and repetition instead of traditional branches to suggest a Christmas tree. The stacked tiers establish a clear triangular shape, while the cream edging separates each layer and prevents the dark burgundy fabric from looking visually heavy. Pearl accents add a delicate decorative detail without overwhelming the crochet work. This tree is also an excellent option for anyone who enjoys handmade décor and wants a reusable Christmas centerpiece.
To achieve a similar result, I would choose a structured crochet pattern that creates progressively smaller ruffled layers from the bottom to the top. Burgundy and ivory yarn would preserve the contrast seen in the photograph, although the same construction could work in other complementary colors. Before attaching beads or decorative pearls, I would make sure they are securely fastened, especially if the ornament will be displayed where children or pets can reach it. The oversized bow can be added at the end to emphasize the top of the tree.
I would display this piece on a stable tabletop where its detailed craftsmanship can be appreciated up close. Because the design already contains plenty of texture and decoration, it does not need additional ornaments or complicated surroundings. A softly illuminated background would help emphasize the deep red yarn and give the finished craft a cozy holiday atmosphere.
DIY Christmas Trees Made From Plastic Spoons
These two striking Christmas trees are constructed from overlapping spoon-shaped pieces arranged in dense, downward-facing layers. The taller tree is finished in silver, while the shorter one has a deeper charcoal-metallic appearance. Both have a tapered silhouette that resembles stylized evergreen trees, and their reflective surfaces catch the light across the repeated curved edges. The simple backdrop and a few red baubles at the bottom keep the focus on the unusual construction and metallic finish.
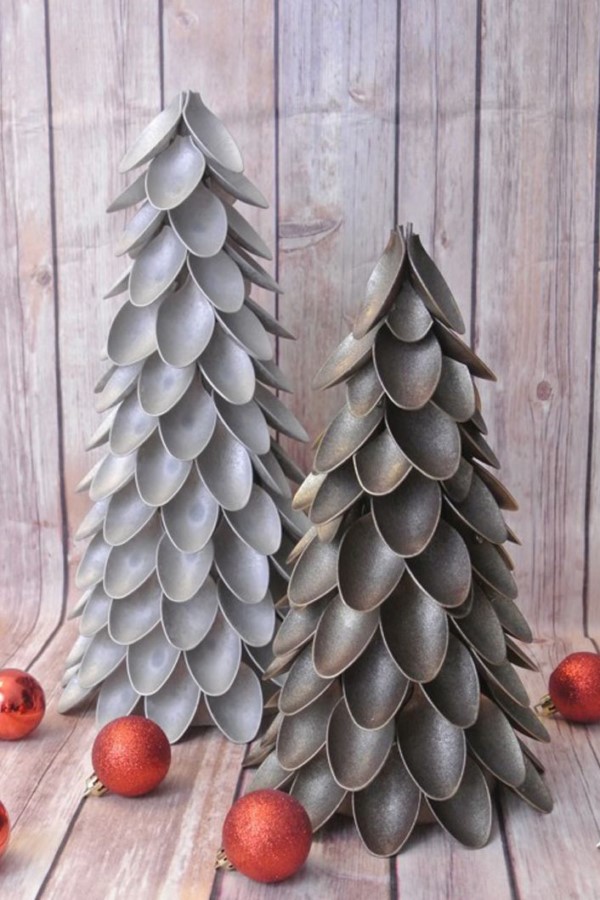
The strength of this design lies in its repetition. Individual spoon bowls become decorative scales, and the overlapping arrangement creates depth without requiring conventional branches. I like how the monochromatic finishes make the trees look sculptural and contemporary. Their narrow footprints are also useful when decorating a shelf, mantel, or tabletop where a traditional tree would take up too much room. Displaying the two sizes together creates a balanced composition while allowing each tree to remain visually distinct.
To recreate the idea, I would begin with a firm cone-shaped base and carefully arrange cleaned plastic spoon bowls in horizontal rows, overlapping each row with the one beneath it. The handles would need to be removed with appropriate tools, and the cut edges should be handled carefully. A suitable adhesive and a secure base are essential for keeping the structure stable. Once the surface is covered, metallic silver or graphite paint can unify the pieces and create the reflective finish shown in the photograph.
I would keep the rest of the display restrained, perhaps using a few red ornaments to introduce a controlled pop of color. Before beginning, I would choose a well-ventilated painting area and make sure the finished piece is kept away from open flames and other heat sources. For a more sustainable approach, I would consider clean, reclaimed materials or reusable decorative pieces rather than buying new plastic solely for the project.
Rustic Wall-Mounted Christmas Tree With Fairy Lights
This wall-mounted Christmas tree is formed from horizontal branches arranged in descending lengths to create a simple triangular outline. Thin vertical strings connect the branches, holding the structure together and providing a framework for the decorations. Delicate warm-white fairy lights wind around the branches, while small white ornaments, snowflakes, miniature reindeer, and silver accents hang at different levels. The pale wall behind the arrangement allows the natural brown branches and light-colored decorations to stand out.
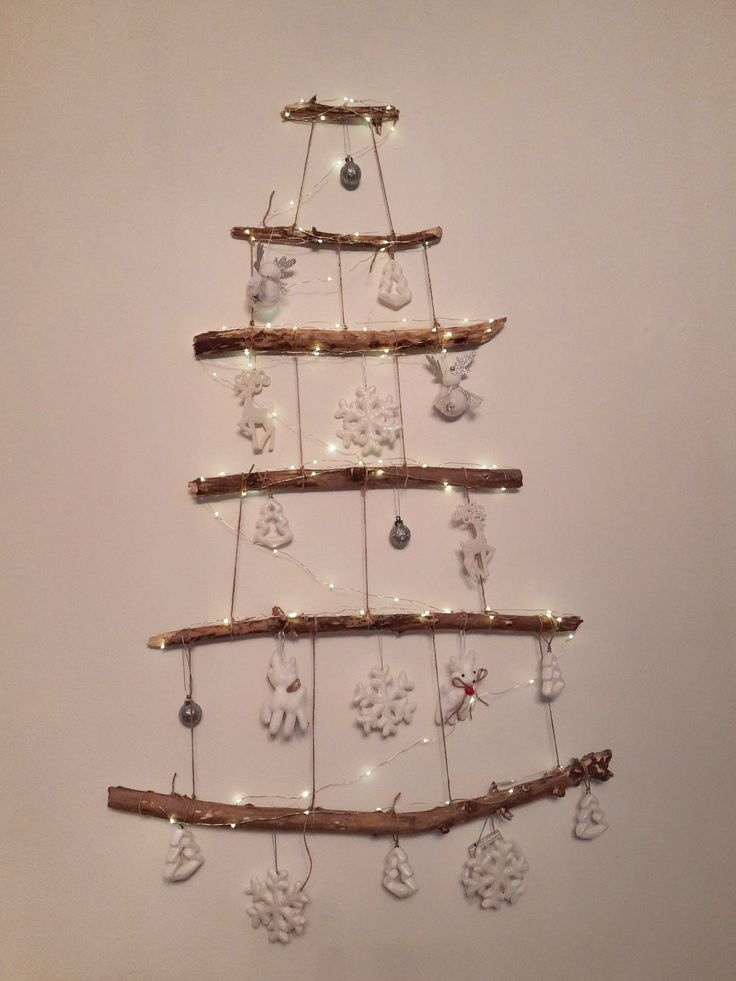
I appreciate how this design offers the recognizable shape of a Christmas tree without using a traditional standing frame. Its open construction leaves plenty of visible wall space, making it a practical choice for a small apartment, narrow hallway, or room where floor space is limited. The horizontal branches provide several levels for hanging ornaments, while the fairy lights add warmth and help define the outline. Because the tree is relatively flat, it can also be easier to store than a bulky artificial tree.
To make a similar decoration, I would collect branches in several lengths, choosing pieces that are reasonably straight and strong enough to support small ornaments. After arranging them from shortest to longest, I would connect them with sturdy cord or wire and secure the entire structure to an appropriate wall attachment. A small strand of battery-operated fairy lights can be wrapped around the branches, followed by lightweight decorations in a coordinated palette. I would test the balance before hanging the finished tree to make sure the weight is distributed evenly.
For my own version, I would preserve the natural irregularities of the branches rather than making every line perfectly uniform. Those small differences give the arrangement its character. I would also keep the ornaments relatively lightweight and avoid overcrowding the lower branches, allowing the open shape and soft lighting to remain the main features.
Cozy Cream Crochet Christmas Tree With a Knitted Star
This soft cream-colored Christmas tree is made from thick yarn or wool, with rows of rounded bobble-like details covering its conical shape. The tree stands on a matching knitted pedestal and is topped with a large five-pointed star made from the same textured material. Its warm ivory shade creates a gentle, understated appearance, while the repeated raised stitches give the surface depth. Nearby are simply wrapped gifts, a strand of warm fairy lights, and a neutral-colored mug filled with marshmallows, completing the cozy seasonal scene.
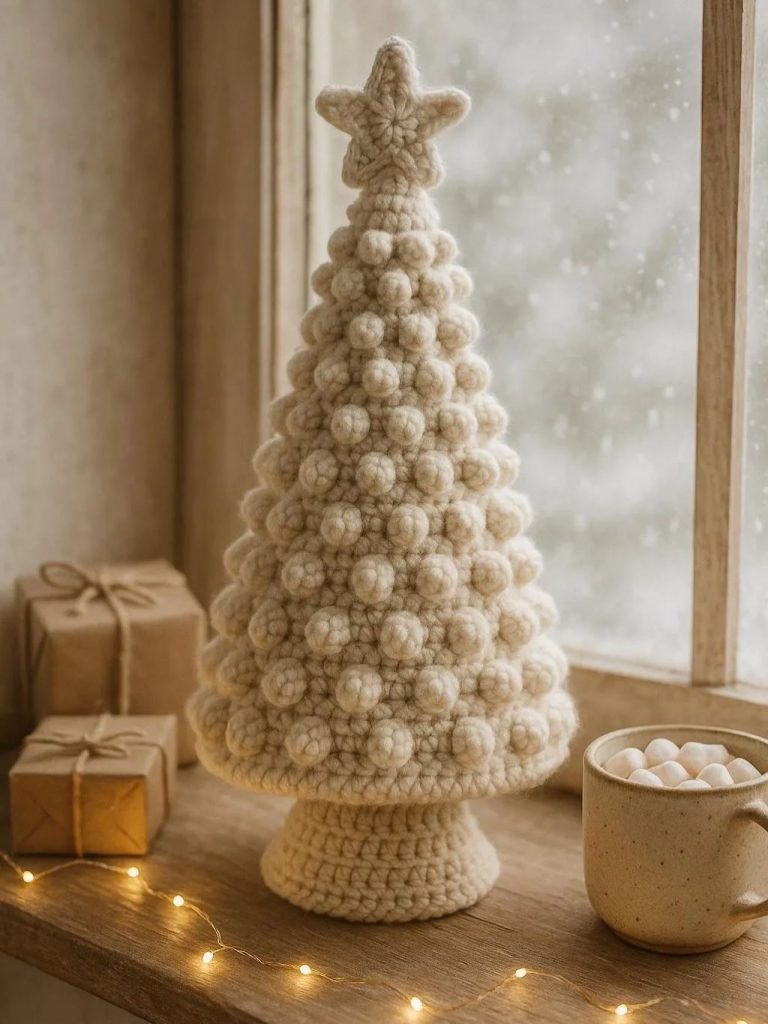
I love how this design uses a single color to make texture the main attraction. Instead of relying on shiny baubles or colorful decorations, the raised wool details create a playful surface that looks soft and inviting. The matching pedestal gives the tree a finished, freestanding appearance, while the star reinforces its traditional silhouette. Its neutral palette also makes it easy to combine with many existing interiors, particularly spaces that already feature cream, beige, and other soft tones.
To recreate this look, I would use chunky yarn and a pattern designed to produce a firm conical structure with raised bobbles or loops. A weighted base would help the tree stand securely, and the knitted pedestal could conceal the supporting structure. I would finish the top with a matching crocheted or knitted star, keeping the shade consistent throughout. The most important detail is maintaining a regular overall shape while allowing the surface texture to remain prominent.
I would style this tree with just a few complementary accessories, such as wrapped gifts in neutral paper and a warm string of lights. The restrained palette makes the arrangement feel coordinated without requiring many separate decorations. Since knitted pieces can collect dust, I would also choose a design that can be gently cleaned or stored in a protective container after the holiday season.
DIY Wooden Frame Christmas Trees With Ornaments
These two freestanding Christmas trees are built from triangular wooden frames with horizontal metal rods spanning the open centers. Red, silver, and white baubles hang from the rods at different heights, creating a festive display without traditional branches. The larger frame stands to the left, while a slightly smaller version sits beside it. Their muted brown wood, thin metal supports, and classic ornaments create a simple combination of natural structure and familiar Christmas colors against a white paneled door.
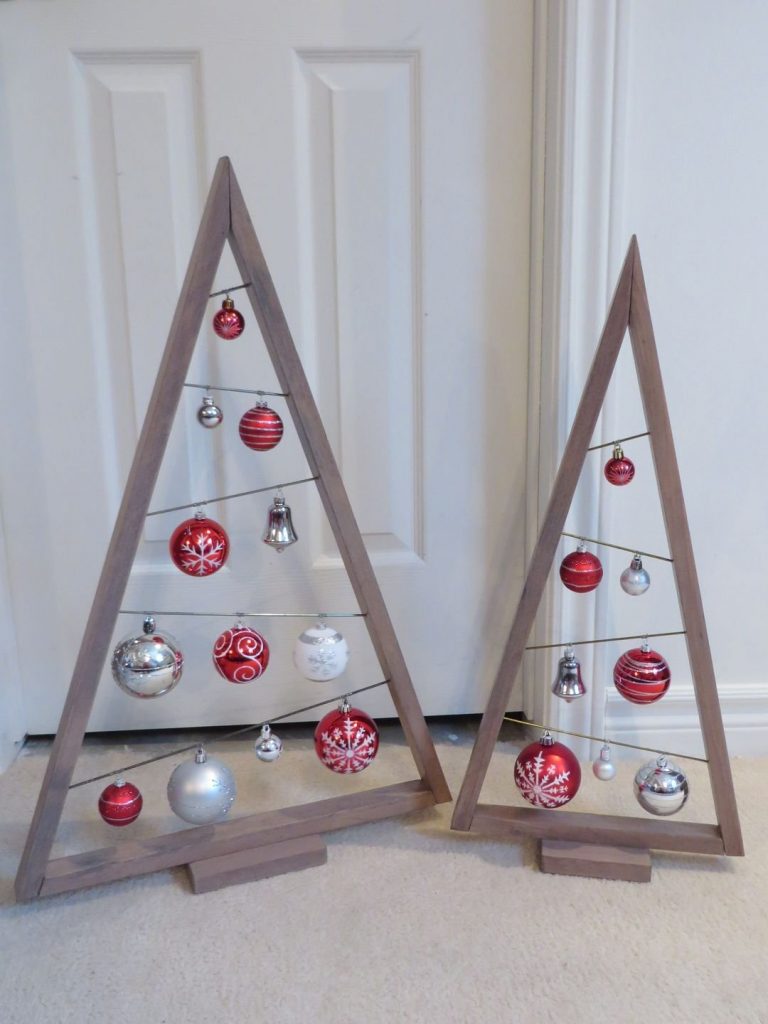
I find this design especially practical because the open frame makes the tree visually light while still providing plenty of space for decorations. Unlike a dense evergreen, this structure allows every ornament to be seen clearly. The triangular outline instantly communicates the shape of a Christmas tree, and the two different sizes create a coordinated display without making the arrangement feel repetitive. These trees can also be useful in rooms where a conventional tree would block a walkway or occupy too much floor area.
To create a similar frame, I would assemble wooden pieces into a stable triangle and add horizontal rods or strong wire at several levels. The base should be wide enough to prevent tipping, and the hanging supports should be firmly attached to the frame. Once the structure is secure, I would arrange baubles of different sizes along the rods, mixing red and silver ornaments with a few white pieces for balance. Choosing decorations with similar finishes helps the entire display feel unified.
I would leave some space between the ornaments rather than filling every section of the frame. This open arrangement is part of what makes the design attractive. For a slightly warmer effect, a small strand of fairy lights could be added along the frame, provided the lights are suitable for the materials and do not interfere with the hanging decorations.
Creative Wall Christmas Tree Made From Circular Tubes
This wall-mounted Christmas tree is created from numerous circular tubes arranged in a triangular formation on a large rectangular backing panel. The tubes vary in diameter, forming a pattern of open rings that becomes wider toward the bottom. Many of the openings contain colorful ornaments and small decorative objects in turquoise, pink, red, gold, green, and other shades. A small red decorative piece sits at the top, while a simple white cylindrical element near the bottom suggests the tree’s trunk. Wrapped gifts and a few colorful furnishings appear below the display.
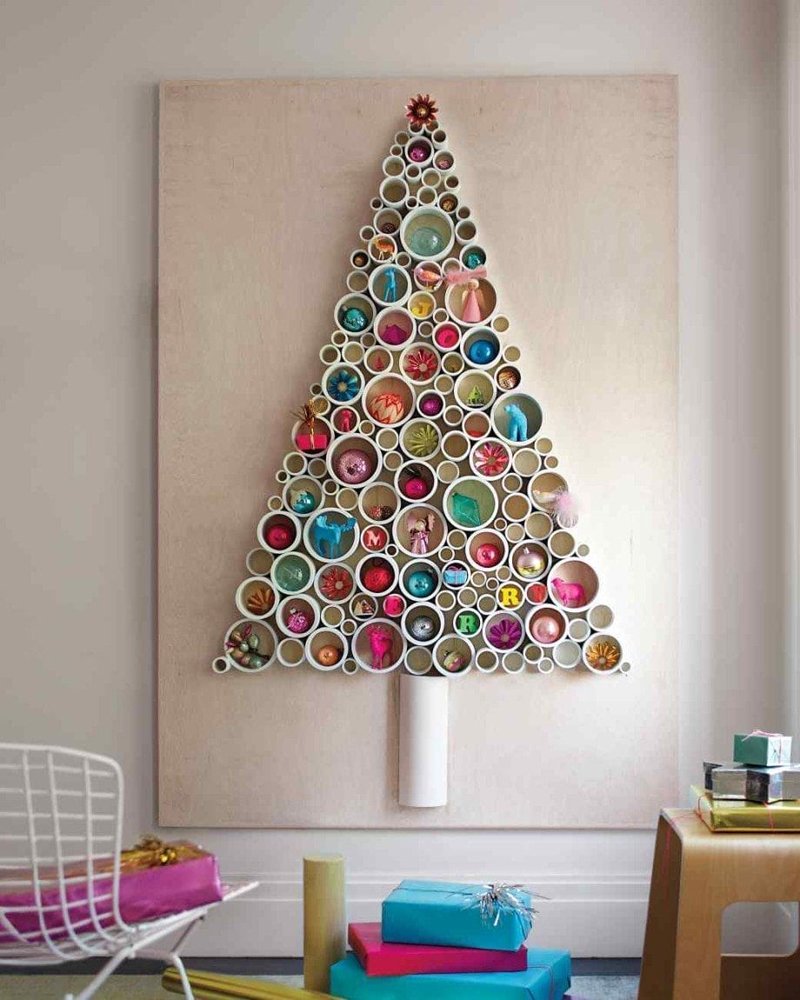
The most interesting feature here is the use of geometric repetition to create a festive silhouette. Each circular opening acts like a tiny display niche, giving the tree both structure and visual variety. I like how the bright decorations stand out against the pale backing panel, while the different tube sizes create a lively pattern. Because the entire design is mounted on the wall, it preserves floor space and can serve as a statement piece in a contemporary living area or a creative holiday display.
To make a similar project, I would arrange cardboard tubes or other lightweight cylindrical sections on a firm backing panel, testing the triangular layout before attaching anything permanently. The openings can then be filled with small ornaments, decorative objects, or miniature keepsakes. I would distribute the colors across the composition so that no single area feels too heavy. A secure wall-mounting system is important because the backing panel and its contents will add weight.
I would treat each circular opening as a small frame and choose decorations that fit neatly inside it. Some openings can remain relatively simple to give the eye a break, while others can hold brighter accents. For a cleaner result, I would paint the tubes and backing in a consistent neutral shade, allowing the colorful ornaments to remain the focus. This idea is particularly appealing for anyone who enjoys a more graphic, customizable alternative to a traditional Christmas tree.
Natural Pinecone Christmas Tree With Twine and Gold Accents
This final Christmas tree has a rich, earthy appearance, with pinecones, nuts, small branches, and other natural-looking materials packed closely together to form a tapered shape. Twine wraps around the arrangement in several places, creating rustic-looking bows and horizontal accents. Gold ornaments introduce a subtle shimmer, while small green sprigs and pale decorative elements add contrast to the brown textures. The tree stands on a circular base covered in a natural woven material, and its compact composition makes the different textures easy to appreciate.
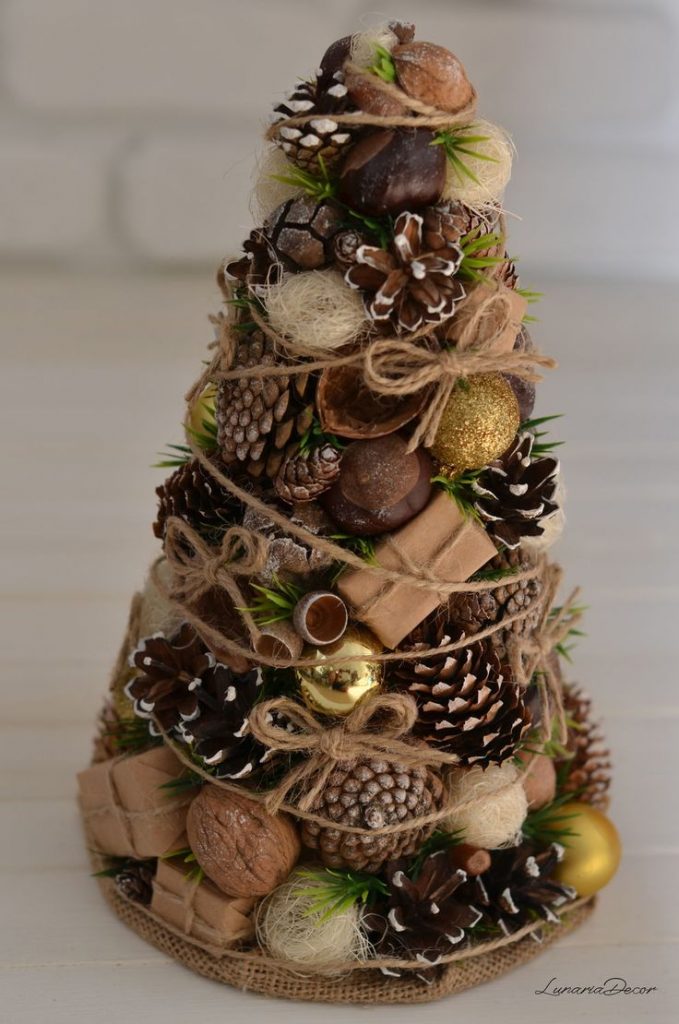
What I like most about this design is how it celebrates the visual variety of natural materials. Pinecones provide strong shapes and layered surfaces, while nuts, twine, and small branches fill the gaps and create a sense of abundance. The occasional gold ornament catches the light without overpowering the earthy palette. This approach also allows the maker to experiment with different combinations of collected materials, creating a decorative tree that feels individual rather than mass-produced.
To recreate the look, I would begin with a firm cone-shaped base and attach the larger pinecones first, distributing them around the structure to establish the overall shape. Smaller pinecones, nuts, twine, and decorative branches can then fill the remaining spaces. I would add a few gold accents near the end, using them sparingly so the natural materials remain dominant. A woven circular base helps the finished tree look complete and provides a stable surface for displaying it.
For my finishing touch, I would keep the color palette close to the shades already visible in the photograph: brown, beige, muted green, and gold. A few carefully placed twine bows can connect the different materials and add a handmade quality. If using collected natural materials, I would make sure they are clean and completely dry before assembling the tree, then store the finished decoration in a dry place between seasons.
Minimalist Wooden Christmas Tree With Hanging Ornaments
This handmade Christmas tree features a simple triangular silhouette cut from pale wood, creating a clean and modern alternative to a traditional evergreen. Small dark holes are arranged across its surface, while short wooden pegs hold delicate white ornaments, including stars, circles, and geometric shapes. The tree stands on a matching wooden base against a charcoal-gray wall, with a rustic brown tabletop and a small evergreen branch completing the arrangement. I love how the natural wood grain and restrained color palette give this decoration a calm, understated appearance.
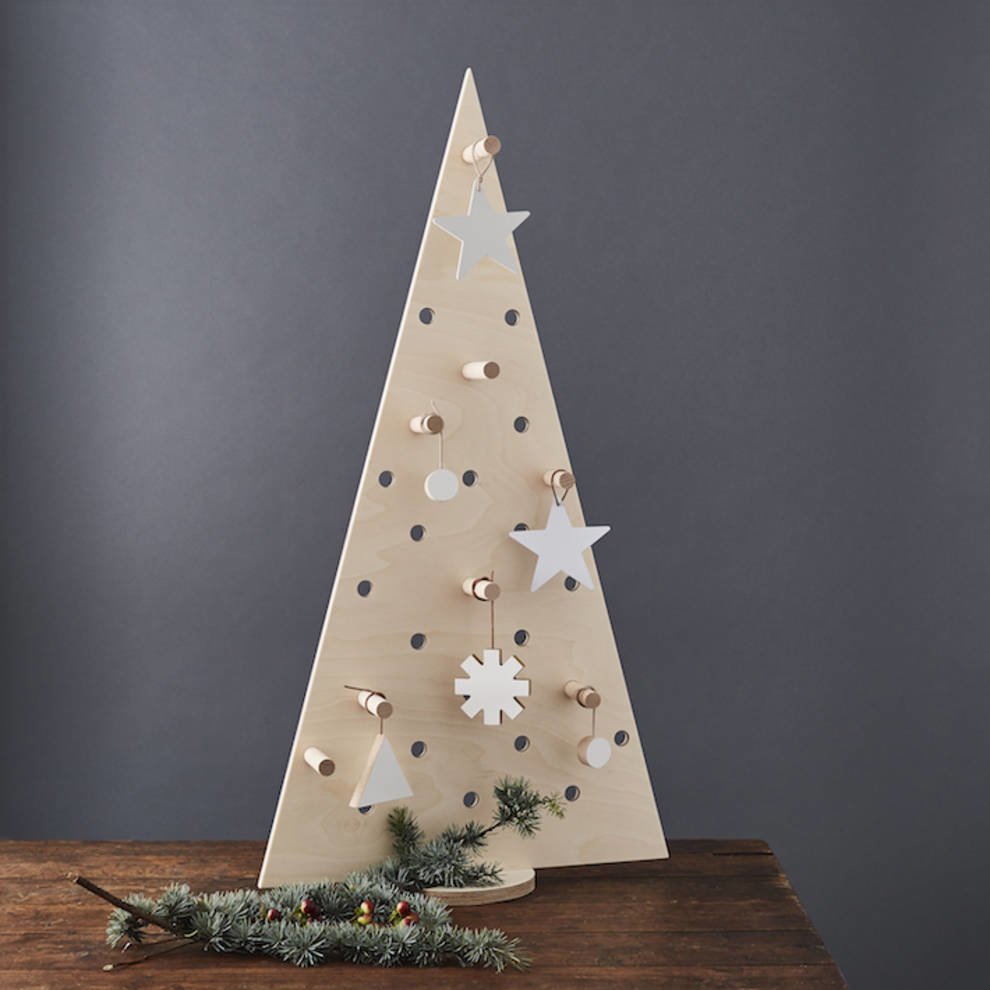
The beauty of this design lies in its simplicity. Its flat construction takes up relatively little visual space, making it ideal for a console table, shelf, or compact living area. The removable hanging ornaments also make the tree easy to customize from year to year. I would keep the decorations light and evenly distributed so that the geometric outline remains the main attraction.
To recreate this look, I would use a triangular plywood panel, a stable base, and carefully positioned holes or pegs for hanging ornaments. Sanding the edges and applying a clear matte finish would help preserve the natural appearance of the wood. White wooden shapes, neutral string, and a few understated details are enough to achieve the same minimalist effect without making the project complicated.
Cozy Yarn-Wrapped Christmas Tree With Buttons and Pearls
This charming tabletop Christmas tree is covered in thick cream-colored yarn, creating a soft, knitted appearance with layered textures across its conical shape. Wooden buttons and small white pearl-like ornaments are scattered over the surface, while a textured star crowns the top. The tree sits on a natural wood slice, surrounded by simple craft materials, including a ball of yarn and small wooden decorations. In the background, a traditional Christmas tree with warm lights adds a gentle festive glow. I find this design especially inviting because its handmade texture makes the entire display feel warm and personal.
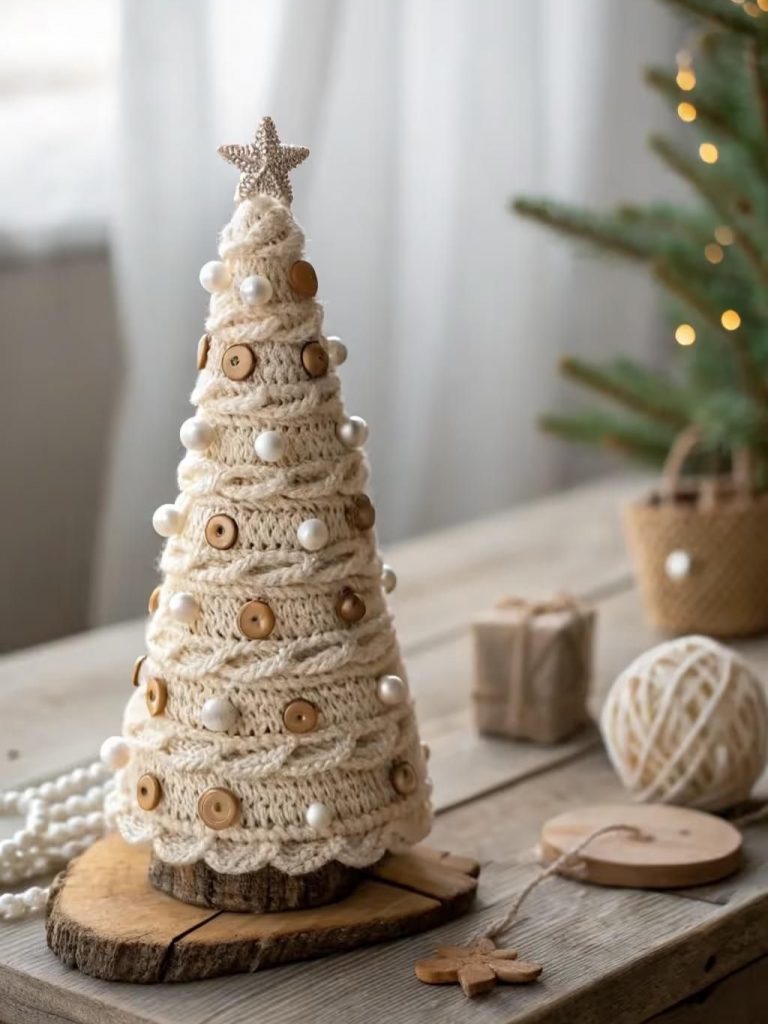
The combination of yarn, wood, and rounded ornaments creates visual interest without relying on bright colors or elaborate decorations. Unlike a full-sized Christmas tree, this compact craft can fit comfortably on a coffee table, desk, or bedside surface. Its neutral palette also makes it easy to coordinate with existing holiday decorations, especially if the room already features cream, beige, or natural wood tones.
For a similar project, I would wrap yarn around a lightweight cone, securing it as I work to prevent loose sections. Different yarn thicknesses can create additional texture, while wooden buttons and small lightweight ornaments add a handmade finishing touch. I would choose a stable base and attach the top star securely so the finished tree remains upright and attractive throughout the season.
DIY Christmas Tree Made From White Paper Cups
This playful Christmas tree is constructed from rows of upside-down white paper cups arranged in an increasingly smaller pyramid. Each cup is decorated with a gold star, while shiny red, green, and gold baubles hang between the layers. Red bead garlands curve across the structure, and a large gold star sits at the very top. The warm beige background and simple floor surface allow the colorful decorations to stand out. I like how an everyday disposable item becomes the foundation for an oversized holiday centerpiece.
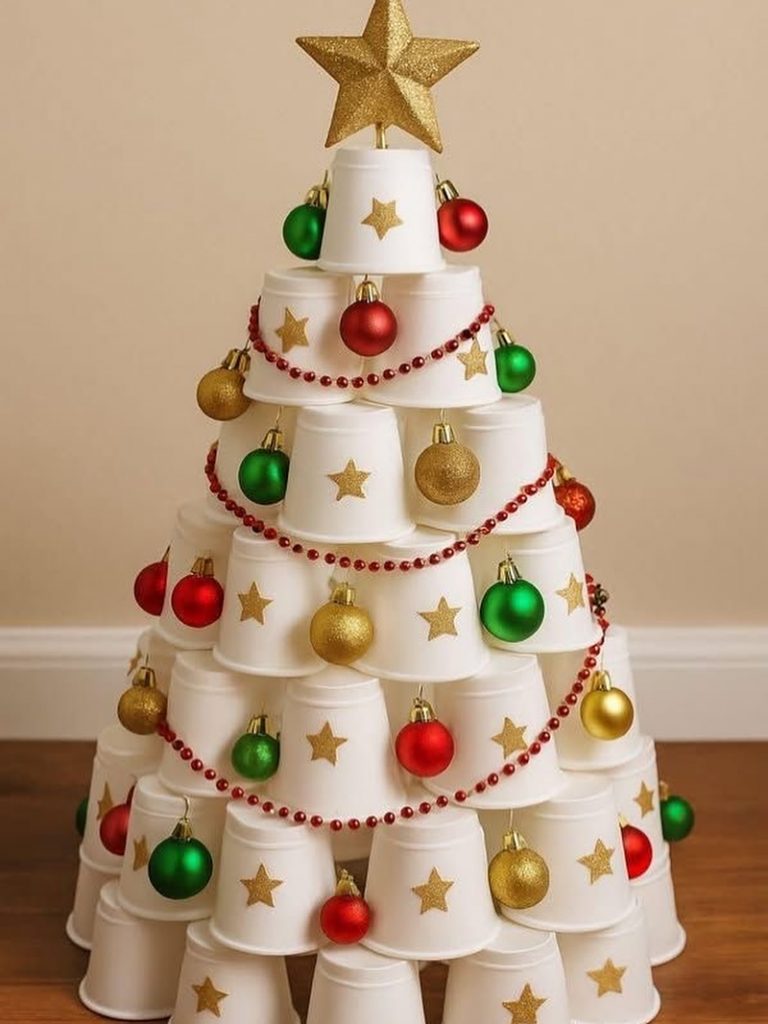
The stepped arrangement gives the cups the appearance of individual branches, creating a recognizable tree silhouette without needing a traditional frame. Repeating the same cup shape throughout the design keeps the overall structure visually consistent, while the red and green ornaments introduce a familiar Christmas color scheme. This idea could work particularly well for a school celebration, community event, craft display, or family holiday project.
To make a similar tree, I would arrange the cups in rows, gradually reducing the number in each layer. A secure backing or supporting frame would help keep the structure stable, especially if the display is tall. I would attach the lightweight ornaments carefully and use adhesive suitable for the cup material. If the tree is intended for repeated use, reusable cups could be a practical alternative to disposable ones.
Handmade Crochet Christmas Tree With Red Bows
This handmade Christmas tree has a rich green surface formed by thick crochet stitches, giving the entire cone a textured, almost evergreen-like appearance. Glossy red spherical ornaments are distributed across the tree, while white star decorations and red-and-white checked bows provide contrast. A small red star finishes the top. The tree stands against a dark tabletop with light curtains behind it, creating a simple background that highlights the intricate stitching. I love how the combination of traditional Christmas colors and handmade texture makes this piece feel cheerful without needing lights or additional accessories.
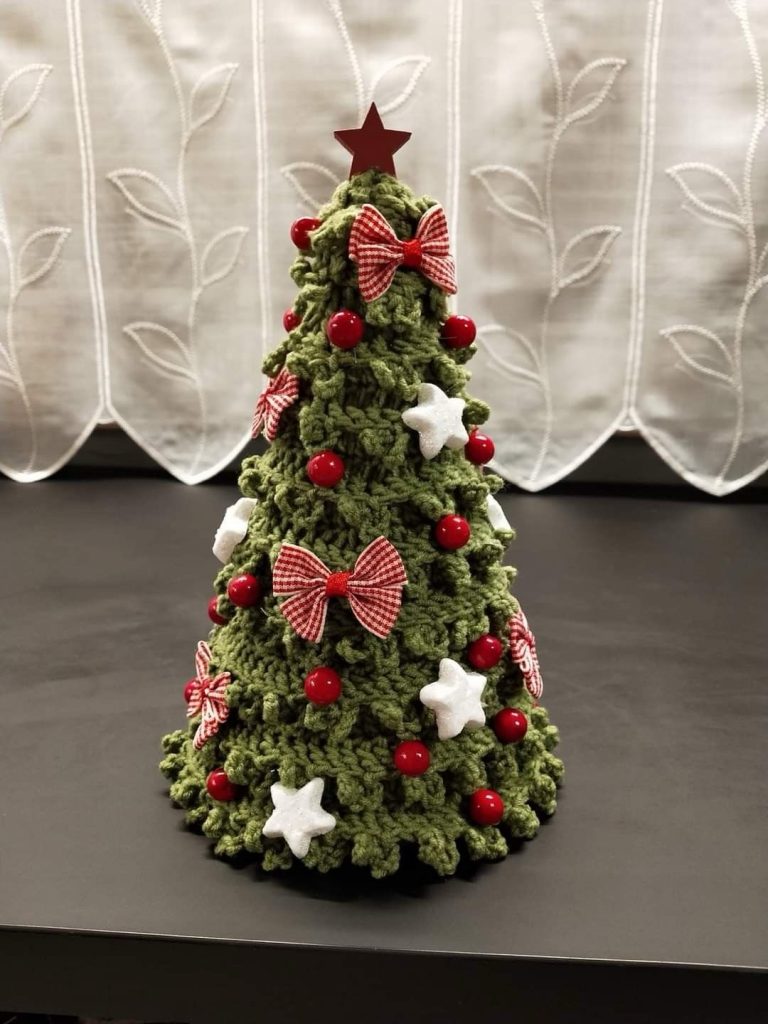
The crocheted surface gives the tree depth and dimension, allowing it to resemble a miniature evergreen while remaining soft and decorative. The red ornaments and bows are easy to notice against the green yarn, and the white stars break up the darker areas. Because the decoration is relatively compact, it could serve as a tabletop centerpiece or become part of a collection of handmade holiday ornaments.
For a similar result, I would crochet or knit a cone-shaped cover using thick green yarn, building up the texture to create a full appearance. Beginners could also wrap a sturdy cone with textured yarn if they prefer not to crochet. Lightweight baubles, fabric bows, and felt stars would complement the surface beautifully. I would secure every embellishment firmly and keep the base wide enough to support the finished shape.
Rustic Twig Christmas Tree With Natural Ornaments
This rustic Christmas tree is assembled from a network of thin brown twigs arranged in a triangular, cone-like form. Cream, champagne, and copper-colored baubles are nestled among the branches, alongside small pinecones, dried botanical accents, and cinnamon sticks. Several pale natural elements add contrast to the darker twig structure, while a small star tops the arrangement. The tree stands against a light paneled background, emphasizing its intricate construction and earthy color palette. To me, this is a lovely example of how simple natural materials can create a detailed holiday decoration.
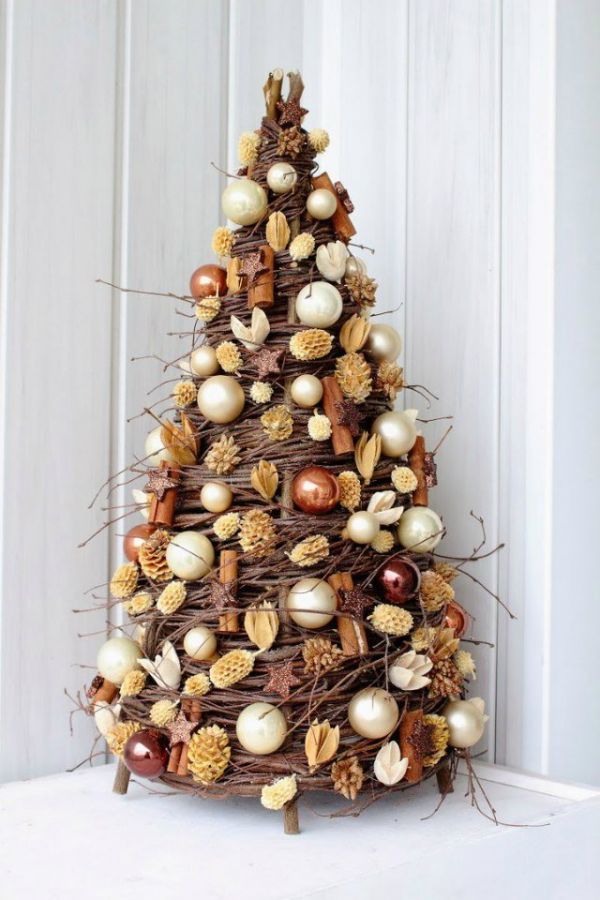
The open structure gives this tree a lighter appearance than a solid, densely decorated design. Small gaps between the twigs allow the underlying construction to remain visible, making the arrangement interesting from different angles. The combination of metallic ornaments and natural textures also creates balance: reflective surfaces catch the light, while the branches and pinecones add a more organic quality. This design would suit a tabletop, entryway, or quiet corner where its details can be appreciated up close.
I would recreate this project by arranging sturdy twigs around a simple cone-shaped support and securing them gradually as the structure takes shape. Once the frame is stable, I would add pinecones, lightweight baubles, and a few dried accents in a consistent palette of cream, bronze, and copper. Cinnamon sticks can contribute extra texture, although I would use them sparingly to avoid overcrowding the branches. A simple base and a restrained selection of decorations would preserve the handmade character.
Creative Christmas Tree Made From Stacked Books
This imaginative Christmas tree is made from stacks of books arranged in a broad base and progressively narrower upper layers. The colorful spines create horizontal bands that form the tree’s recognizable silhouette, while small red and silver baubles are tucked between the stacks. Warm string lights wind around the books, highlighting their edges and adding a festive glow. A silver star crowns the display, and wrapped presents sit around the base. I find this idea particularly appealing for book lovers because it turns a familiar part of everyday life into a personalized holiday centerpiece.
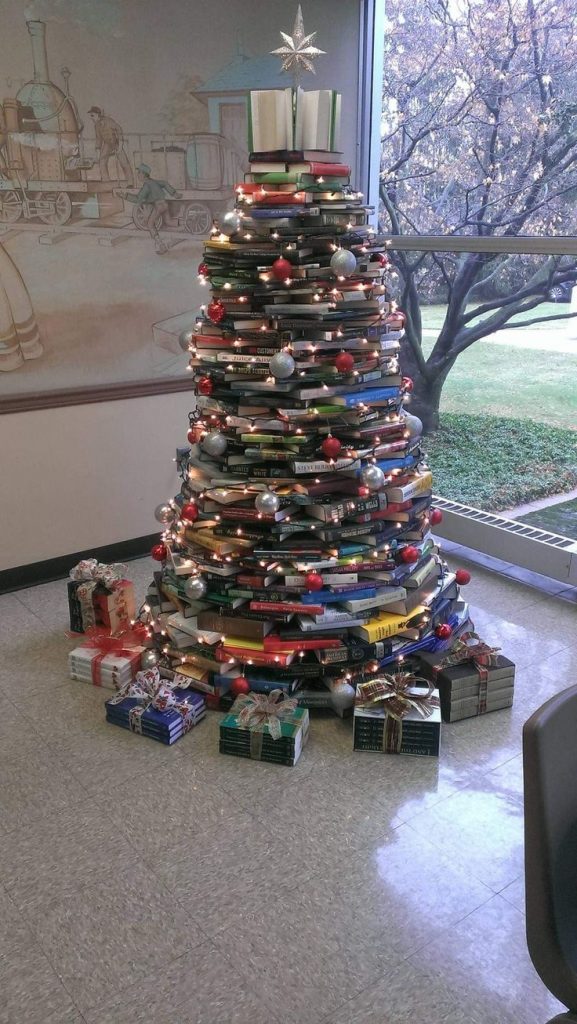
The layered construction makes excellent use of objects that are already available in a home, so there is no need to purchase a traditional tree for this particular display. The book spines also provide natural variation in color, texture, and size, giving the finished arrangement a distinctive appearance. The design is especially suitable for a reading nook, library, study, or living room where books are already part of the decor.
To build a similar tree, I would start with the widest stack at the bottom and gradually reduce the width of each layer toward the top. I would choose books with sturdy covers and make sure the stacks remain balanced rather than leaning. Battery-operated string lights can add warmth without requiring a nearby outlet, and lightweight ornaments help prevent the display from becoming unstable. I would also keep the lights arranged neatly to avoid tangling them around the books.
DIY Triangle Frame Christmas Tree With Hanging Baubles
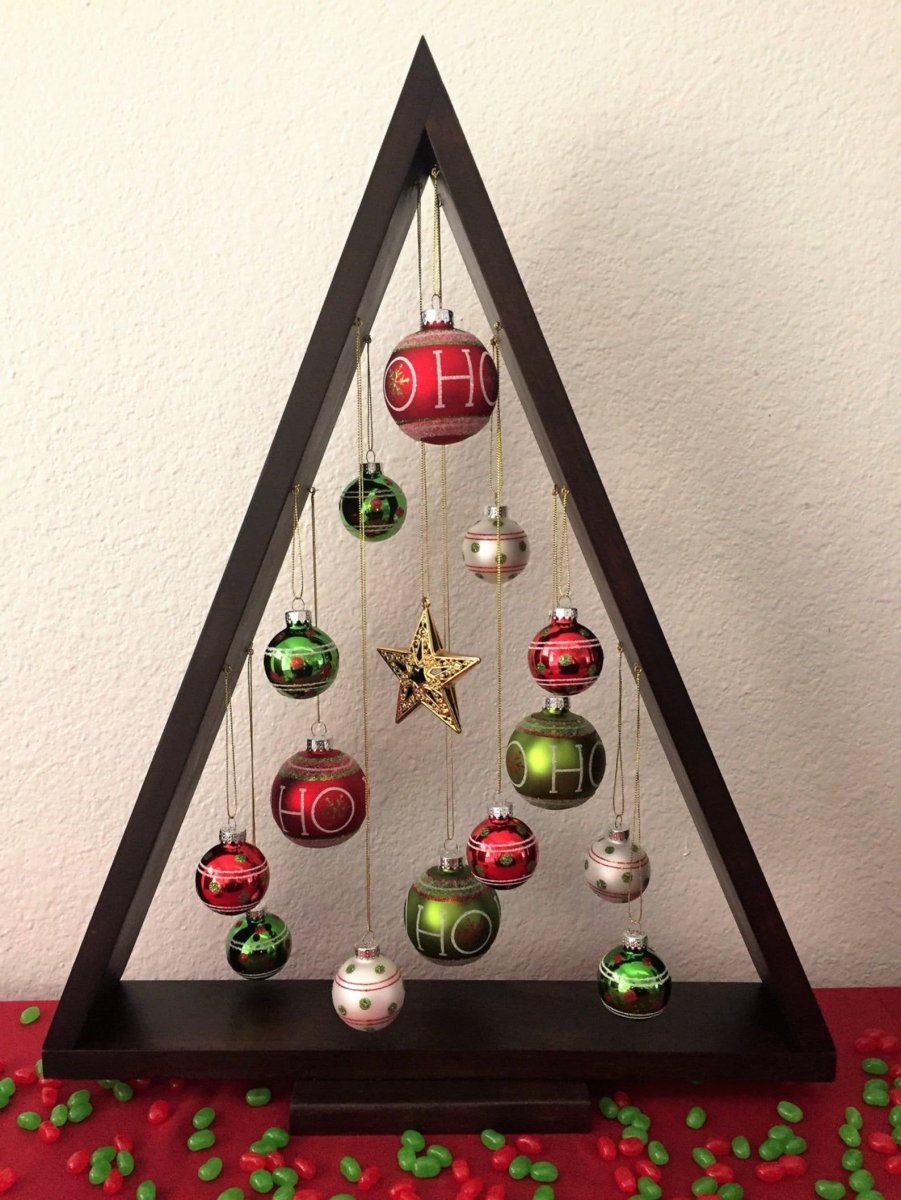
This decorative Christmas tree is formed by a dark triangular wooden frame mounted on a matching horizontal base. Instead of branches, the open interior holds red, green, and white baubles suspended from thin gold-colored strings at different heights. A gold star hangs near the center, while the ornaments are arranged throughout the triangular opening to create the impression of a decorated tree. The background is a plain cream wall, and small red and green candies are scattered along the surface below. I like the clever use of empty space, which allows every ornament to remain visible.
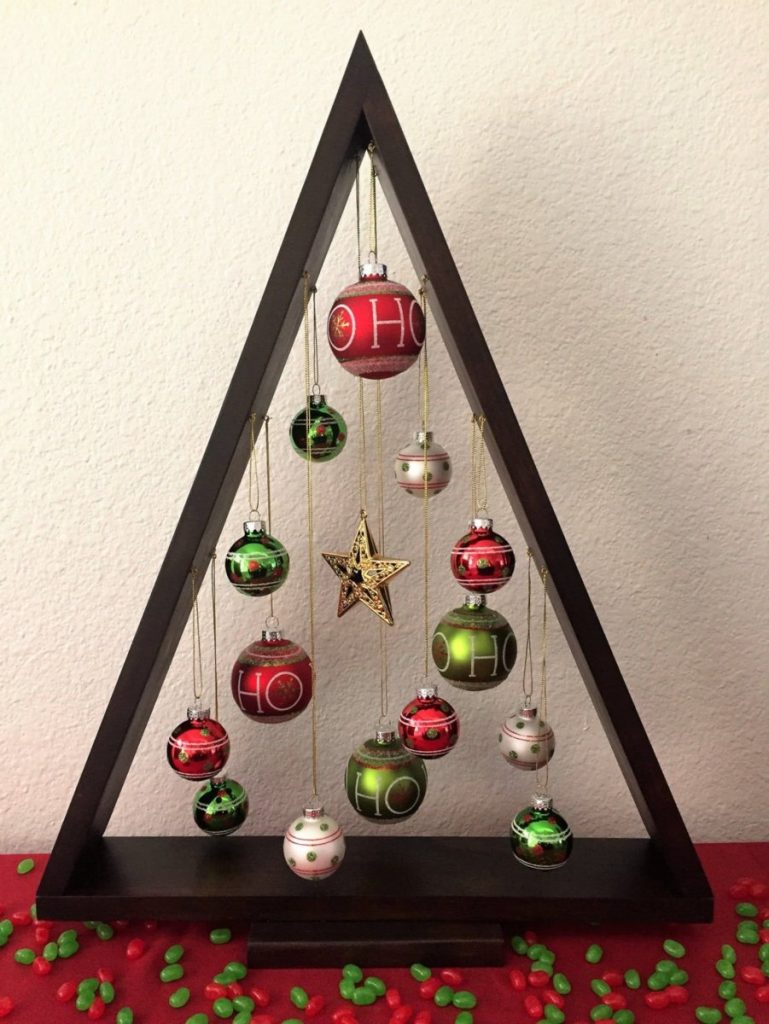
The open frame gives this tree a lightweight visual presence and makes it a practical option for smaller spaces. Since the ornaments hang independently, they become the main decorative feature rather than competing with branches or dense greenery. The triangular outline also makes the tree easy to recognize while preserving a clean, modern appearance. It could work particularly well on a sideboard, narrow console, or tabletop where a bulky tree would feel out of place.
For a similar DIY project, I would use three pieces of wood to create a stable triangle and attach it to a sturdy base. Small hooks or carefully positioned nails could support the hanging strings, allowing the ornaments to sit at varied heights. I would use baubles in two or three coordinating colors and check that the frame is stable before adding them. Leaving some open space between the ornaments would help preserve the elegant, airy effect shown here.
Oversized Kraft Paper Christmas Trees With Fairy Lights
This living room features two tall handmade Christmas trees constructed from layers of crumpled brown paper. Their irregular surfaces create a sculptural, ruffled texture, while silver and white baubles decorate the branches-like folds. Tiny warm lights are woven throughout the paper, creating a soft glow against the neutral walls. The taller tree stands beside a smaller matching version near a dark fireplace, with a framed picture and a few simple accessories completing the surrounding decor. I love how the trees make a strong visual statement while using an unexpectedly simple material.
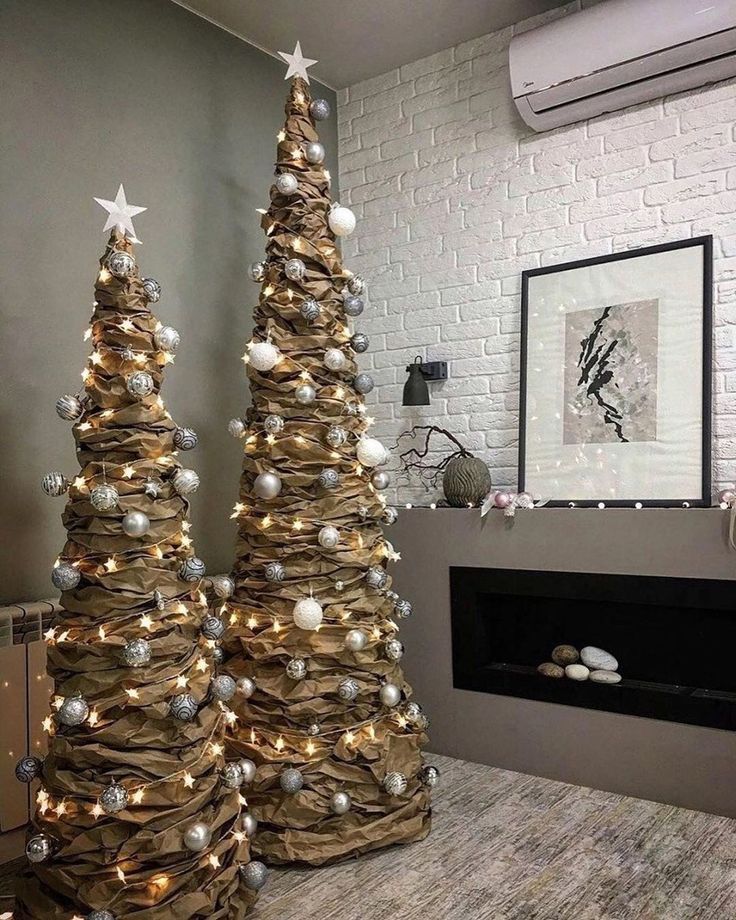
The repeated paper folds create volume without requiring the dense structure of a traditional evergreen. Displaying two trees of different heights adds balance to the room and makes the arrangement feel intentional. Their brown surfaces work especially well with the gray walls, pale flooring, and dark fireplace because the metallic ornaments introduce a subtle reflective contrast. The warm lights also bring out the texture of the paper, helping the trees feel festive rather than unfinished.
To recreate this look, I would form a sturdy cone-shaped framework and layer crumpled kraft paper around it, securing the material as I work. I would vary the folds slightly to create a full, dimensional surface, then add silver ornaments and warm LED lights. Because paper is combustible, I would use cool-running LED lights, keep them away from damaged wiring, and never use candles or hot bulbs. A stable base is also essential for a tall display.
Pinecone Christmas Tree With Red Berries and Ornaments
This compact Christmas tree is covered almost entirely in pinecones arranged closely together to create a dense conical silhouette. The natural brown and gray tones of the cones are accented with small red berries, glossy red baubles, and a few pale decorative details. The top is formed from a cluster of pinecones, while a red textured material surrounds the base. Soft greenery appears beside the tree, adding contrast to the neutral natural materials. I find this design especially attractive because it celebrates the varied shapes and textures of pinecones rather than hiding them beneath conventional decorations.
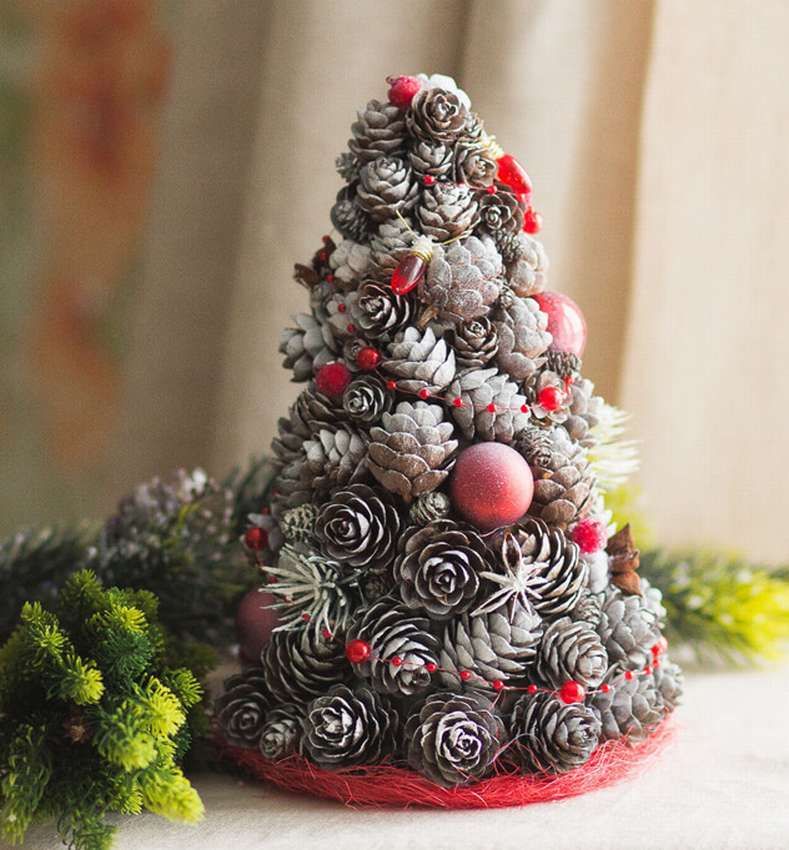
The close arrangement of the pinecones gives the tree a full, richly textured appearance even though the materials are simple. Their overlapping scales create natural shadows, making the surface interesting without requiring many additional ornaments. Red berries and baubles introduce small areas of color that stand out against the muted cones. Because the tree is relatively compact, it could work well on a tabletop, shelf, or mantel as part of a natural holiday display.
To make a similar tree, I would attach clean, fully dried pinecones to a sturdy cone-shaped base, working from the bottom upward and filling visible gaps as needed. I would choose cones of different sizes to create a more natural surface and reserve the smallest pieces for the upper section. Red berries and a few lightweight ornaments would provide a festive finish. I would also make sure the base is stable and keep the decoration away from open flames, particularly if the pinecones are dry.
Green and White Paper Christmas Tree With a Glitter Star
This tall, slender Christmas tree features numerous layers of curled paper strips in alternating shades of green and white. The strips fan outward from a narrow central structure, creating a feathery appearance that resembles the layered branches of a traditional tree. At the top sits a decorative gold-green star embellished with colorful jewel-like accents. The tree stands against a plain, light-colored wall on a dark wooden surface, making its delicate paper construction easy to appreciate.
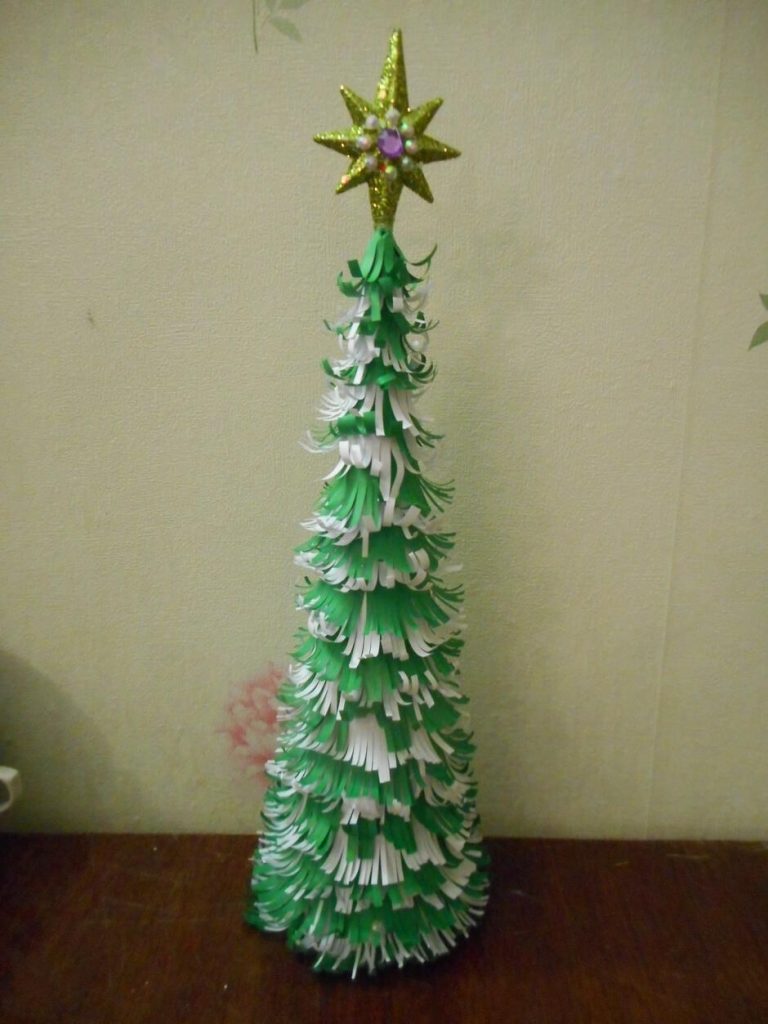
What I like about this project is how a simple material creates such a detailed result. The alternating colors give the tree depth and rhythm, while the curled paper edges add movement without requiring additional ornaments. Its narrow shape also makes it suitable for a tabletop, shelf, or another small display area where a full-size Christmas tree would be impractical. The star adds a festive focal point while maintaining the handmade character of the piece.
For a similar project, I would use a sturdy cone or central support and prepare paper strips in two complementary colors. Curling the ends before attaching the strips creates the layered texture seen in the photograph. I would work from the bottom upward, overlapping each row to conceal the structure underneath. Because paper can be delicate, I would handle the finished tree carefully and display it away from open flames, heaters, and other sources of heat.
Handmade Green Paper Christmas Trees With Golden Stars
This arrangement features several cone-shaped Christmas trees in different sizes, with the central tree decorated using layered green paper, small gold stars, and a yellow star topper. Red-and-white twisted cord wraps around the central tree in a loose spiral, creating contrast against the green surface. Two simpler green cones stand behind it, while a clear string of small lights winds around the arrangement. A mass of pale, wispy material surrounds the base, adding a soft, snowy-looking texture.
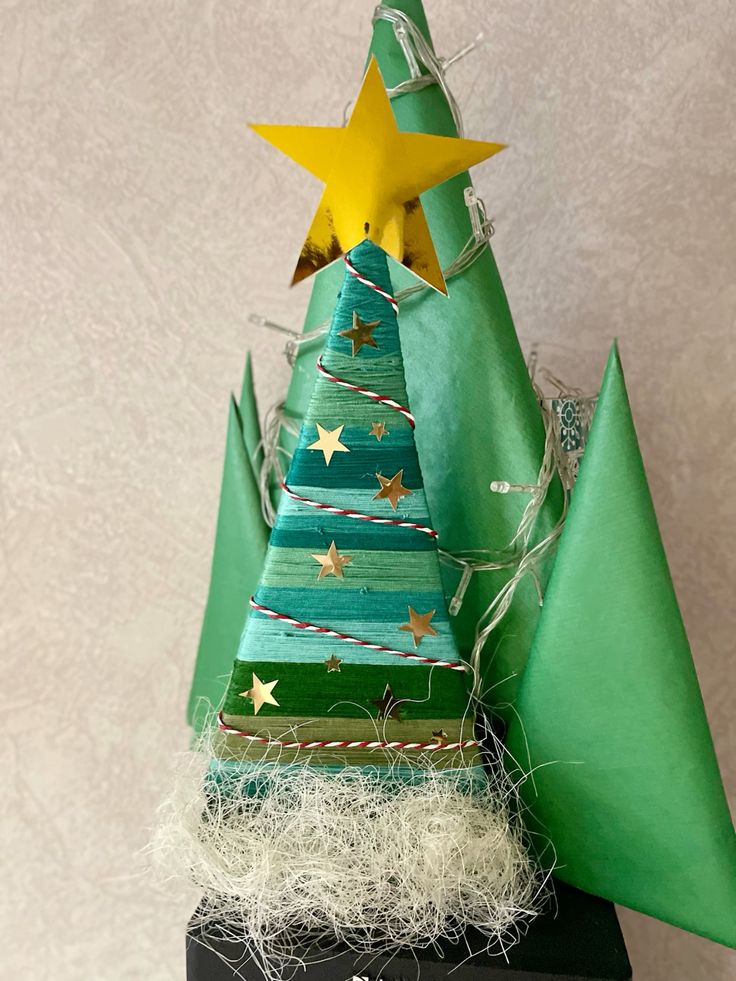
I appreciate how the different tree heights create a miniature Christmas forest rather than a single isolated decoration. The central tree receives the most attention through its layered colors and embellishments, while the simpler surrounding cones provide visual balance. The combination of green, gold, red, and white immediately communicates a festive mood. The arrangement also demonstrates how several small handmade objects can work together to create a more substantial decorative display.
To recreate this look, I would cut or assemble cones from green paper or lightweight cardstock, varying their heights to create depth. The central piece could be decorated with gold paper stars and a spiral of red-and-white cord, while the surrounding trees could remain relatively plain. A string of battery-powered lights would introduce a gentle glow, and pale decorative fibers could create a soft base. I would secure each cone on a stable surface and arrange the tallest piece near the center so the composition feels balanced.
Golden Walnut Christmas Tree With Sparkling Accents
This unusual Christmas tree is built from whole walnuts arranged closely together to form a broad cone. Most of the shells have been coated in a muted gold finish, while several smaller, darker decorative elements fill the spaces between them. Some of the golden accents have a glittery surface, introducing a subtle sparkle among the more softly textured nuts. A small gold star-shaped ornament sits at the top, and the tree rests on a round base wrapped in natural-looking cord.
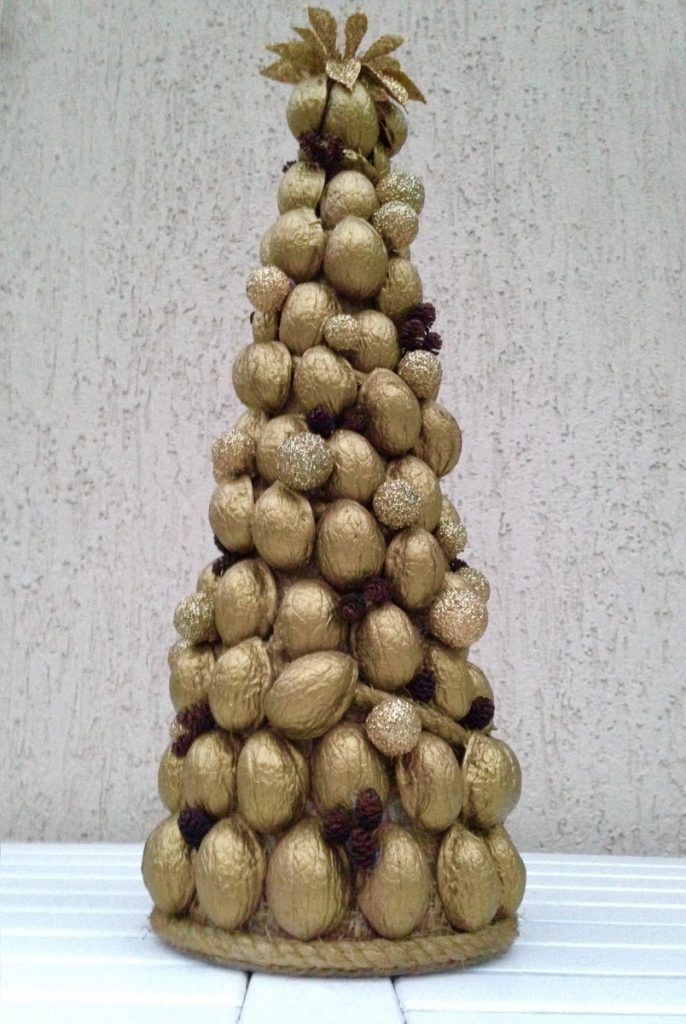
What makes this project stand out to me is the contrast between the organic shapes of the walnuts and the metallic finish. The nuts create a repeating pattern that feels structured without looking perfectly uniform, while the different gold textures prevent the surface from appearing flat. The darker accents add depth, and the matching star completes the tree’s silhouette. It is a good example of how a familiar natural material can become a striking decorative object through careful arrangement and a unified finish.
For a similar project, I would start with a lightweight cone and attach the walnuts in closely spaced rows, keeping their orientation consistent enough to create a balanced outline. A combination of matte gold and glittered accents could reproduce the variation visible in the image. I would add darker decorative pieces sparingly and finish the base with cord for a coordinated appearance. Since nuts can attract pests or deteriorate over time, I would choose clean, dry materials and store the finished decoration in a dry container after the holidays.
Sculptural Brown Paper Christmas Tree
This tall, dramatic Christmas tree is created from numerous strips of brown paper arranged in overlapping, angular layers. The strips project outward at different angles, forming a full silhouette with a distinctly sculptural appearance. Their natural kraft-like color creates a monochromatic effect, while small dotted markings on some pieces introduce subtle detail. The tree stands in a light-colored room beside a white fireplace surround and a pale brick wall, where its generous size and intricate texture make it an impressive focal point.
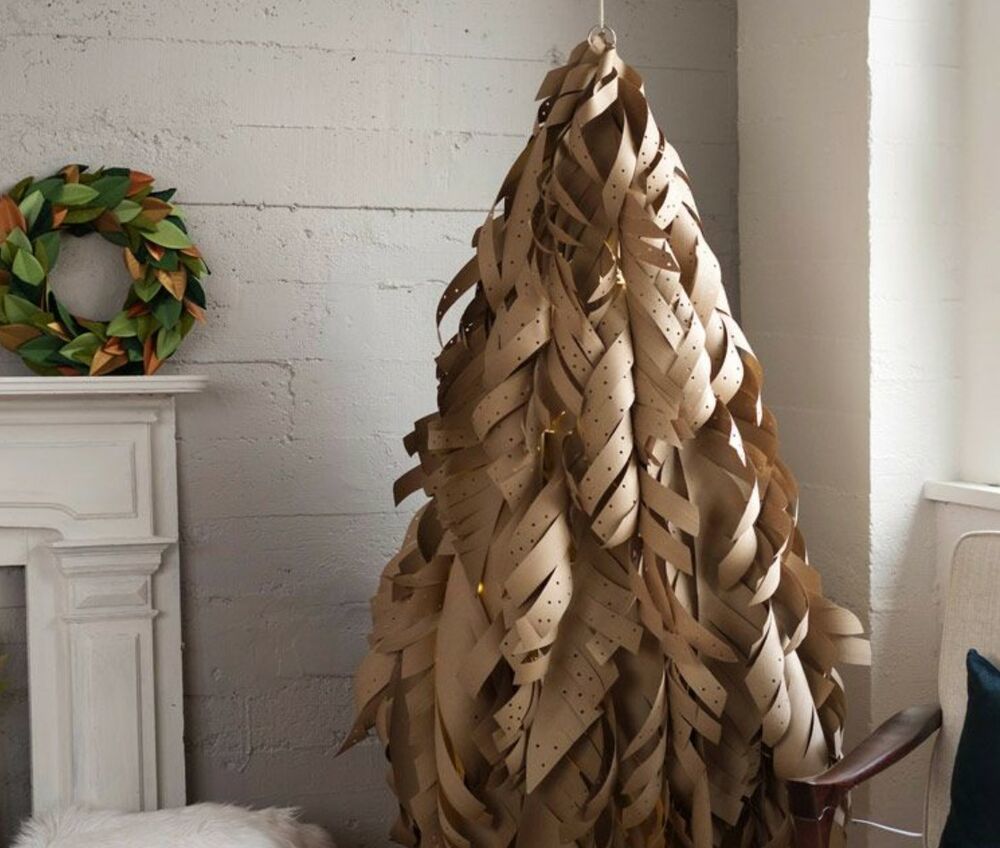
I find this design particularly successful because it creates volume through the arrangement of the paper itself rather than through traditional branches or ornaments. The overlapping strips cast small shadows against one another, giving the surface depth and movement. Its neutral color also makes the shape stand out without introducing a competing palette. Unlike a conventional tree decorated with individual baubles, this piece functions as a large handmade sculpture in its own right.
To achieve a similar result, I would prepare many paper strips, vary their lengths slightly, and attach them to a stable cone or central frame in overlapping tiers. Arranging the strips at different angles would help reproduce the irregular, layered texture shown here. I would test the structure as I worked, making sure the lower layers could support the weight of the upper ones. For a large indoor display, I would also choose a stable base and position the paper well away from candles, fireplaces in use, and other heat sources.
Colorful Wine Cork Christmas Tree With a Festive Ribbon
This flat, triangular Christmas tree is made from wine corks arranged side by side in compact horizontal rows. The cork ends face outward, revealing a mixture of natural beige, pale pink, muted green, and darker brown tones. A pink-and-red ribbon forms a decorative bow at the top, with its long loops extending down both sides of the arrangement. A round wooden ornament bearing a small Christmas tree motif hangs near the center, adding a traditional holiday detail to the otherwise unconventional design. The piece is displayed in front of a window, with a pinecone and a small pot of greenery nearby.
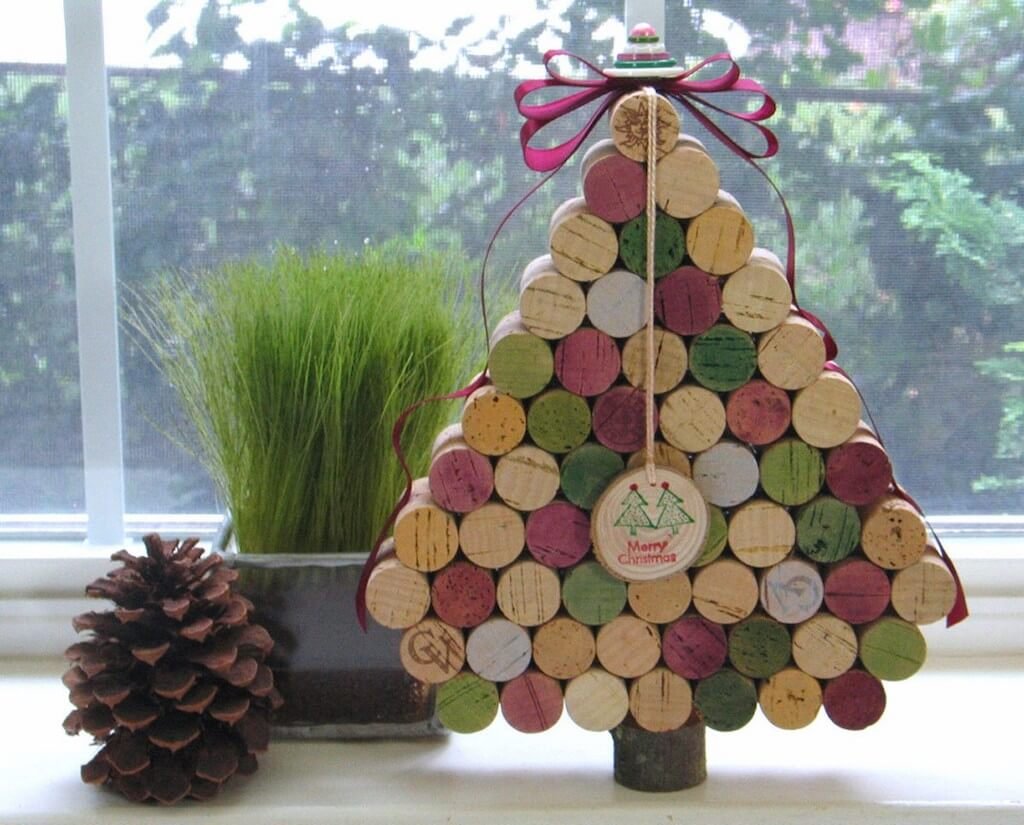
What I like about this final idea is how it combines the recognizable shape of a Christmas tree with a relatively simple, space-conscious construction. The flat profile allows it to sit against a wall or another vertical surface without occupying the space required by a freestanding tree. The mixed cork colors create a naturally varied pattern, while the ribbon introduces a softer decorative element. The round ornament adds a clear focal point and reinforces the festive theme.
To recreate this design, I would arrange corks into a triangular outline on a firm backing, beginning with the widest row at the bottom and gradually reducing the width toward the top. Mixing natural and colored corks would create a similar patchwork effect. I would attach the ribbon securely around the sides and finish the arrangement with a small central ornament. A backing with a hanging loop would make it easy to display on a wall, while a freestanding support could work if I preferred to place it on a shelf or table.
Handmade Fabric Christmas Tree Ornaments
These three fabric Christmas tree ornaments offer a charming interpretation of holiday décor on a smaller scale. Each tree is made from patterned fabric and shaped into a slightly padded silhouette, with hanging loops attached at the top. The designs include red-and-green plaid, green-and-white checks, and brown-and-cream gingham. Small fabric hearts, ribbons, lace trim, and other decorative details give each ornament an individual personality. The central tree also features a pinecone and a checkered bow, while wooden letter embellishments spell out “XMAS.”
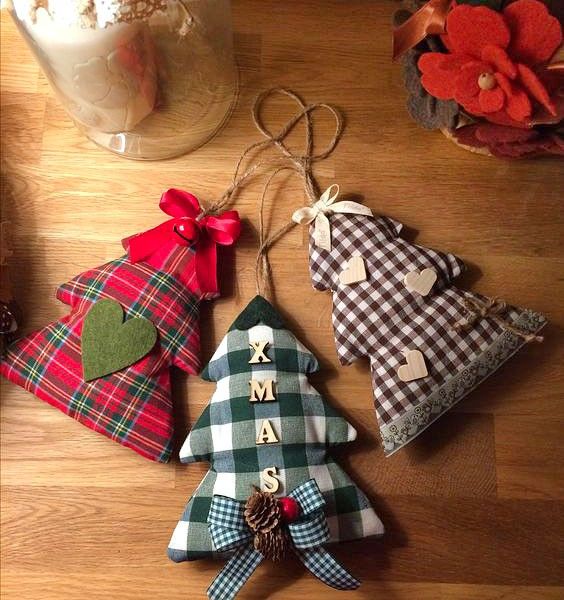
What I particularly like about this collection is the way the repeated tree shape creates a cohesive set while the different fabrics keep every piece interesting. The soft fabric construction makes these ornaments lightweight, and the hanging loops allow them to be displayed on a Christmas tree, a decorative branch, or a seasonal garland. Their relatively flat shape also makes them convenient to store between holidays. Unlike fragile glass decorations, fabric ornaments can offer a more relaxed, handmade look.
To make similar ornaments, I would cut two matching tree silhouettes from coordinating cotton fabrics, sew around the edges, and add a little stuffing if I wanted a fuller appearance. A narrow ribbon or twine loop can be secured into the top seam. Once the basic shape is complete, I would personalize each tree with small hearts, bows, lace, or carefully attached embellishments. Mixing plaid and gingham patterns works especially well when the colors share a consistent red, green, cream, or brown palette.
I would use these ornaments together as a small collection rather than scattering them among completely unrelated decorations. Their coordinated patterns make them especially attractive for a handmade Christmas display. For a more polished result, I would pay attention to neat stitching and keep the decorative additions proportionate to the size of each tree.
Modern Silver Christmas Tree With Hanging Baubles
This modern Christmas tree consists of slender silver branches extending from a narrow central trunk. Rather than dense foliage, the design uses widely spaced branches decorated with shiny silver spherical ornaments in several sizes. The tree stands in a simple white square planter placed on a black console table, creating a strong contrast between the pale metallic decoration and the dark surface. A sculptural silver decorative object sits beside the tree, reinforcing the monochromatic styling and giving the arrangement a contemporary appearance.
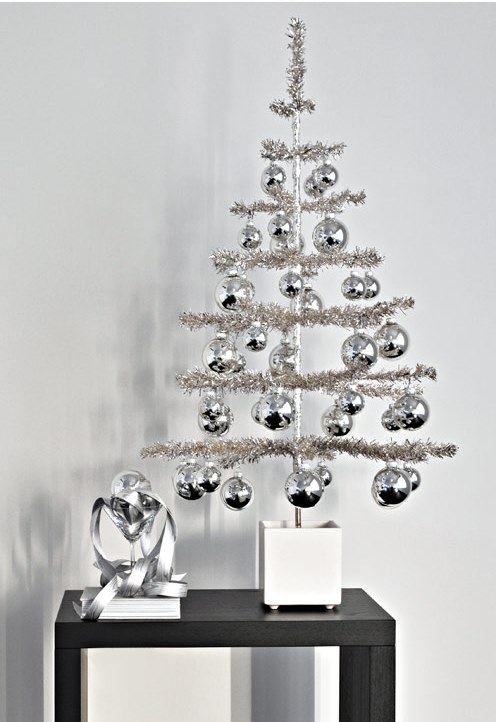
What makes this tree successful is its deliberate simplicity. The open branches preserve plenty of negative space, so the ornaments remain clearly visible instead of disappearing into dense greenery. The combination of silver, white, and black creates a cohesive color scheme that feels clean and modern. I also like the way the compact base allows the tree to function as a decorative accent in a living room, entryway, or another area where a full-sized Christmas tree might feel overwhelming.
To achieve a similar effect, I would start with a sparse silver artificial tree or a sturdy branch structure finished in a metallic color. I would then hang reflective baubles at varying heights, balancing larger ornaments along the lower branches with smaller ones near the top. A plain white planter helps the arrangement look intentional, while a dark console or side table provides contrast. I would avoid adding too many extra colors because the reflective surfaces are already doing most of the decorative work.
If I wanted to refine the display further, I would arrange the baubles so that they are distributed evenly around the visible branches. This helps the tree look balanced from the front without losing its airy silhouette. A nearby sculptural accent can complement the metallic theme, but I would leave enough open space on the tabletop to prevent the composition from feeling crowded.
Rustic Bark Christmas Trees With Wooden Star Toppers
These two handmade Christmas trees are constructed from irregular pieces of bark stacked in progressively smaller layers. The natural brown surfaces show different textures, shapes, and weathered edges, giving each tree an individual appearance. Both sculptures stand on short, round wooden bases, and simple wooden stars finish their pointed silhouettes. Set against a pale stone-textured wall, the trees look understated and sculptural, with the natural materials providing nearly all the decoration.
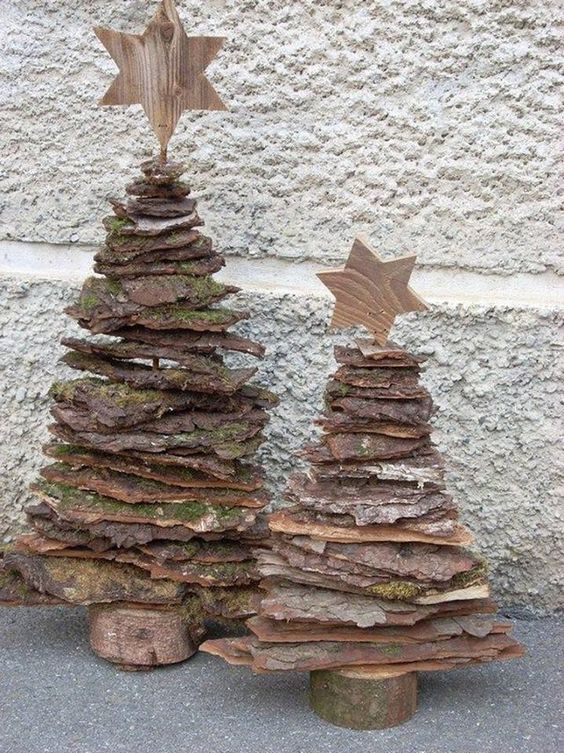
For me, the appeal of this design lies in its simplicity. Instead of relying on glitter, bright colors, or elaborate ornaments, the trees celebrate the variations already present in the bark. Their different heights make them work well as a pair, and the visible gaps between the layers keep the structures from appearing too heavy. The natural finish also makes these decorations easy to incorporate into a room with neutral colors and understated seasonal styling.
To make a similar pair, I would select dry bark pieces in a range of sizes and arrange them from widest at the bottom to narrowest at the top. A stable central support or carefully secured backing would help keep the layers in place, while small wooden rounds could serve as bases. I would preserve the bark’s natural variation rather than trying to make every piece identical. Before displaying the trees indoors, I would make sure the materials are clean, dry, and free of loose debris.
Elegant White Seashell Christmas Tree
This decorative Christmas tree is covered with an assortment of white and cream-colored seashells, creating a richly textured surface with subtle differences in shape and size. The shells are arranged tightly over a cone-shaped base, with their curved edges and ridged details forming a layered, almost floral pattern. A pale shell ornament crowns the top, while a matching light-colored base keeps the composition visually consistent. The tree is displayed on a neutral wooden surface against cream wall paneling, reinforcing its soft, understated appearance.
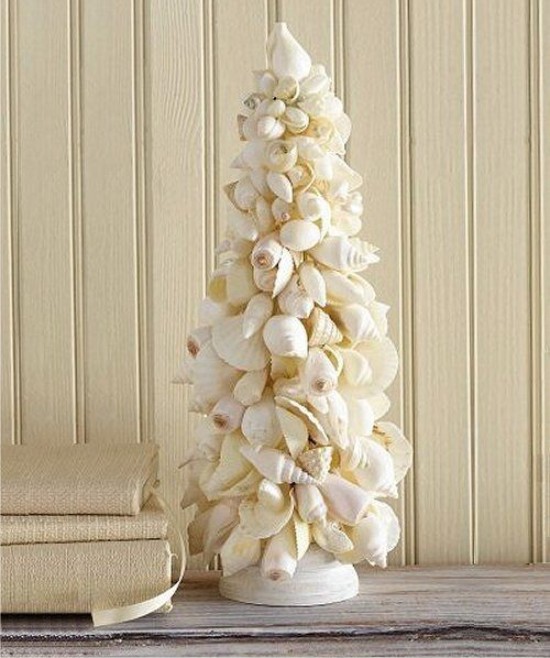
I find this design especially effective because the shells provide both the decoration and the visual texture. Their natural curves catch the light differently, so the surface remains interesting even without colorful ornaments or additional embellishments. The restricted palette of ivory, cream, and white also gives the tree a cohesive appearance. It could work beautifully as a tabletop centerpiece or as a seasonal accent in a room decorated with similarly soft neutral tones.
To achieve this look, I would use a firm cone-shaped base and attach clean, completely dry shells in overlapping rows. Larger shells could establish the main pattern, while smaller pieces would fill the gaps and create a more continuous surface. I would keep the color palette consistent to preserve the refined appearance shown in the photograph. Because shells can be fragile and their edges may be sharp, I would handle them carefully and make sure each piece is securely attached before moving the finished tree.
Modern Black and White Wooden Christmas Tree Decorations
This minimalist arrangement features three freestanding Christmas tree silhouettes in different sizes and finishes. One tree is black with thin white horizontal lines and small pale ornaments, another is white with black dots and a simple outlined shape, and the third has a gray surface decorated with white snowflake patterns. Each tree is mounted on a slender stem with a round base, creating a coordinated collection of sculptural decorations. The neutral wall and pale tabletop keep the focus on the contrasting shapes. I appreciate how this display offers a festive interpretation of Christmas trees without using conventional greenery.
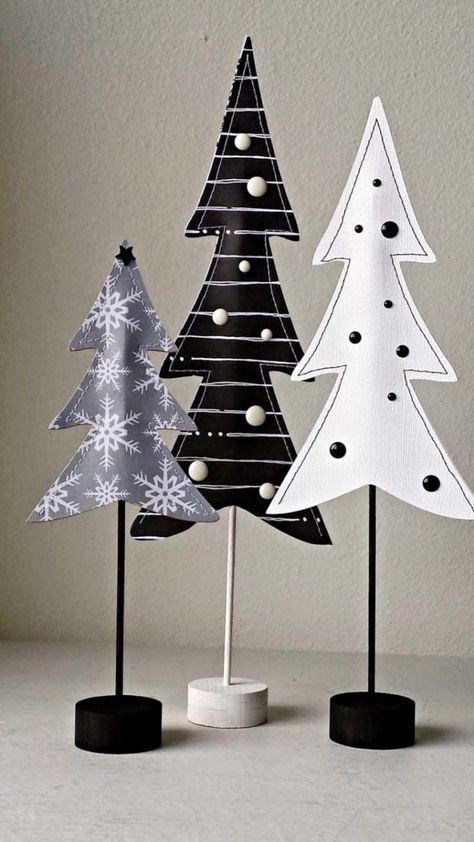
The three-piece arrangement works because the trees share a similar silhouette while each has its own pattern and visual identity. The black-and-white palette creates a consistent look, and the different heights add variety without making the display feel crowded. These decorative trees could be arranged together on a mantel, shelf, side table, or windowsill, particularly in a home that favors simple geometric accessories.
To achieve a similar look, I would cut or purchase flat tree-shaped panels, then decorate them with paint, thin lines, dots, or snowflake patterns. Slim supports and weighted bases would help each piece stand upright. I would keep the patterns relatively simple so the individual shapes remain easy to recognize. For a more personalized display, I might repeat one motif across all three trees while allowing each one to have a different background color.
Unique DIY Christmas trees prove that holiday decorating doesn’t have to follow traditional rules to feel festive and beautiful. With a little imagination and a few simple materials, you can create a statement piece that reflects your personality and transforms your space. Whether you prefer a minimalist design, a playful handmade creation, or an artistic alternative to a classic evergreen, the possibilities are endless. Choose your favorite idea, add your own creative touches, and make this Christmas decor truly unforgettable.