
Christmas is the perfect time to get creative and transform your home with handmade decorations that reflect your personal style. DIY Christmas Decorations For Home 2026 offer plenty of inspiration, from charming pine cone ornaments and playful snowmen to colorful paper trees and elegant displays with warm fairy lights. I love how simple materials like twigs, burlap, wood slices, and evergreen branches can become beautiful holiday accents with just a little imagination. Whether you prefer natural textures, traditional Christmas colors, or minimalist decorations in soft neutral shades, there is an idea here to suit every home. These creative projects can also be a wonderful way to spend time with family, personalize your holiday décor, and make meaningful decorations without spending a fortune. Explore these inspiring ideas and discover how to make your home feel warm, festive, and uniquely yours this Christmas.
Handmade Snowman Ornaments With Evergreen Branches and Pine Cones
This hanging Christmas decoration combines cheerful snowmen with natural greenery and traditional holiday colors. A horizontal branch wrapped with twine serves as the base, while several small snowmen made from round wood slices hang from individual strings. Their white heads feature smiling faces, orange noses, and rosy cheeks, while black buttons and red-and-green plaid scarves complete their appearance. Fresh-looking evergreen sprigs, pine cones, and clusters of red berries decorate the upper branch and add texture to the arrangement.
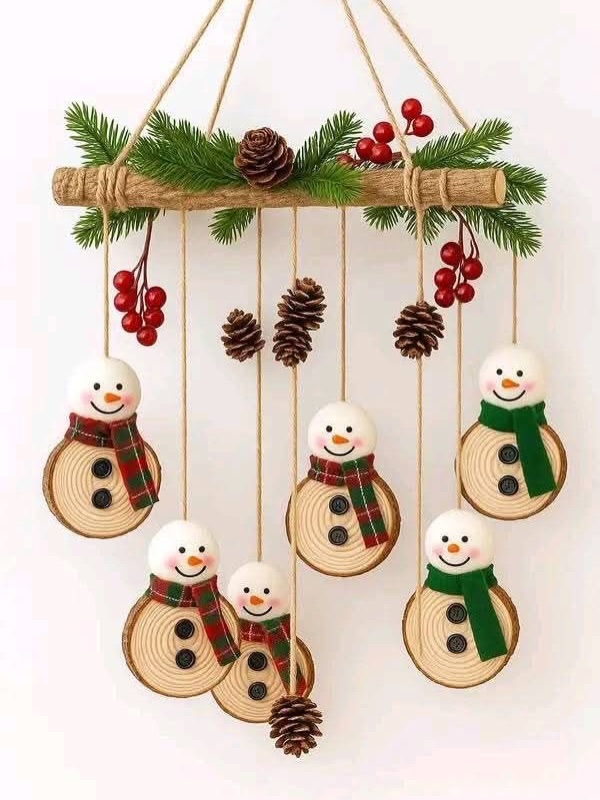
I find this design especially appealing because it brings several recognizable Christmas elements together in one handmade piece. The contrast between the pale wood, dark pine cones, deep green needles, and red berries creates a balanced seasonal palette. Hanging the snowmen at different heights also gives the decoration movement and makes each little character easy to see. Instead of taking up valuable table space, the finished piece can be displayed on a wall, door, or another suitable vertical surface.
To recreate this look, I would start with a sturdy fallen branch, natural twine, wood slices, and small pine cones. Paint the snowmen’s faces with simple expressions, add button details, and make miniature scarves from plaid fabric or ribbon. Secure the hanging strings evenly along the branch, then attach evergreen sprigs and artificial berries with craft wire. I recommend checking that the branch is strong enough to support the finished decoration and keeping the greenery securely fastened.
For an extra finishing touch, I would use a little white paint or artificial snow on selected pine cone tips to create a subtle wintry effect. The key is to preserve the handmade appearance rather than making every detail perfectly identical. That small variation gives this Christmas wall decoration its playful personality.
Festive Christmas Mug Arrangement With a Gnome and Colorful Ornaments
This Christmas arrangement transforms a white ceramic mug into a compact holiday centerpiece. The mug features a delicate seasonal illustration and acts as the container for an abundant mix of evergreen branches, red berries, gold decorative foliage, candy canes, and shiny baubles. At the center sits a small gnome with a long white beard and a tall red knitted hat. Silver, pale blue, gold, and white ornaments fill the spaces between the greenery, creating a colorful display that feels festive without requiring a large vase.
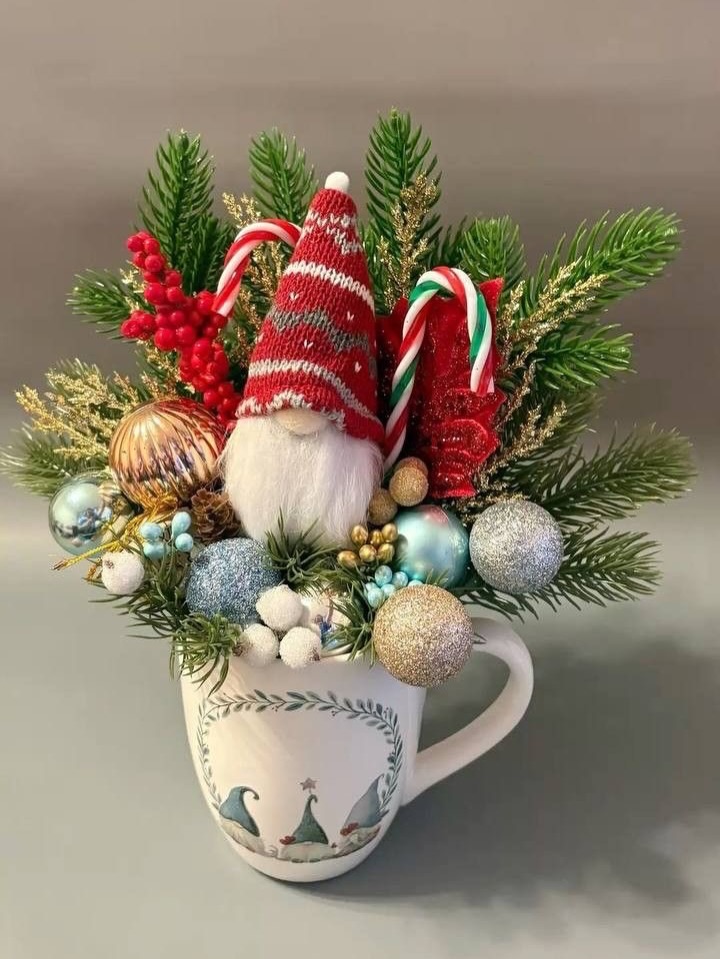
What I particularly like about this idea is the way an everyday household object becomes part of the decoration. The mug provides a defined base, while the greenery spreads outward to create a full, rounded silhouette. The gnome becomes the focal point, and the candy canes reinforce the familiar Christmas theme. The mixture of metallic finishes, soft knitted fabric, glossy berries, and feathery evergreen needles makes the arrangement interesting from every angle.
To make a similar centerpiece, I would choose a wide, stable mug and secure floral foam or another suitable arrangement base inside it. Artificial evergreen stems are especially practical for a decoration that needs to last throughout the season. Add the tallest pieces first, position the gnome near the center, and then arrange the candy canes and ornaments around it. I would distribute the heavier decorations evenly so that the arrangement remains balanced rather than tipping to one side.
I would display this piece on an entryway console, a shelf, or a side table where its details can be appreciated up close. If you want a more coordinated appearance, repeat two or three of the mug’s accent colors in nearby decorations. Since the arrangement contains small ornaments and decorative pieces, I would also keep it out of reach of young children and pets.
Minimalist Wooden Christmas Trees With Warm Fairy Lights
Three triangular wooden frames create an alternative Christmas tree display beside a large window. Each frame has a simple open structure, allowing the background wall to remain visible. Warm fairy lights trace parts of the wooden outlines, while suspended gold and bronze baubles add decoration without covering the frames. Pine cones, evergreen branches, and muted green foliage sit at the bases, giving the arrangement a natural finish. The combination of pale wood, metallic ornaments, and soft lighting creates a calm, contemporary holiday atmosphere.
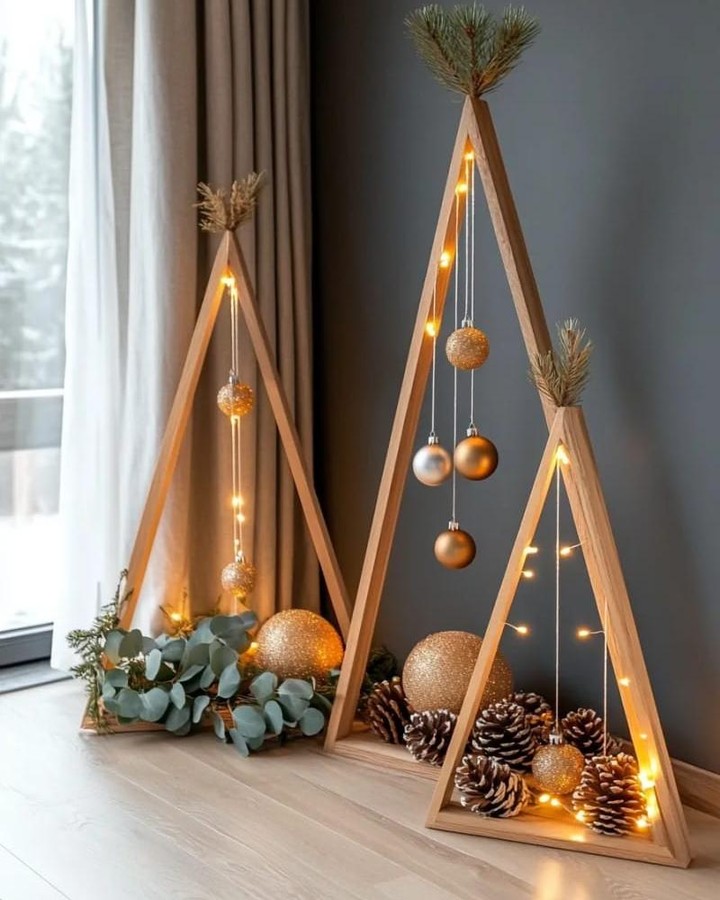
I love how this arrangement offers the familiar outline of a Christmas tree without the density of a traditional full-size tree. The open frames preserve a sense of space, which is particularly useful in smaller homes or rooms where a large tree might obstruct movement. Using three different sizes adds height variation and makes the display feel intentional. The warm lights also provide a welcoming glow near the window, especially during the darker winter evenings.
To create this look, I would use lightweight wooden strips assembled into triangular frames, making sure that the joints are stable and the bases sit securely on the floor. Wrap a battery-powered or appropriately rated fairy-light strand around selected sections, then suspend a few ornaments from the upper crossbars or internal hanging points. Pine cones and evergreen sprigs can be grouped at the base to give each frame a finished appearance. I would keep the number of ornaments limited so that the clean geometric shapes remain the main feature.
For a cohesive result, I would choose baubles in similar metallic shades rather than mixing too many competing colors. Warm-white LED lights would complement the natural wood particularly well. This is also a flexible decorating idea because the frames can be reused from one Christmas to the next, with different ornaments or greenery giving them a fresh look each season.
Rustic Burlap Rose Ornaments for a Natural Christmas Tree
These handmade ornaments resemble roses formed from tightly coiled strips of natural burlap. Each rounded flower has a visible spiral at its center and a softly textured surface created by the woven fabric. Simple twine loops allow the ornaments to hang from the evergreen branches, while nearby pine cones reinforce the natural Christmas theme. The background includes pale furnishings and black-and-white plaid textiles, which complement the neutral color of the burlap without distracting from the ornaments.
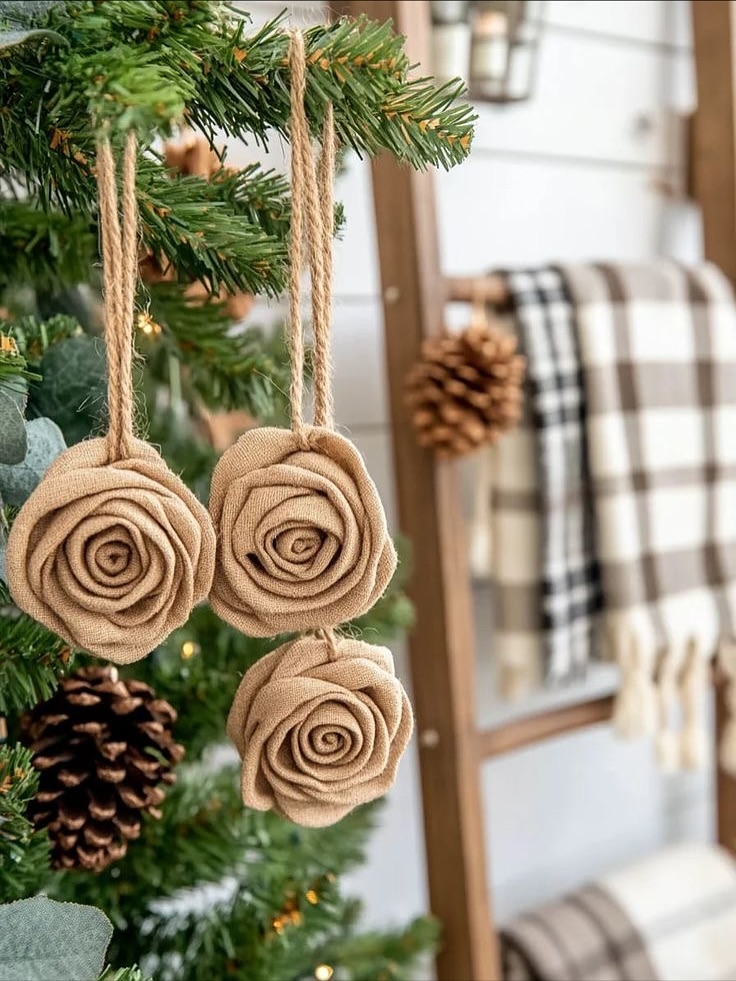
The appeal of these decorations lies in their simplicity. Rather than relying on glitter or bright colors, they use texture and shape to create visual interest. I like the way the warm beige fabric stands out against the dark green branches, while the handmade rose forms add a softer, more decorative detail. Because the ornaments share a consistent color and material, several of them can be grouped together without making the tree look overcrowded.
To make similar ornaments, I would cut burlap into long strips, fold the edges as needed, and gradually twist and wrap each strip into a rose shape. Small stitches or a discreet amount of fabric glue can hold the coils in place. Once the flowers are secure, attach a loop of twine to the back. I would create a few different sizes while keeping the overall color consistent, allowing the finished decorations to look coordinated rather than identical.
These burlap roses would also work well on a wreath or as decorative accents on wrapped gifts. When styling them on a Christmas tree, I would leave enough space between the ornaments to show their individual shapes. A few pine cones and warm lights are all they really need; adding too many other decorative elements could take attention away from their distinctive woven texture.
Colorful Paper Christmas Tree Made From Layered Handprint Shapes
This playful Christmas tree is assembled from overlapping hand-shaped paper cutouts in a wide range of colors. The cutouts are arranged in horizontal layers that gradually narrow toward the top, creating a tree silhouette crowned with a yellow star. Blue, green, pink, red, purple, and yellow shapes give the design a cheerful, multicolored appearance. The craft is displayed against a pale pink wall decorated with paper stars, while jars of glitter and containers filled with colored pencils sit on the table below.
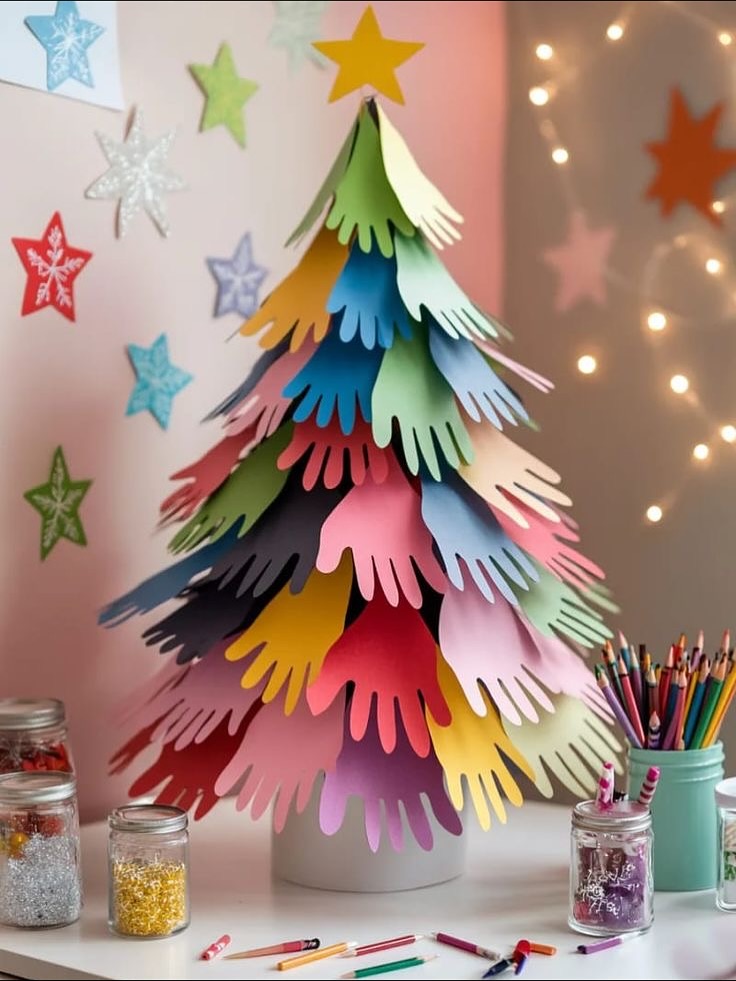
I think this is an especially inviting idea for a family crafting session because the design celebrates creativity rather than precision. Each hand-shaped piece can represent a child’s contribution, turning the finished tree into a seasonal keepsake. The layered arrangement creates a recognizable Christmas silhouette, while the different colors make the display feel energetic and fun. It also offers a way to decorate a wall or tabletop without needing a traditional evergreen tree.
To recreate it, I would trace hand shapes onto colored paper or lightweight cardstock and cut out enough pieces to form several overlapping rows. Starting with the widest layer at the bottom, I would attach each row to a backing surface, gradually reducing the width as the design moves upward. A paper star completes the top. I would arrange the colors before gluing anything in place so that neighboring layers create a balanced mix rather than leaving one color concentrated in a single area.
For a polished result, I would make sure that the tree’s central line stays reasonably straight and that each layer extends slightly beyond the one above it. Paper stars can be added around the display to connect the main decoration with its background. This project is particularly suitable for a children’s room, classroom, or creative corner, and it can easily become an annual tradition by using new colors or adding handprints from different family members.
Lighted Miniature Christmas Tree With Colorful Pennants and Snowflake Ornaments
This compact artificial Christmas tree stands on a white circular base and is decorated with colorful miniature pennant garlands, small ornaments, pine cones, snowflake shapes, and warm-white lights. The multicolored decorations contrast with the dark green branches, creating a festive display with a playful, handmade character. Around the bottom, a low decorative border and scattered ornaments help finish the base. The tree is positioned against a light gray wall with a delicate botanical pattern, which keeps the surrounding setting relatively understated.
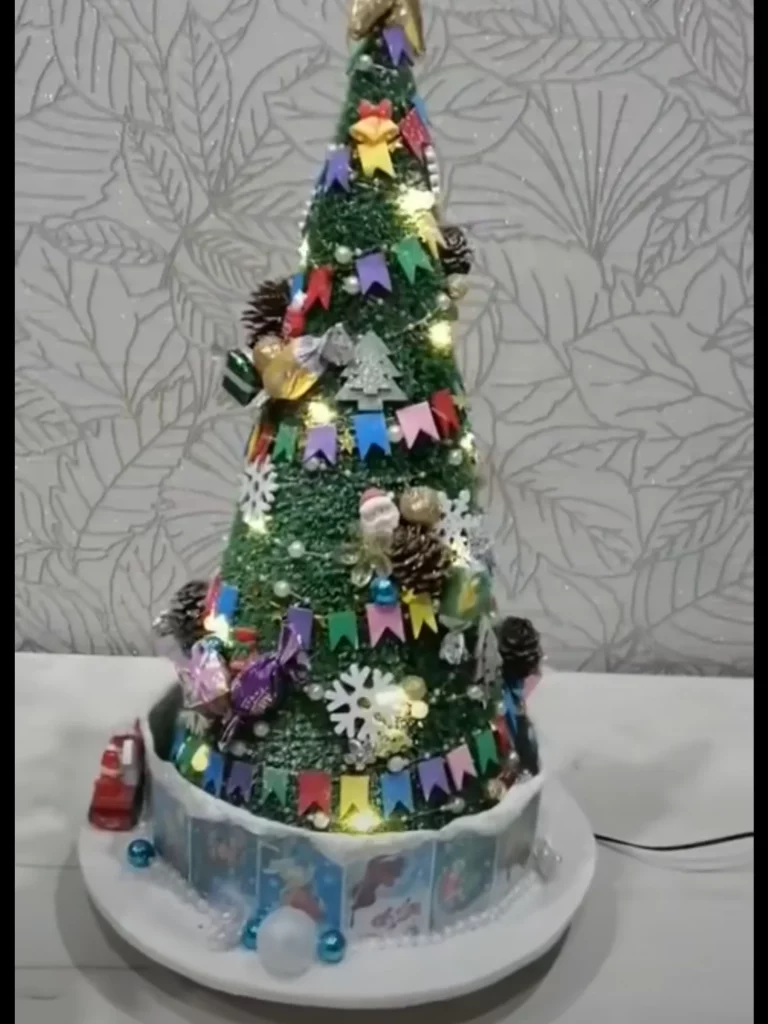
What works well here is the combination of familiar Christmas greenery with small, colorful decorations. The pennant garlands create horizontal bands around the tree, making its conical shape more noticeable. The warm lights soften the brighter colors and help the ornaments stand out. I also like the compact scale, which makes this type of display suitable for a tabletop or another small area where a larger Christmas tree would be impractical.
To achieve a similar result, I would begin with a small artificial tree and wrap it with lightweight paper or felt pennants. Miniature snowflakes, pine cones, and simple baubles can then be distributed across the branches. I would position the lights throughout the tree rather than concentrating them in one place, checking the effect from the front as I work. A white base provides a clean visual finish, while a few small decorations around its edge make the entire display feel complete.
I would keep the color palette playful but repeat the same shades throughout the garlands and ornaments to maintain a sense of unity. If the tree is intended for a child’s room, lightweight paper decorations are a practical option, provided they are securely attached. I would also arrange electrical cords safely and use suitable low-heat LED lights to help keep this little Christmas display both attractive and practical.
Pine Cone Snowman With a Knitted Hat and Scarf
This charming snowman is crafted from a large pine cone and decorated with a white face, black bead-like eyes, and a small orange nose. A brown knitted hat with a pom-pom sits on its head, while a matching knitted scarf wraps around the neck. The pine cone’s natural scales form the body, and small dark buttons provide additional detail. The figure stands on a round wood slice covered with artificial snow, accompanied by a small evergreen branch, a bare twig arrangement, additional pine cones, brown decorative spheres, and a star-shaped dried botanical accent.
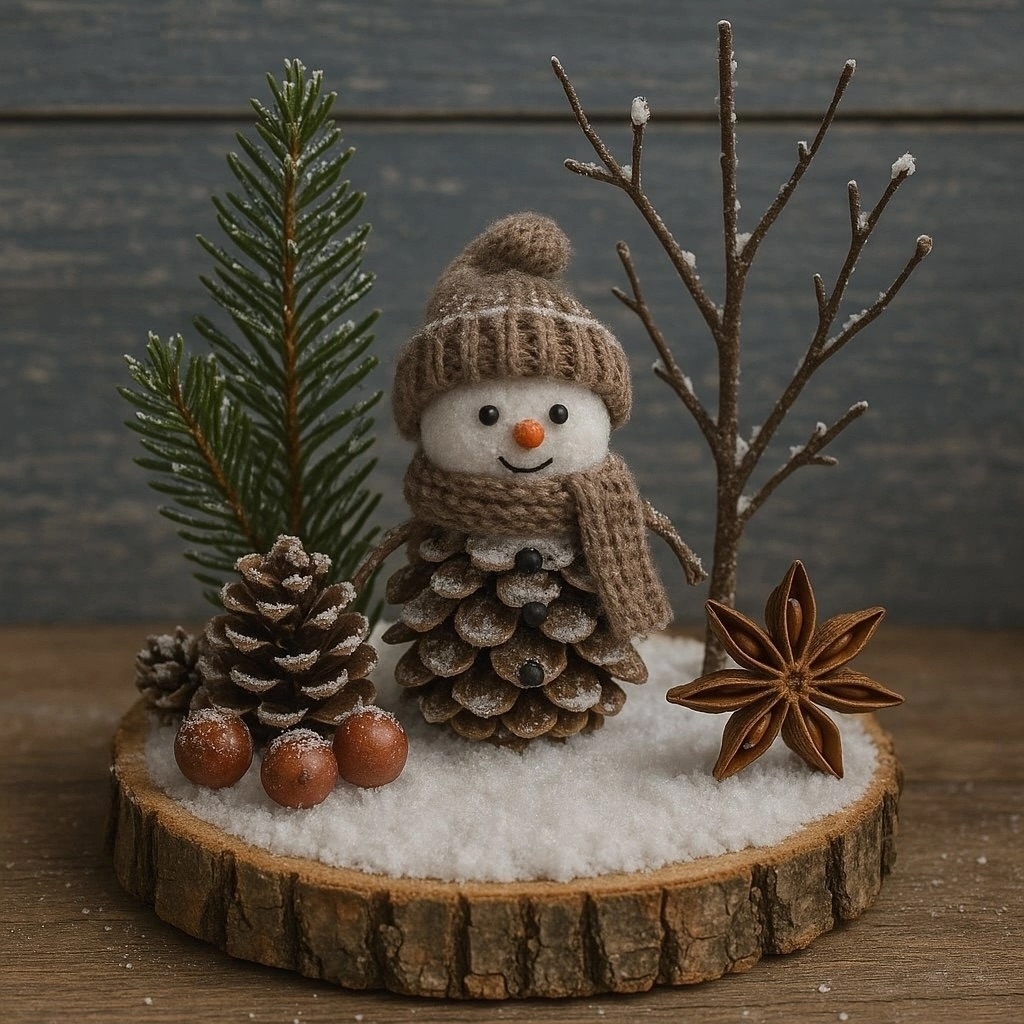
I find this decoration particularly appealing because it allows the natural structure of a pine cone to become part of the character’s design. The layered scales already suggest the shape of a winter coat, so the craft requires relatively few additional materials. The knitted accessories introduce softness and contrast with the rough pine cone, while the wood-slice base gives the scene a defined footprint. Together, these details create a miniature winter landscape that feels charming without needing elaborate construction.
To make a similar snowman, I would select a large pine cone with a stable shape and clean it thoroughly before decorating it. A small craft ball or a lightweight rounded head can provide the face, which can then be painted with simple features. I would add a miniature knitted or fabric hat and scarf, using craft glue where appropriate, and attach small buttons to the front. Finally, I would cover a wood slice with artificial snow and arrange a few natural accents around the figure.
For an attractive finish, I would keep the accessories within a coordinated range of brown and cream shades, as shown here. A little white paint on the pine cone tips can suggest frost, but I would avoid covering all the natural texture. This handmade snowman would look lovely on a mantel, shelf, or holiday display table, where its small details can be appreciated up close.
Christmas Tree Sculpture Made From Stacked Wood Slices
This alternative Christmas tree is assembled from short sections of logs and branches arranged in a triangular stack. The circular cut ends face forward, creating a pattern of pale wood surfaces surrounded by darker bark. Small evergreen sprigs and pine cones fill selected gaps, while delicate warm-white fairy lights weave between the stacked pieces. The tree-shaped arrangement stands directly on the floor against a light wall, creating a natural focal point without the need for a conventional artificial tree or a large collection of ornaments.
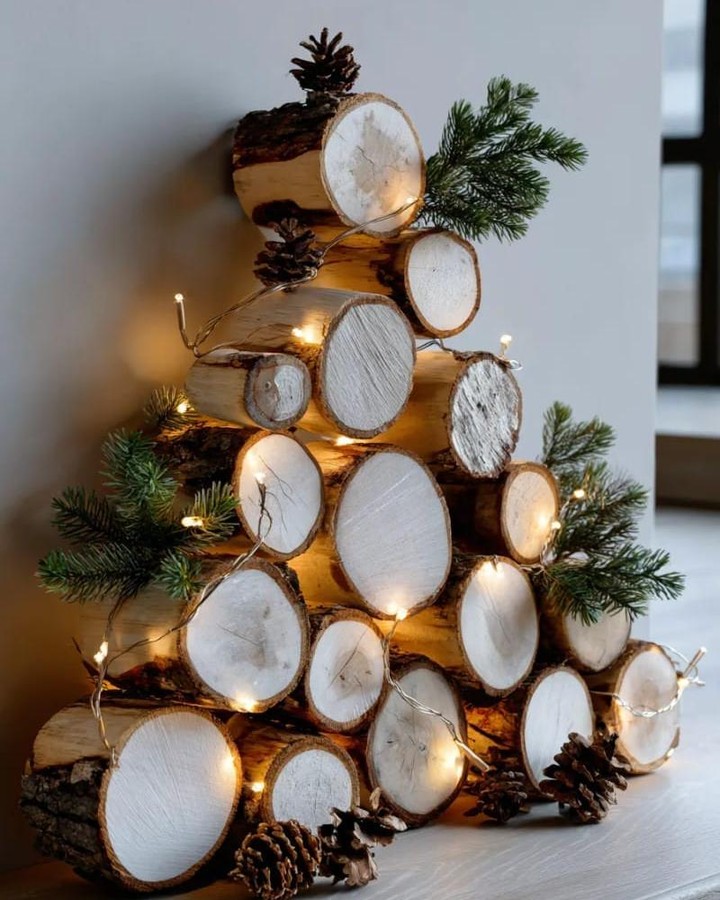
The strongest feature of this design is its sculptural structure. The wood sections form the outline of a Christmas tree while allowing each piece to remain visible, so the natural grain, bark, and circular growth patterns become part of the decoration. I like the contrast between the solid log shapes and the fine strands of light. The greenery softens the edges, and the pine cones provide small dark accents that connect the arrangement to traditional Christmas decorating.
To recreate this idea, I would collect wood sections of varying diameters and cut them to suitable lengths, ensuring that the cut ends are relatively flat. Before stacking them, I would plan the arrangement on the floor, beginning with a wide base and gradually narrowing each row toward the top. The pieces should be secured or supported so that the structure cannot shift or topple. Evergreen branches and pine cones can be placed in selected gaps, followed by a carefully arranged strand of battery-powered LED lights.
I would preserve the natural color differences between the bark and the cut surfaces instead of painting every piece. Those variations are what make the sculpture visually interesting. For homes with limited space, the design offers an alternative festive focal point that does not require a traditional tree shape made from dense foliage. It is important, however, to use dry, stable wood, keep the display away from open flames, and ensure that the stacked pieces remain securely in place.
Hanging Branch Christmas Chandelier With Neutral Ornaments and Candles
This elegant Christmas arrangement features a natural branch suspended horizontally above a dining table. Several beige and cream ornaments hang from thin strings at varying heights, including smooth spherical baubles and ribbed designs. Below, the table is styled with white plates, folded neutral napkins, evergreen garland, and warm fairy lights. Tall white pillar candles provide additional seasonal atmosphere, while the soft daylight from the windows keeps the overall setting light and calm. The neutral palette allows the branch and hanging ornaments to stand out without competing with the table setting.
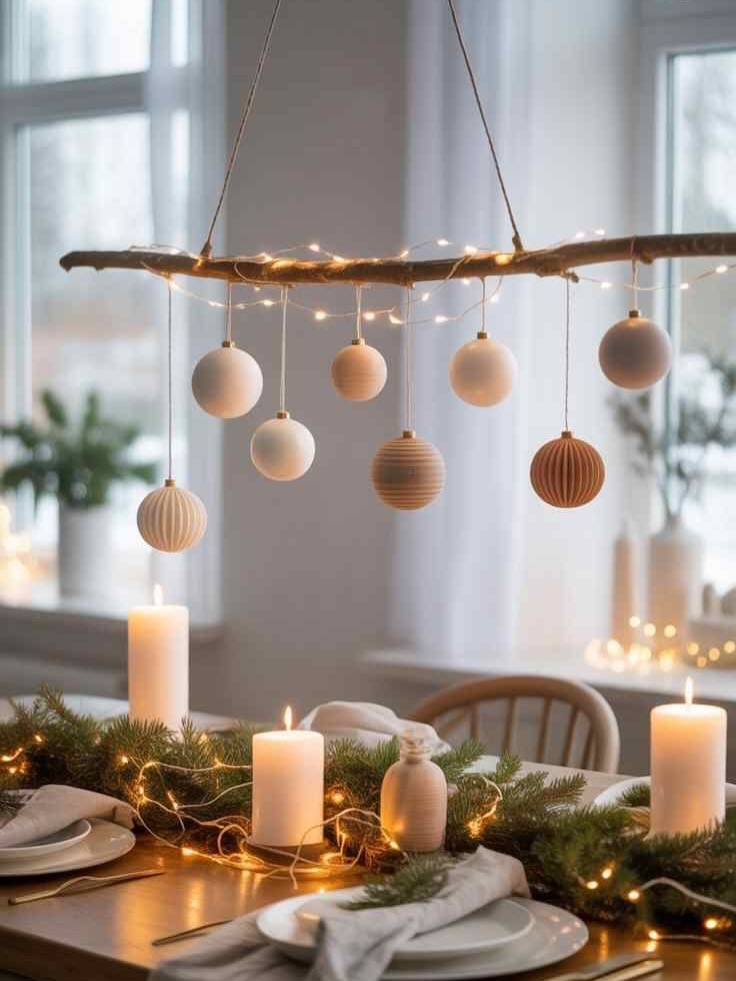
What I appreciate most about this design is the way it decorates the space above the table rather than adding more objects to the tabletop. The suspended branch creates a visual focal point while leaving room for plates, serving dishes, and conversation. Varying the hanging lengths adds depth, and the restrained palette makes the arrangement feel coordinated with the white tableware and natural greenery. The combination of soft candlelight and tiny string lights creates a welcoming atmosphere that works particularly well for a Christmas meal.
To create a similar display, I would select a sturdy branch with an appealing natural shape and suspend it using secure ceiling attachments suitable for its weight. Lightweight ornaments can be hung from thin strings, with their lengths adjusted so that the arrangement looks balanced from different seating positions. I would use a mixture of smooth and ribbed baubles in cream, beige, and soft tan shades, keeping the spacing loose enough for each ornament to remain distinct. A strand of warm fairy lights wrapped around the branch can provide a subtle glow.
I would make sure the hanging decoration is positioned high enough that it does not obstruct anyone sitting or standing beneath it. Because the image also includes lit pillar candles on the table, I would keep the candles well away from hanging strings, greenery, and other combustible materials; flameless LED candles would be a safer alternative, particularly when the table is in use. With thoughtful placement and a limited color palette, this overhead decoration can make an ordinary dining area feel special throughout the holiday season.
Evergreen Christmas Wreath With Red Berries and Gold Ornaments
This handmade Christmas wreath features abundant evergreen branches arranged in a generous circular shape. Glossy red baubles, small gold ornaments, natural pinecones, and clusters of red berries are distributed throughout the greenery, creating a traditional holiday color palette. The wreath hangs in front of a window, where natural daylight highlights the rich green needles and reflective ornaments. I particularly like the slightly irregular shape because it gives the arrangement a natural appearance rather than making it look overly structured.
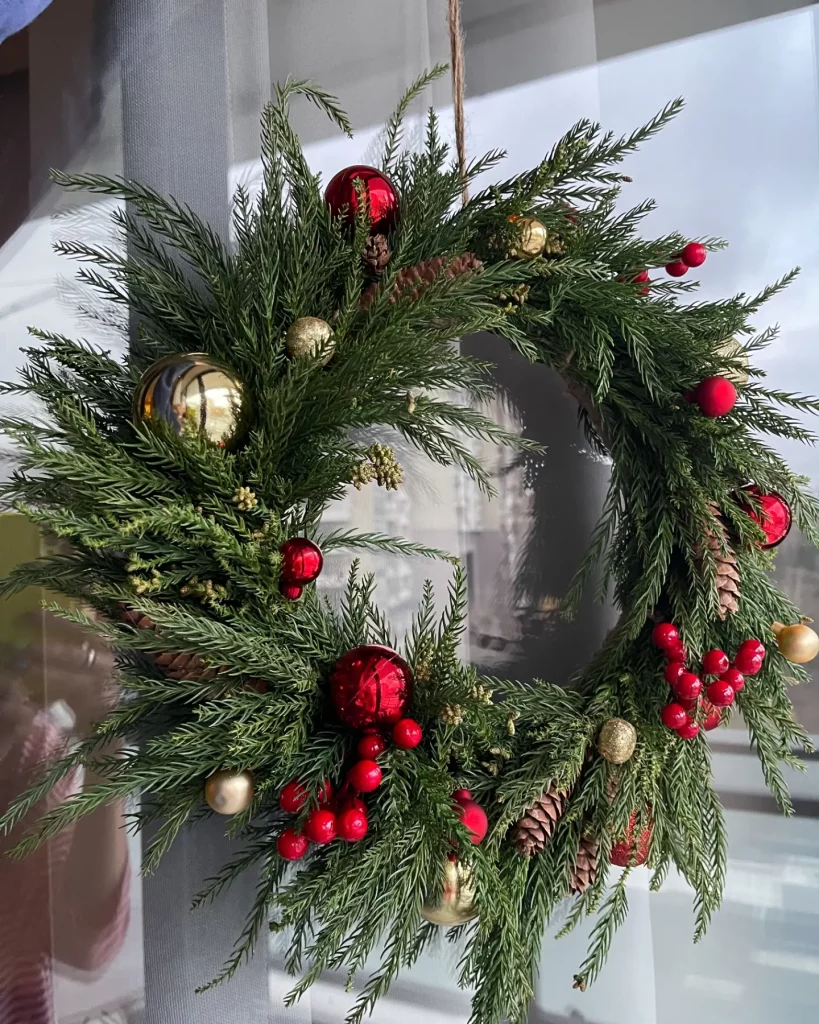
What makes this DIY Christmas decoration so effective is the combination of different textures and finishes. The soft evergreen needles contrast with the smooth, shiny baubles, while pinecones and berries introduce more organic details. Red and gold create a familiar festive combination that feels warm and timeless. I would choose this design for anyone who wants a statement wreath that looks full and decorative without requiring an elaborate construction.
To recreate the look, I would begin with a circular wreath base and attach evergreen branches in overlapping layers. Once the greenery looks sufficiently dense, I would add pinecones, red berries, and lightweight baubles, distributing them around the wreath rather than placing everything in one area. Mixing glossy and glittery ornaments creates visual depth, while a few visible pinecones preserve the natural character of the design. Floral wire or suitable craft ties can help keep the branches and decorations securely in place.
For my finishing touch, I would maintain the same red, gold, and green palette throughout the wreath. Before hanging it, I would check that the ornaments are firmly attached and that the wreath sits securely on its hook. If I use fresh greenery, I would keep it away from heat sources and inspect it regularly to maintain its appearance throughout the Christmas season.
Pastel Paper Angel Ornament With Layered Wings and a Flowing Dress
This delicate Christmas angel is made from layers of pastel-colored paper in pink, aqua blue, mint green, and creamy yellow. Its rounded head, simple circular halo, white wings, and tiered dress create a soft, graceful silhouette. The ornament hangs in a cozy living room, with a Christmas tree decorated with warm lights in the background and a glowing fireplace nearby. I love how the gentle pastel colors stand out against the warm golden lighting, giving this handmade decoration a whimsical and peaceful appearance.
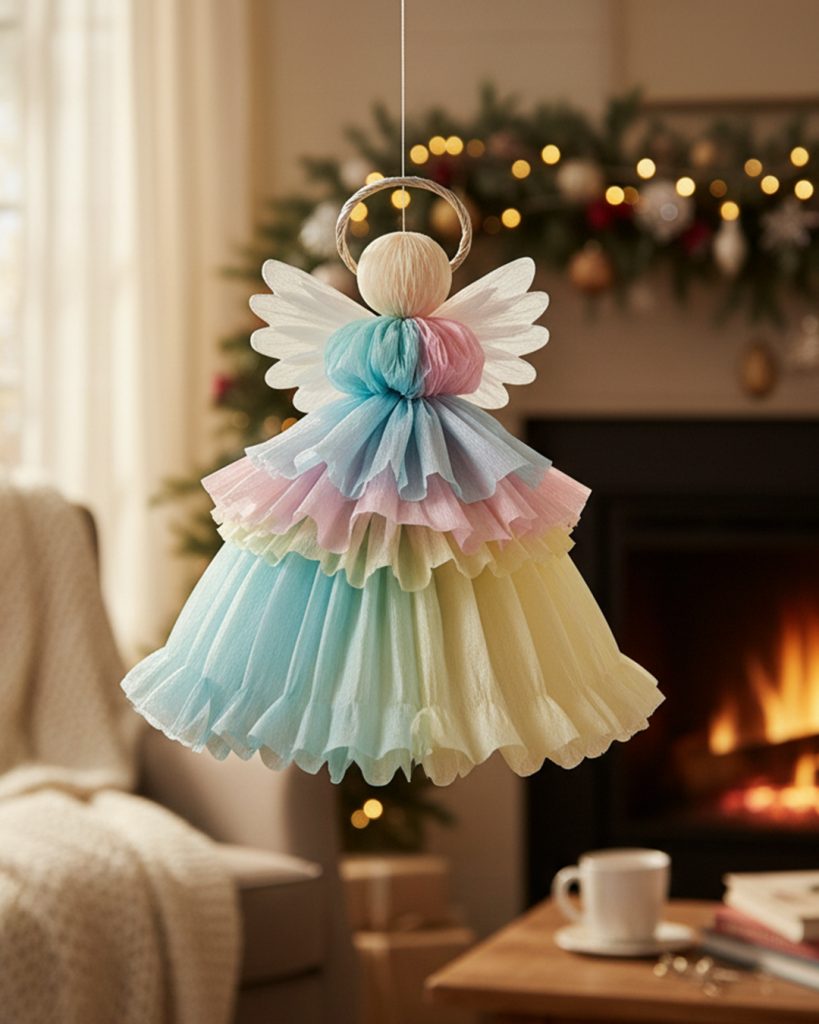
The charm of this ornament comes from its lightweight construction and layered shapes. The paper folds create volume and movement, allowing the angel to look intricate without requiring expensive materials. I also appreciate the departure from traditional red-and-green Christmas decorations. Pastel shades make the ornament feel fresh and playful, while the white wings and simple halo keep the overall design delicate. This is an excellent idea for anyone who wants to introduce a softer color palette into their holiday decorating.
To make a similar angel, I would use colored tissue paper or lightweight craft paper for the dress, firmer white paper for the wings, and a small ball or handmade paper shape for the head. Folding and gathering the paper into several layers creates the flared skirt. A loop of thin cord can form the halo, while a thread attached at the top allows the finished ornament to hang. I would assemble the dress first and then attach the wings and head, making sure the different elements are balanced.
For a coordinated display, I would create several angels in complementary pastel shades and hang them at different heights. They could decorate a Christmas tree, a window, or a festive corner of the living room. Since paper is delicate and combustible, I would keep these ornaments well away from the fireplace, candles, and other heat sources.
Woodland Christmas Sculpture With Twig Rings and Tiny Birds
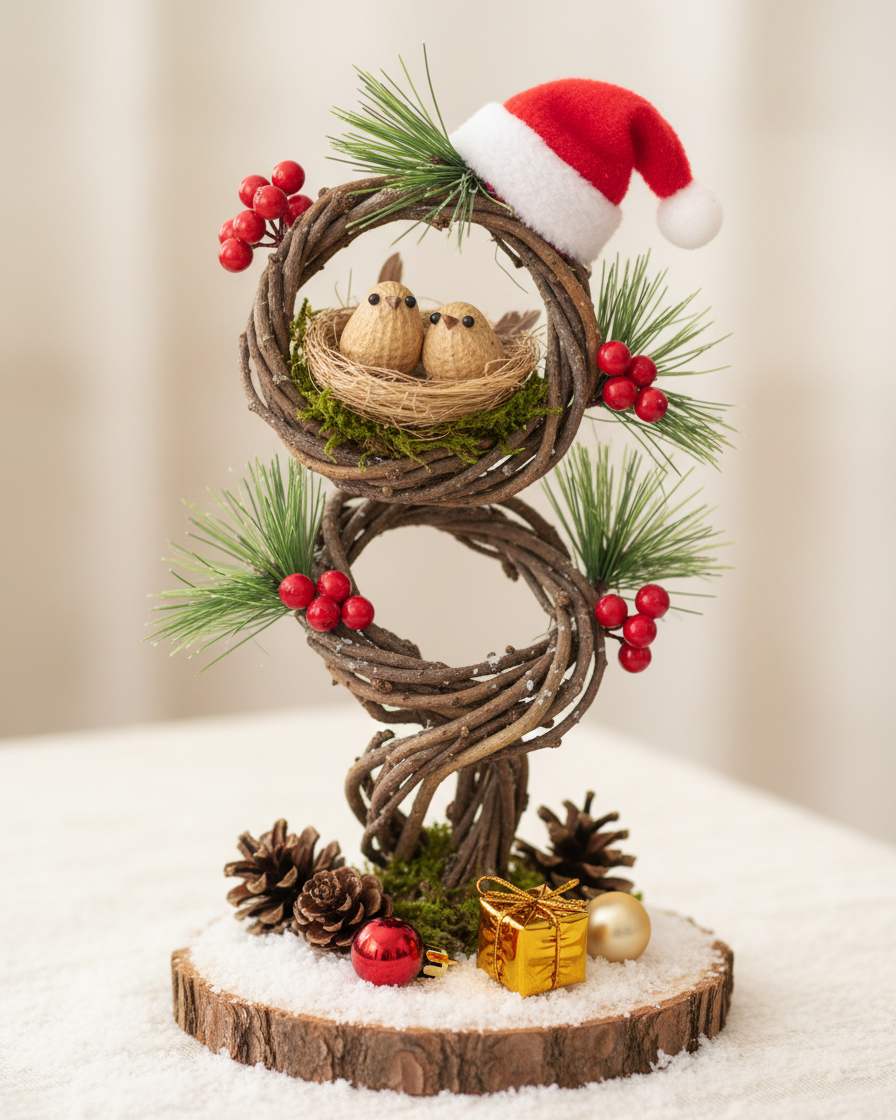
This unusual Christmas decoration combines two circular structures made from twisted brown twigs, arranged vertically to create a sculptural tabletop display. The upper ring contains a small nest with two tiny bird figures, while a miniature red Santa hat adds a playful seasonal detail. Evergreen sprigs and red berries decorate the twig framework, and pinecones, small baubles, and a gold gift accent the snow-covered base. I find this design especially charming because it combines woodland-inspired textures with recognizable Christmas accessories.
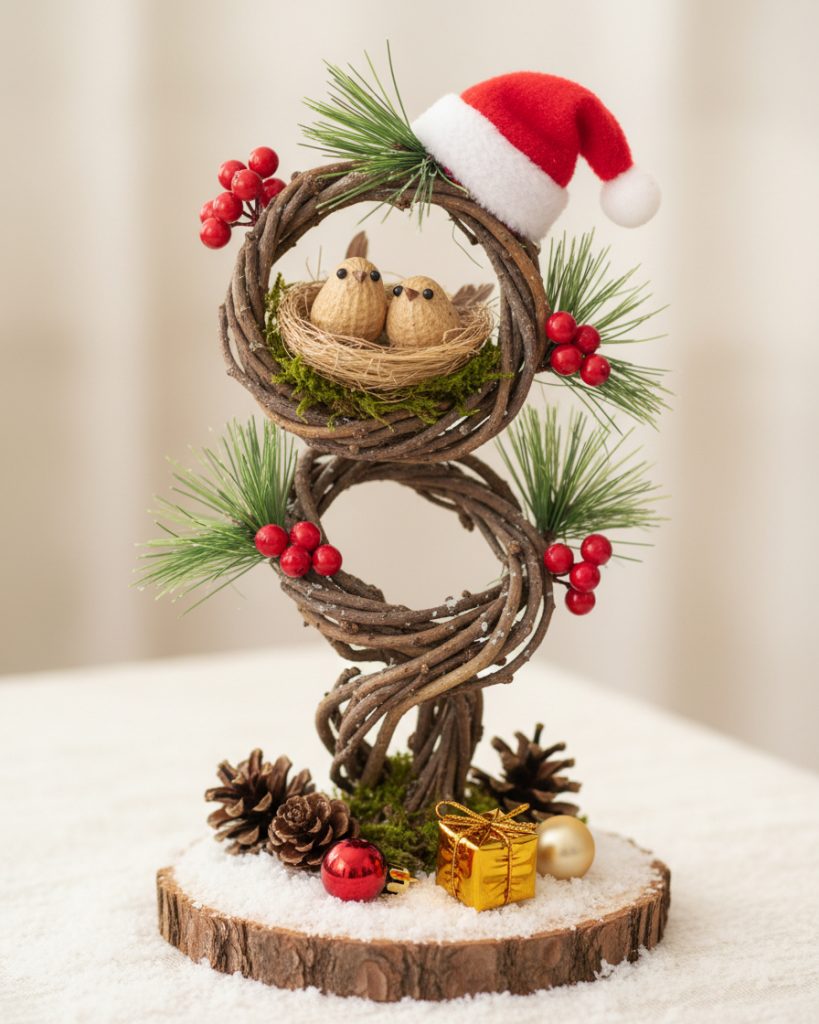
The vertical composition gives the decoration an interesting shape without requiring a large display area. The open twig rings allow the background to remain visible, making the structure feel lighter than a solid centerpiece. The tiny birds create a focal point, while the red berries and Santa hat introduce festive color. In my opinion, this project demonstrates how natural-looking materials and a few small accessories can create a distinctive Christmas decoration with plenty of personality.
To recreate the design, I would shape flexible twigs into two rings and secure them with thin craft wire or twine. The rings would need a stable central support and a solid base to keep the sculpture upright. For the nest, I would use raffia or dried grass and add two small bird figures. Evergreen sprigs, decorative berries, and a miniature hat would complete the upper section, while artificial snow, pinecones, and tiny ornaments could be arranged around the bottom.
I would keep the decorative elements relatively small so the twig structure remains the main feature. A limited number of accents helps preserve the open, sculptural appearance. This handmade decoration would work particularly well on a console, side table, or shelf where its unusual shape can be appreciated from different angles.
White Woven Basket Filled With Festive Evergreen Branches
This Christmas arrangement features a white woven basket with a braided handle, filled with dense evergreen branches, glossy red baubles, clusters of red berries, and a prominent pinecone. The greenery spreads outward from the basket, creating a full arrangement with a natural silhouette. The decoration is positioned outdoors against dark green foliage and rests on a textured stone surface. I like the contrast between the pale basket and the rich green branches because it makes the entire arrangement stand out without relying on excessive ornamentation.
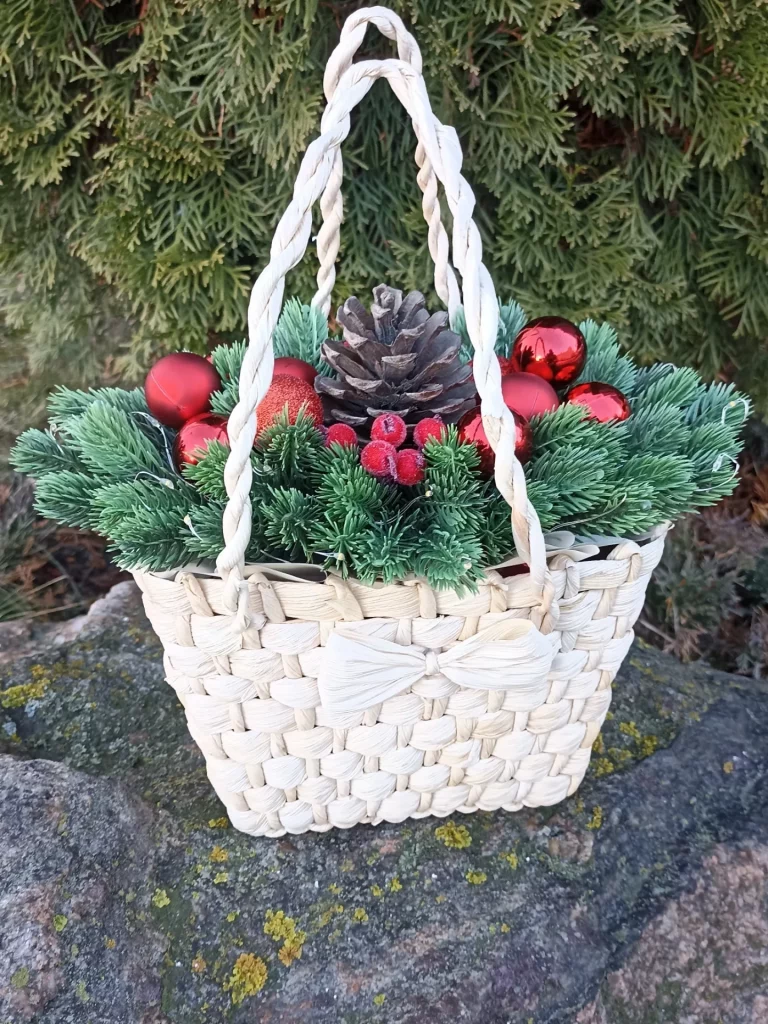
The woven basket provides an attractive alternative to a traditional vase or planter. Its visible texture adds another layer of detail, while the handle makes the arrangement easy to carry and reposition. The evergreen branches create volume, and the red decorations introduce a recognizable Christmas accent. I would use this type of arrangement to decorate a sheltered entrance, porch, or outdoor seating area where a welcoming seasonal detail would make an immediate impression.
To create a similar decoration, I would begin with a sturdy woven basket and place a suitable container or floral foam inside to support the branches. I would insert the evergreen cuttings at different angles, allowing some branches to extend beyond the rim. A large pinecone could serve as the central accent, while red baubles and berry clusters would provide color. I would arrange the decorations gradually, stepping back occasionally to check the overall balance.
For outdoor use, I would place the basket in a sheltered location where it is protected from strong winds and prolonged exposure to rain. If the basket is not designed for outdoor conditions, a covered entrance would help preserve its appearance. I would also check the arrangement regularly and replace any greenery that becomes dry or discolored.
Pastel Paper Spiral Decorations Above a Christmas Mantel
This festive living room features long spiral paper decorations in pastel pink, aqua blue, and pale yellow, suspended from the ceiling above a white mantel. Gold stars, white snowflake shapes, evergreen garland, and warm string lights complete the arrangement. A Christmas tree decorated with coordinating pastel ornaments stands to the left, while pale curtains and neutral furnishings keep the room feeling light. I particularly like how the hanging spirals create movement and draw attention upward, making the entire display feel more playful.
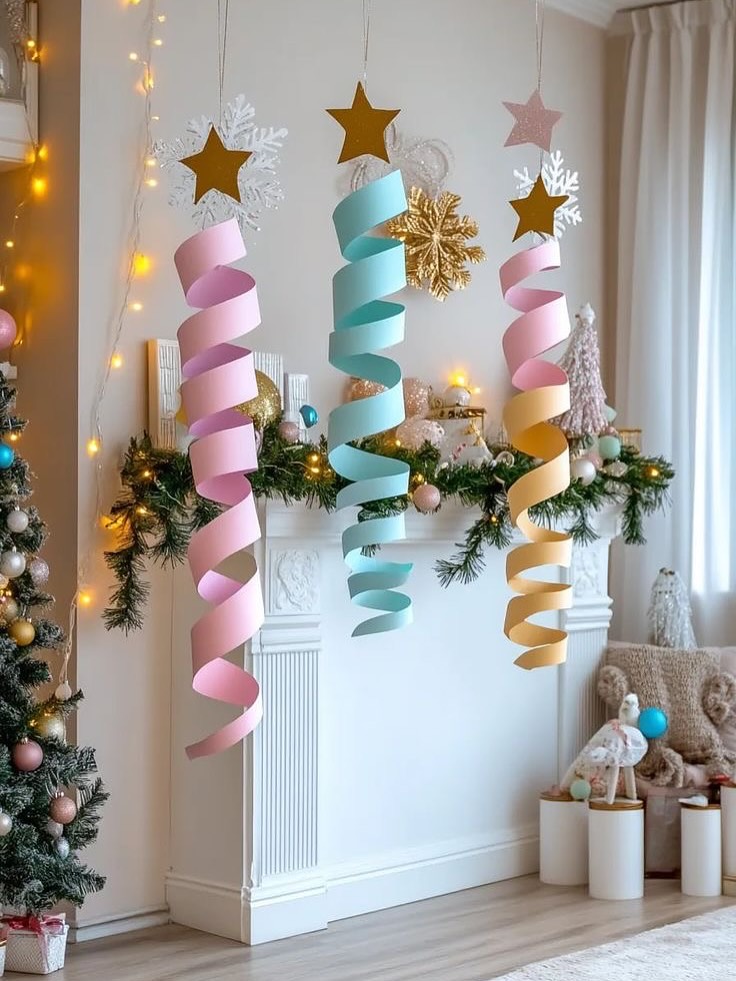
The main advantage of these decorations is that they use vertical space rather than taking up room on tables or shelves. Their elongated shapes add height, while the repeating pastel colors connect the hanging elements to the Christmas tree. The evergreen garland and warm lights provide a familiar seasonal foundation, balancing the more contemporary paper decorations. I would consider this approach especially useful when decorating a living room where the mantel already serves as a natural focal point.
To make similar spirals, I would cut lightweight colored paper into curved shapes and suspend them using thin thread. Paper stars and snowflake cutouts could be added at different heights to create a layered effect. I would choose three coordinating colors and repeat them throughout the arrangement so the decorations feel connected. The paper shapes can be made in different lengths, allowing the display to look dimensional without becoming visually crowded.
For a polished finish, I would measure the hanging lengths before attaching the decorations and leave enough space between them for gentle movement. I would also make sure that the paper hangs securely and remains well away from candles, fireplaces, and other heat sources. This is an affordable way to create a noticeable Christmas display using simple craft supplies.
DIY Wooden Snowman With a Burgundy Knitted Hat and Scarf
This charming snowman is constructed from two round wooden slices stacked to form the body and head. The upper slice has a white face with black eyes, a dotted smile, and an orange carrot-shaped nose. A burgundy knitted hat and matching scarf add warmth, while two dark buttons decorate the wooden body. Small branches extend from the sides as arms, and pinecones and red decorative berries surround the base. I love the combination of visible wood grain and soft knitted accessories because it makes the figure look both rustic in character and cozy.
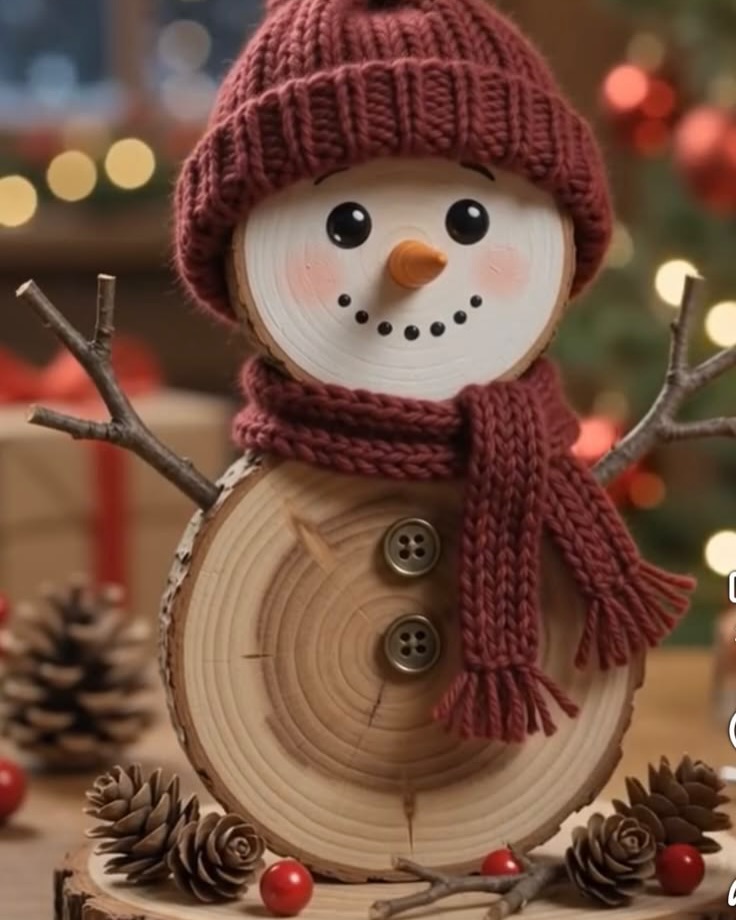
The design works particularly well because it combines contrasting materials without making the decoration feel complicated. The circular wooden slices reveal their natural grain, while the painted face gives the snowman a recognizable expression. The knitted accessories introduce softness and color, creating a strong visual contrast with the wood. I would use this decoration as a tabletop accent in a living room, entryway, or holiday display.
To recreate the snowman, I would start with two sanded wooden rounds and attach them securely to form the figure. I would paint the face with simple shapes and use an orange piece for the nose. A miniature knitted hat and scarf can be made from leftover yarn, while buttons provide an easy finishing detail. Small branches can be attached to the sides, and a stable base will help the completed figure stand upright.
I would keep the surrounding decorations simple, using a few pinecones and red accents to complement the burgundy accessories. If I wanted to create a coordinated display, I could make several snowmen with different scarf colors while keeping the same basic design. For a family craft project, adults should handle any cutting, drilling, or hot-glue work, while children can help paint the face and choose the decorative details.
Gingerbread Man Garland With Colorful Beads and Red Ribbons
This playful Christmas display features gingerbread-man-shaped ornaments hanging from red ribbons beneath a colorful garland of round beads. Each brown figure has white icing-style outlines, a smiling face, and small colored buttons. Additional gingerbread figures and candy-cane decorations hang farther into the room, creating a repeating festive pattern. The warm lighting enhances the brown tones of the ornaments and gives the display a cheerful, inviting appearance. I like how the familiar gingerbread shapes immediately establish a fun Christmas theme.
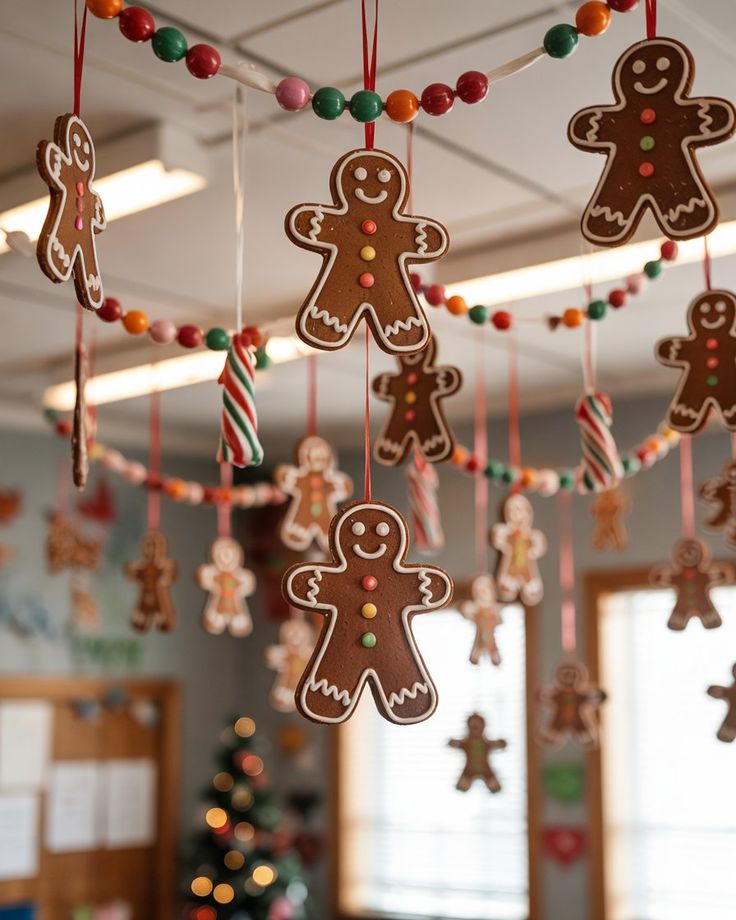
The strength of this arrangement lies in repetition. The repeated gingerbread figures create visual consistency, while the multicolored beads introduce variation and connect the individual decorations. Suspending the ornaments overhead also makes use of vertical space, leaving tables and other surfaces available for everyday activities. I would consider this idea especially suitable for a kitchen, dining area, or family room where playful seasonal decorations feel appropriate.
To create a similar garland, I would cut gingerbread shapes from sturdy cardboard or felt, or use salt dough for a firmer ornament. White paint or craft pens can create the icing-style outlines and facial details, while small colored circles represent buttons. Once the decorations are completely dry, I would attach red ribbons and arrange them along a string decorated with colorful beads. Repeating the same shape helps the finished display look cohesive.
For the best result, I would vary the hanging lengths slightly while keeping the ornaments evenly distributed across the garland. I would check that every ribbon is secure and that the decorations do not obstruct doors, lighting fixtures, or everyday movement. If I wanted to reuse the garland each year, I would choose durable craft materials instead of edible cookies, which may become fragile or attract pests over time.
Dried Citrus and Cinnamon Stick Christmas Ornaments
These handmade Christmas ornaments feature overlapping dried citrus slices in warm shades of golden yellow, amber, and muted green. The translucent fruit reveals delicate radial patterns, while cinnamon sticks extend above the arrangement to create a natural hanging detail. Evergreen branches and softly blurred Christmas lights provide the background, emphasizing the warm colors and organic shapes of the ornament. I love how this decoration brings visual warmth to a Christmas tree without relying on glitter or elaborate embellishments.
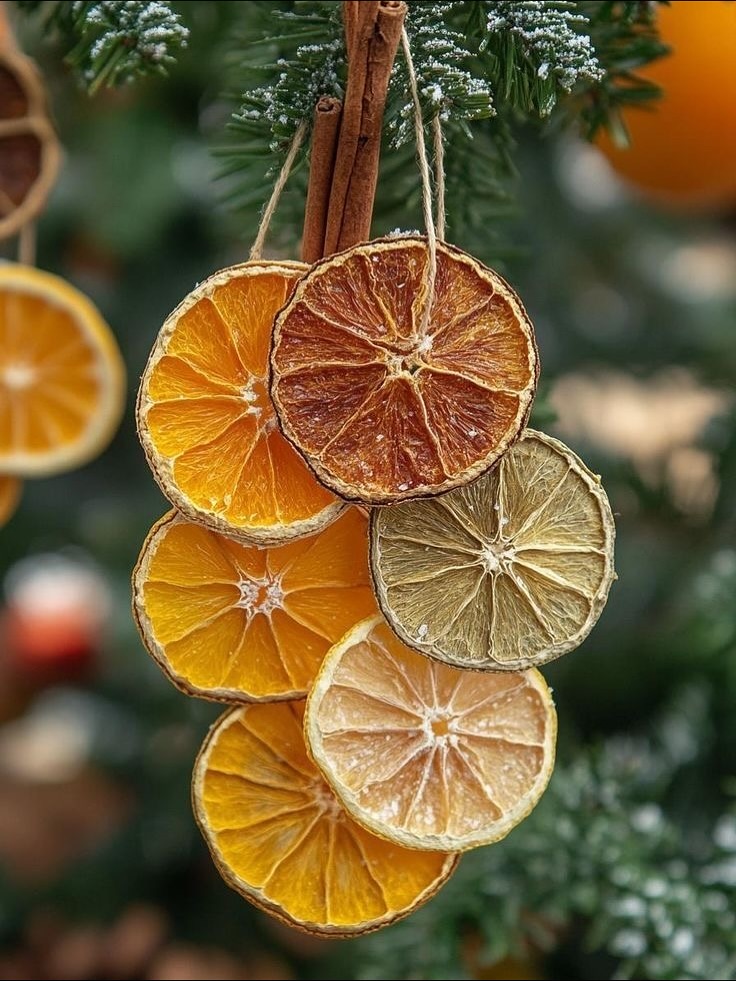
The appeal of dried citrus ornaments comes from their natural variation. Every slice has a different pattern, so even a group of similar decorations will have an individual appearance. Cinnamon sticks add texture and reinforce the traditional seasonal character of the design. I would use these ornaments on a Christmas tree, along a garland, or as part of a handmade arrangement featuring evergreen branches.
To make them, I would slice oranges, lemons, or limes into reasonably even rounds and dry them thoroughly in a low-temperature oven or food dehydrator. After cooling, the slices can be layered and secured with craft wire or strong thread. Cinnamon sticks can be attached near the top with twine, creating a simple hanging loop. I would make sure the citrus is completely dry before assembling the ornament to reduce the risk of mold.
I would combine these decorations with evergreen greenery and warm white lights to highlight their golden tones. A few cinnamon sticks or additional dried citrus slices can create a coordinated look throughout the room. After Christmas, I would store the ornaments in a dry container and inspect them before reusing them the following season.
Minimalist Christmas Display With Glass Vases and Neutral Ornaments
This understated Christmas arrangement features evergreen branches placed in clear glass vessels, accompanied by smaller transparent jars and spherical ornaments in white, champagne, and gold. The display sits on a round wood-slice base, with a neutral wall and soft natural light providing a calm background. The taller vase gives the arrangement height, while the smaller containers and ornaments create a layered composition. I appreciate how the greenery and pale metallic details introduce a festive feeling without overwhelming the space.
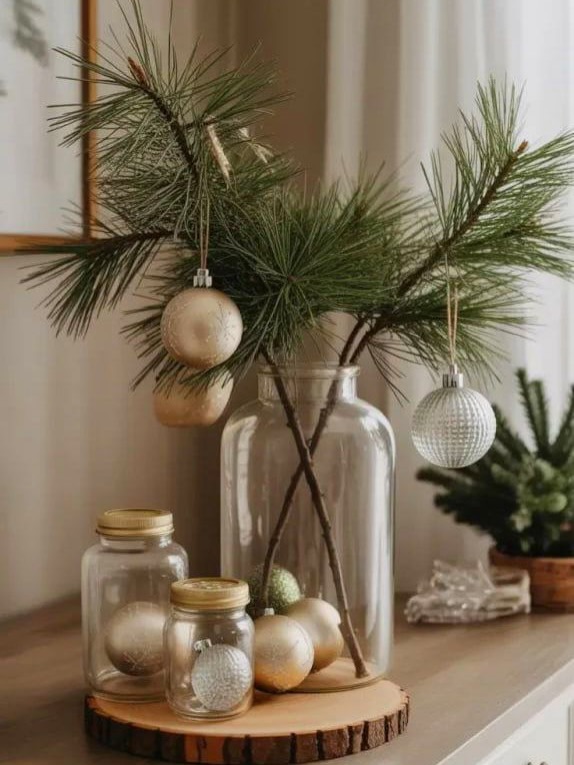
The combination of transparent glass, natural greenery, and neutral ornaments creates a balanced display. Because the containers are clear, the branches remain the main visual feature, while the different vessel heights add interest. The pale ornaments introduce subtle shine without competing with the greenery. I would recommend this approach for smaller rooms or for anyone who prefers understated Christmas decorations that complement existing interiors.
To recreate the arrangement, I would select one tall glass vase and several smaller jars. I would place evergreen branches in the tallest vessel, trimming them so they spread naturally above the opening. Then I would arrange white and gold ornaments around the containers, varying their sizes and finishes. A wood-slice base can visually connect the different pieces, although a simple tray would also work well.
I would leave enough empty space between the objects to keep the display looking airy. If using fresh branches, I would place the cut ends in water when appropriate and remove any foliage that would sit below the waterline. I would also make sure the glass containers are stable and positioned away from the edge of the surface. The result is a simple Christmas arrangement that can be assembled with just a few materials.
Asymmetrical Evergreen Wreath With Dried Oranges and a Textured Bow
This handmade wreath has an open, asymmetrical shape, with evergreen branches extending across the upper and right sides of a curved base wrapped in natural twine. A large textured beige bow decorates the left side, accented with small gold ornaments. Dried orange slices are arranged along the lower curve, creating a warm contrast with the deep green foliage. The wreath hangs in front of a bright window, where natural light highlights the textures of the branches, twine, bow, and citrus. I love how the design feels festive while remaining visually light.
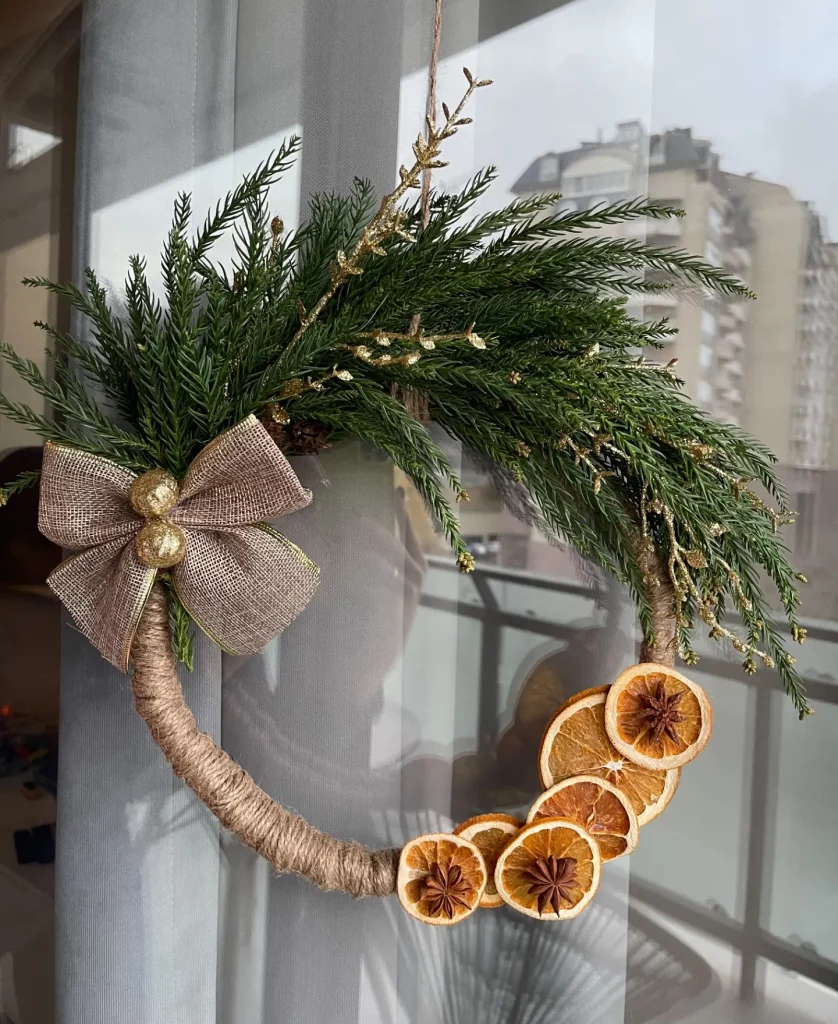
What makes this wreath distinctive is the balance between decorated and exposed areas. Rather than covering the entire base with greenery, the design leaves part of the twine-wrapped structure visible. This creates a more sculptural silhouette and allows the individual materials to stand out. The dried oranges add warm color, while the beige bow connects the natural elements with the small gold accents. I would choose this style for anyone who enjoys handmade decorations with a more relaxed, asymmetrical composition.
To make a similar wreath, I would begin with a circular or curved base and wrap the exposed section with natural twine. Evergreen sprigs can be attached to one side, allowing their tips to extend outward. Dried orange slices can then be secured along the lower curve, while a large textured bow completes the opposite side. I would add a few small gold details only after the main elements are in place, making sure the decoration remains balanced.
For the finishing touch, I would secure the heavier pieces carefully and hang the wreath where the branches can spread freely. A window or sheltered entrance would allow its open shape to stand out. If using fresh greenery, I would check it regularly for dryness, while keeping the dried citrus protected from excess moisture. The limited color palette makes this wreath easy to coordinate with other natural Christmas decorations.
Elegant Paper Christmas Trees in Green, Red, and Cream
The first image features three sculptural Christmas trees made from folded paper, arranged on a white tabletop against a warm cream wall. The tallest tree stands at the back in deep forest green, while a rich red tree and a smaller ivory tree create a balanced arrangement in the foreground. Their layered, accordion-like folds give each silhouette beautiful dimension, and delicate gold detailing runs along the edges. Small gold stars complete the designs, adding a festive finishing touch to these minimalist handmade decorations.
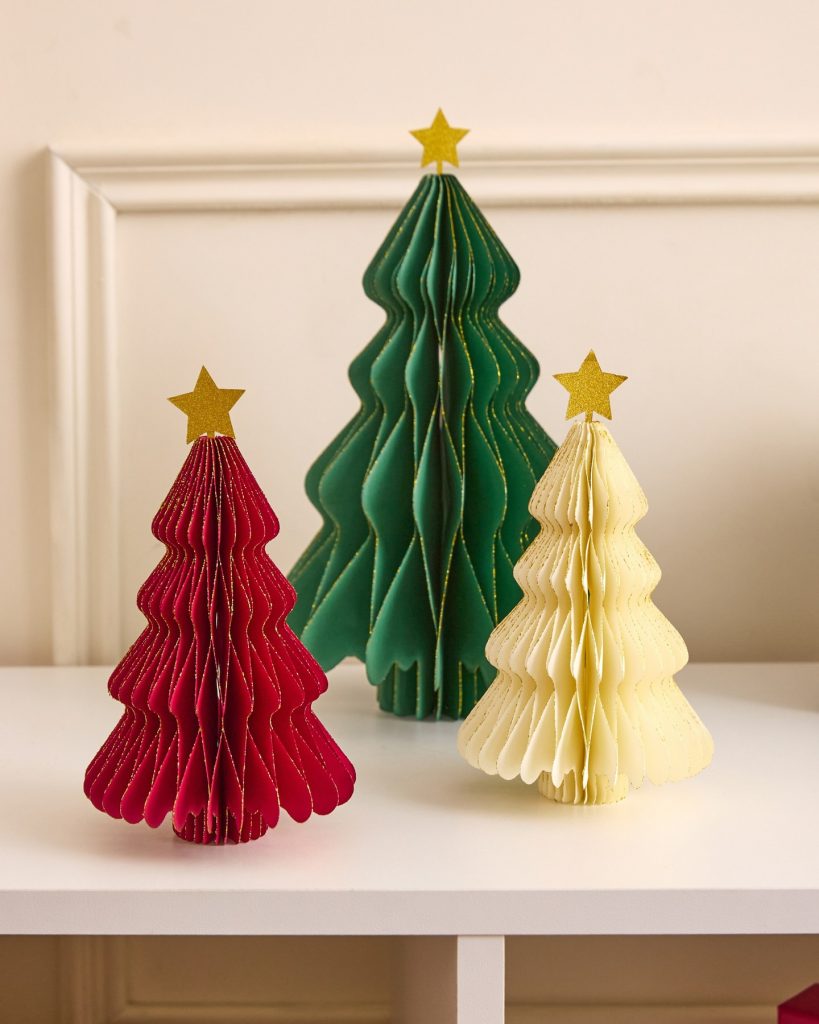
What I particularly like about this arrangement is how it creates a strong visual statement without taking up much space. The three different heights establish a natural focal point, while the traditional red, green, and cream palette feels festive without overwhelming the neutral surroundings. These lightweight decorations are ideal for a mantel, console table, bookshelf, or holiday dining display. Because they do not require electrical lighting or bulky accessories, they are also practical for smaller homes and apartments.
To recreate this look, I would start with thick decorative paper or cardstock that holds its shape when folded. Cut matching tree silhouettes, fold them into evenly spaced layers, and connect the pieces to create a dimensional form. Gold paint or fine glitter accents can emphasize the folds, while a small star cutout adds height and personality. I recommend experimenting with different sizes before assembling the final arrangement so that each tree remains distinct. A simple white surface and an uncluttered background will help the colors and sculptural shapes stand out beautifully.
Gingerbread House Christmas Wreath With Red Poinsettias
The second image shows a large circular Christmas wreath decorated with miniature gingerbread-style houses, red poinsettias, and layered green leaves. Each brown house features white outlines, detailed windows, decorative doors, patterned roofs, and small snow-covered accents. The houses are arranged around an open center, creating a distinctive wreath shape rather than a solid decorative ring. Red petals and deep green foliage fill the spaces between the houses, giving the entire piece a cheerful holiday palette against the neutral wall.
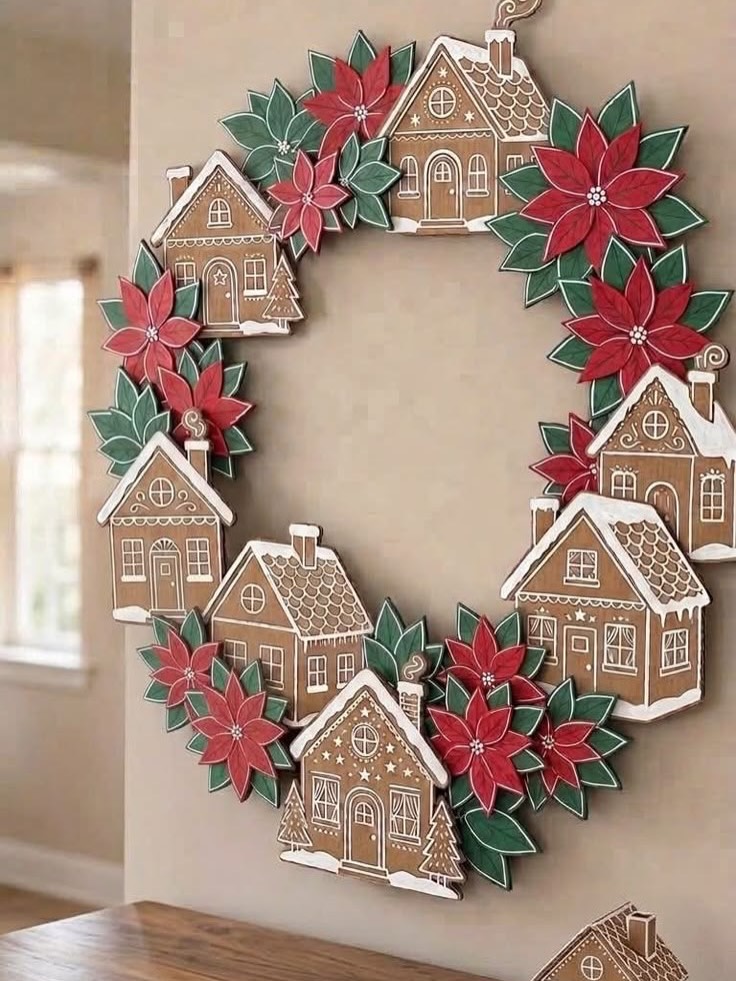
I find this design especially appealing because it combines two recognizable Christmas motifs: gingerbread houses and a traditional floral wreath. The circular arrangement draws the eye around the individual details, while the open center keeps the decoration from looking too heavy. It works particularly well as a statement piece on an interior wall, where the intricate houses and contrasting colors can be appreciated up close. The repeated shapes also give the wreath a sense of unity, even though every miniature house has its own details.
For a similar DIY project, I would create a sturdy circular base and prepare several small house shapes from cardboard, craft foam, or another lightweight material. Brown surfaces can be decorated with white lines to imitate icing, while red and green paper cutouts provide the poinsettias and foliage. Before attaching everything permanently, arrange the pieces around the circle and adjust their spacing until the composition feels balanced. I would keep the center relatively open and vary the roof shapes to make the wreath more interesting. A secure hanging attachment is essential because the finished decoration may be wider and heavier than a simple foliage wreath.
Crocheted Angel Animal Ornaments for a Handmade Christmas Tree
The third image presents four charming crocheted animal ornaments hanging from the branches of a green Christmas tree. The figures include a white cat, a white rabbit, a white dog with tan details, and a warm brown bear. Each has a rounded body, embroidered facial features, and small white wings that give the ornaments an angel-inspired appearance. Yellow hanging cords and golden halo-like details tie the designs together, while the soft yarn texture contrasts beautifully with the tree’s dense evergreen needles.
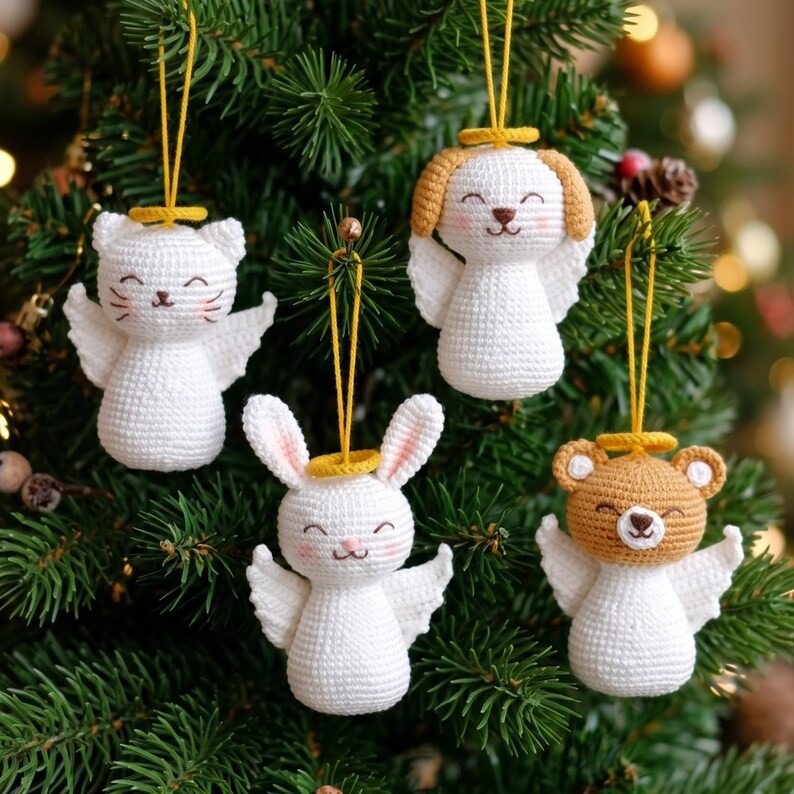
I love the way these handmade ornaments introduce personality and softness into traditional Christmas tree decorating. Their coordinated shapes and similar colors make the collection feel intentional, while the different animal faces give each piece its own identity. The white yarn stands out against the dark green branches, and the tan and brown details add warmth without introducing too many competing colors. These ornaments would be particularly appealing on a family Christmas tree, where decorations can become treasured keepsakes collected over many seasons.
To make a similar set, I would use crochet cotton or soft yarn in white, cream, and brown, along with small amounts of yellow and other accent colors. Simple rounded amigurumi shapes can form the bodies and heads, while embroidered features create the facial expressions. Small wings and halo details complete the angel theme. For a more consistent result, I would repeat the same basic pattern for every animal and vary only the ears, colors, and facial details. If the ornaments will be used around young children, embroidered eyes are a sensible alternative to small plastic pieces that could detach.
Rustic Wooden Frame With Hanging Christmas Ornaments and Fairy Lights
The fourth image features a rectangular wooden frame styled as a small festive display in front of a window. Evergreen branches and pinecones decorate the top, while warm white fairy lights trace the outer edges of the frame. Several thin cords hang across the opening, suspending red baubles, wooden star shapes, and a dried orange slice at different heights. Additional evergreen sprigs and pinecones rest along the bottom, connecting the hanging ornaments to the tabletop arrangement and creating a balanced composition.
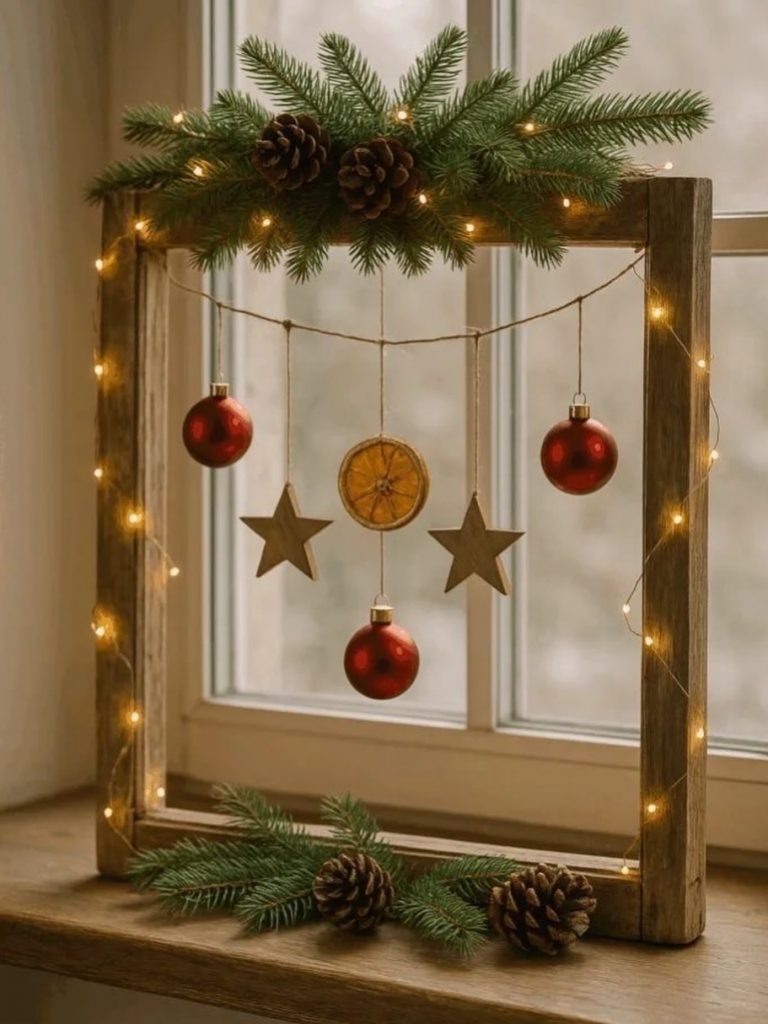
What makes this decoration work so well is its use of vertical space. Instead of placing every ornament on a tree, the frame turns them into a small hanging installation that can be appreciated individually. The red baubles provide a strong focal point, while the wooden stars, natural orange slice, pinecones, and evergreen branches introduce varied textures. The warm lights soften the overall appearance, making the display especially inviting near a window or on a console table.
I would recreate this project using a sturdy rectangular frame, lightweight hanging cords, and a small selection of ornaments in complementary colors. Fresh or artificial evergreen branches can be secured across the top, while battery-operated fairy lights make it easier to arrange the illumination without running a visible power cord. I would vary the hanging lengths so the decorations do not form a rigid horizontal line. Dried citrus slices are also a lovely detail because they add natural color and texture. For safety, I would keep the lights away from dry greenery and use only lights designed for the intended display.
Crocheted Snowman Ornament With a Green Hat and Red Mittens
The fifth image focuses on a single crocheted snowman ornament hanging among evergreen branches. Its rounded white body is made from textured yarn, with a bright green knitted-style hat, an orange carrot-shaped nose, black eyes, and a curved embroidered smile. Two vivid red mittens extend from its sides, creating a cheerful contrast with the white body and surrounding greenery. A simple hanging loop at the top allows the snowman to sit naturally among the tree branches.
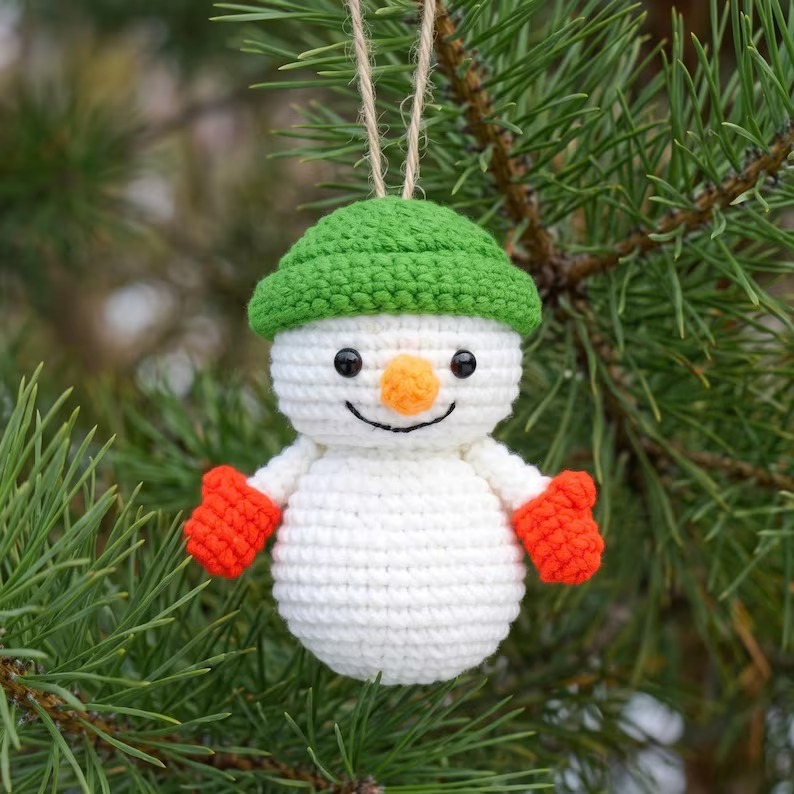
I think this decoration is a wonderful example of how a few carefully chosen colors can make a handmade ornament memorable. The green hat connects visually with the evergreen tree, while the red mittens introduce a traditional Christmas accent. The rounded shape and friendly expression give the snowman a playful character without requiring complicated decorative elements. Because the design is compact, it can be used on a full-size tree, a smaller tabletop tree, or as part of a collection of handmade holiday ornaments.
To achieve a similar look, I would crochet the body from white yarn, shape the hat separately, and add the nose and facial details after assembling the main pieces. Red mittens provide the strongest color accent, so I would keep the remaining details simple. Beginners could use a basic amigurumi pattern and practice shaping the body before adding the smaller accessories. I would also make sure the hanging loop is securely attached to support the ornament throughout the season. Creating several snowmen with slightly different hat colors or expressions would make an especially charming coordinated collection.
Framed Snowman Artwork for a Cozy Christmas Living Room
The sixth image shows six framed snowman pictures arranged in two neat rows on a light-colored living room wall. Each picture has a pale blue background decorated with white snowflakes and a snowman wearing a different hat or scarf. The snowmen feature white textured bodies, carrot-shaped noses, dark eyes, and twig-like arms. Black frames provide a clean outline around each design, while the repeated winter motifs create a coordinated gallery display. Below the artwork, a comfortable light-colored armchair with soft cushions sits beside woven baskets and a small side table, completing the cozy setting.
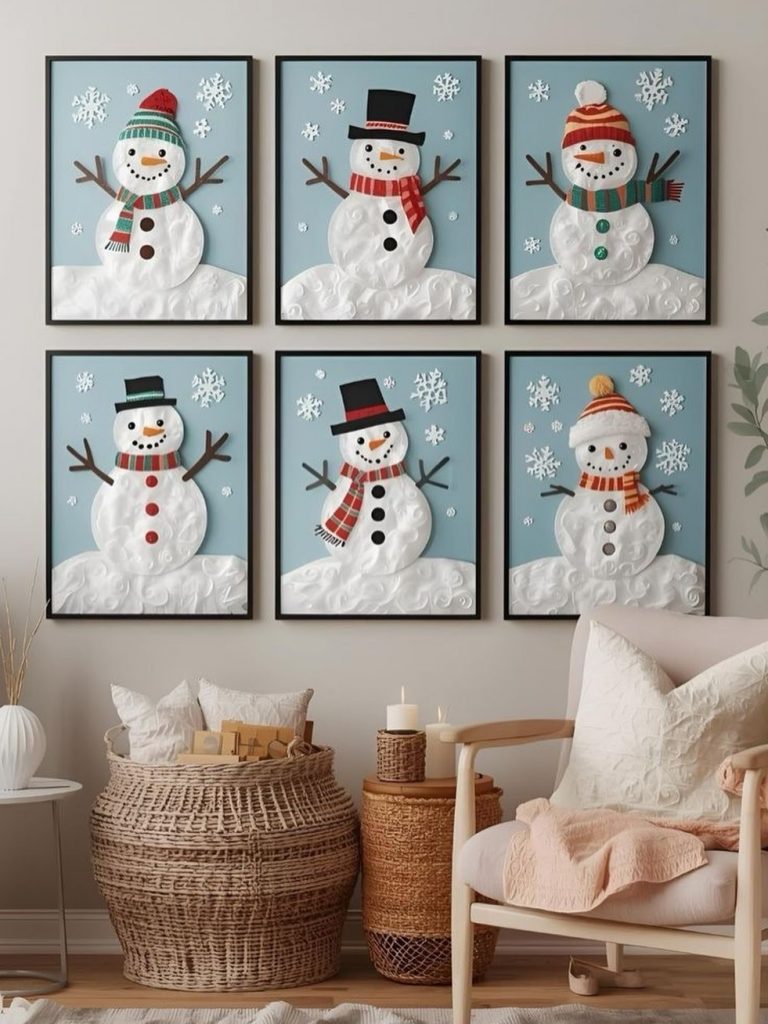
I like this approach because it turns simple seasonal artwork into a noticeable part of the room’s Christmas styling. Displaying six pictures together creates a stronger impact than scattering them across different walls, and the consistent backgrounds and frames make the arrangement feel organized. The pale blue tones provide a cool winter accent, while the surrounding neutral furnishings keep the overall space calm. The woven baskets add texture at floor level, balancing the visual weight of the frames above.
For a DIY version, I would create six individual snowman illustrations using paper, paint, modeling materials, or layered craft elements. Different hats, scarves, and button arrangements would make each character unique while preserving a consistent overall style. Matching frames and similarly sized backgrounds would help the gallery wall look cohesive. Before hanging the pictures, I would lay them out on the floor and measure the spacing to ensure the two rows align neatly. This idea is also easy to adapt: a smaller home could use three coordinated pictures, while a larger wall could accommodate a wider arrangement.
Handmade Crochet Grinch Ornament With a Golden Star
The final image features a bright green crocheted character wearing a red Santa hat and holding a large golden-yellow star. The character has expressive yellow eyes, dark eyebrows, a mischievous smile, and a long curled tail, giving the ornament a playful personality. Its textured yarn surface contrasts with the smooth-looking star, while the green and red colors stand out against the softly blurred Christmas tree and warm lights in the background. The hanging cord attached to the star allows the piece to function as a distinctive tree ornament.

What I find most effective about this decoration is its strong silhouette and expressive face. The oversized star provides a clear focal point, while the character’s vivid green body and red hat make the design immediately recognizable as a festive ornament. Unlike traditional round baubles, this handmade figure tells a little visual story and adds humor to the Christmas tree. It could also work well as part of a playful collection of character-inspired decorations, especially when mixed with simpler ornaments that allow its details to stand out.
To create a similar piece, I would crochet the character’s body and limbs separately, then assemble them with secure stitching. The hat, facial features, curled tail, and large star would provide the defining details. I would pay particular attention to the star’s shape and the placement of the eyes because these elements determine the ornament’s overall expression. Using firm stitches and a securely attached hanging loop will help the finished decoration keep its shape. For households with young children, I would consider embroidering the facial details rather than using detachable small pieces.
DIY Christmas decorations are a wonderful way to make your home feel warm, festive, and full of personality. From handmade pine cone ornaments to creative wooden trees and glowing holiday arrangements, these ideas offer something for every decorating style and budget. I hope these DIY Christmas Decorations For Home 2026 inspire you to try something new and create special holiday memories. Which decoration is your favorite? Leave a comment and share your favorite ideas with others!