64 DIY Halloween Yard Decorations 2025: Creepy, Creative & Easy Outdoor Ideas for a Spooky Yard
Are you interested in making your yard a haunted masterpiece this Halloween? With a big yard or a small front porch, there is no better time than 2025 to make your own Halloween yard decorations and have more creativity and impact than ever before. Whether it is spooky lights or creepy figures, this guide will tell you how to create your ideal haunting yard scene with realistic hand-made details without the need of any professional assistance. So, shall we go through these DIY concepts, employing professional design principles that will make your house not only stylish but scream-worthy?
Spooky Front Yard Entrance Ideas
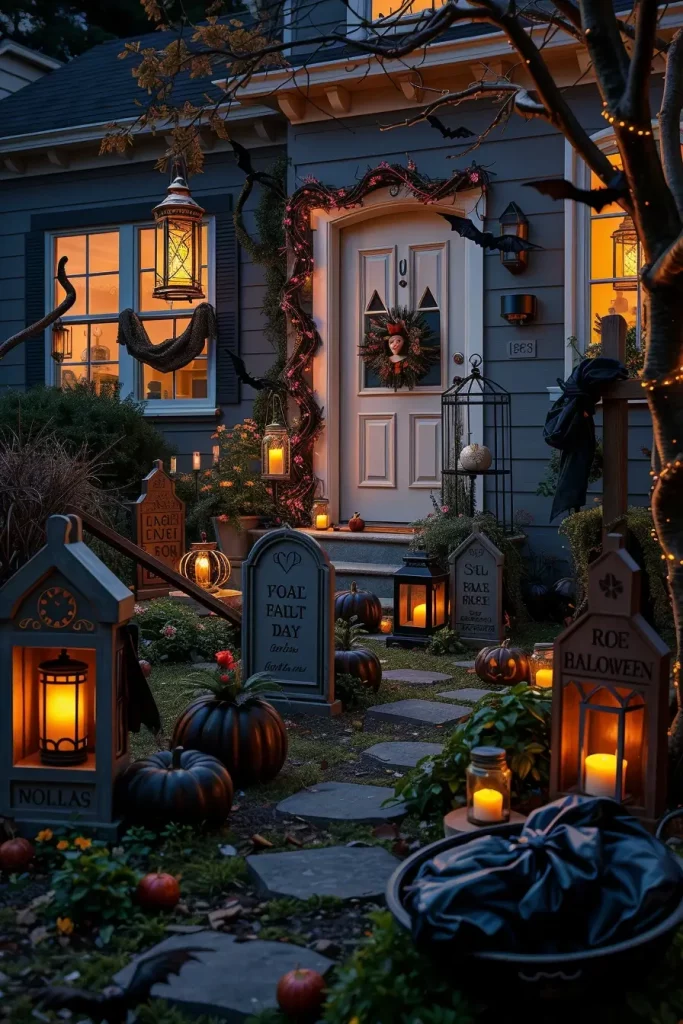
One of the most important aspects of any Halloween yard decor project is to design the entrance. I tend to start with tracing where the guests or trick-or-treaters will be walking, and then frame the shot. This year, PVC pipes covered in black tulle or weathered gauze arched gates create a haunted mansion effect. On either side, flickering LED lanterns on pedestals give depth and a creepy atmosphere.
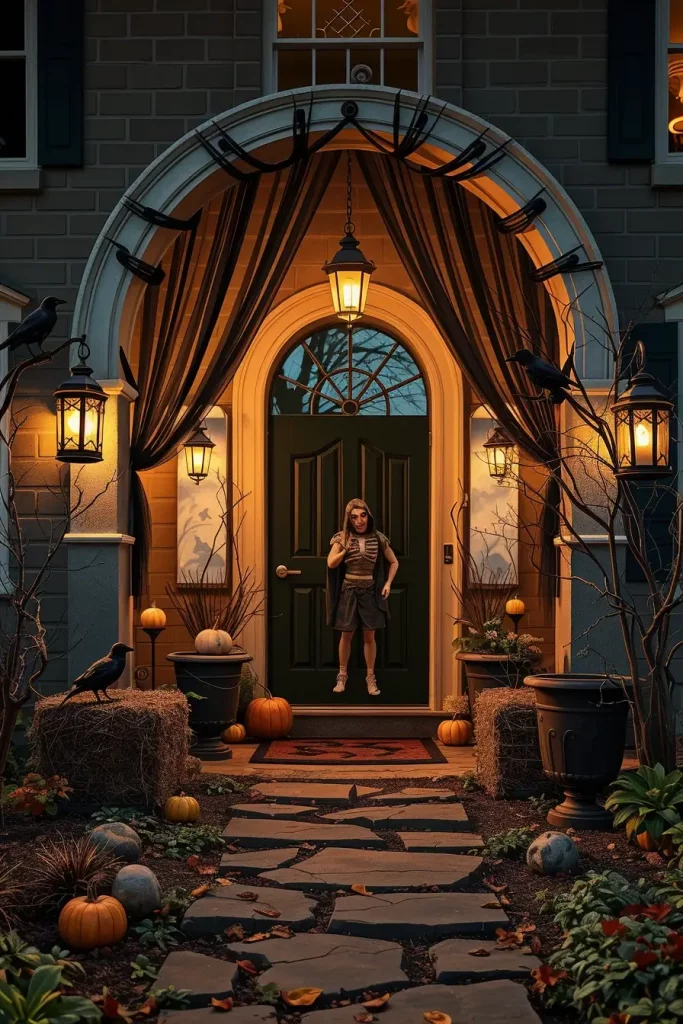
To make the entrance path, I apply cracked stepping stones, an antique metal welcome mat with a spooky message, and hay bales with plastic ravens sitting on top. These are surrounded by faux vines that I creep up lantern posts that I distress with a sponge and matte black paint. The dark and earthy color contrast actually sells the abandoned look. Vertical interest is achieved with twisted branches in tall, narrow planters with dangling rubber bats.
I’ve learned from experience that layering heights at the entry is essential. As recommended by HGTV’s Halloween design special, you want visual obstacles that trick the eye, creating suspense and curiosity as visitors approach. One thing I’d still add here? A howl on a motion-sensor or a pop-up animatronic right behind a planter to add some extra effect.
DIY Creepy Pathway Lighting
Pathway lighting has the potential to transform an otherwise normal front yard into a horror movie. I begin by taking the measurements of the walkway and putting the solar-powered light stakes on both sides with equal distance. With a frosted glass spray on recycled jars, I make ghostly luminarias by drawing spooky faces or skeletal grins on each one, and then inserting flickering LED tealights.

Another of my favorite new things this year is to bury orange extension cords with mini pumpkin lights attached to them along the mulch, and light up the ground up. I put semi-sheer fabric domes over them to give them a ghostly shimmer- this softens the light and adds mystery. To create taller lighting, I created lanterns out of old bird cages that I spray-painted black, and put battery-powered candles in them.

Most designers recommend the application of varied light temperatures and I fully concur. The combination of cool white and amber lights creates texture and narration. Anything you may be lacking here I would recommend a fog layer to be just above the ground with light coming up through it to create exaggerated shadows and glow.
Haunted Yard Fence Decorations
Your fence can serve as a canvas to your whole DIY Halloween yard. The skeleton is always made of black plastic fencing netting or distressed wooden panels. I hang cheesecloth dipped in tea and ripped in a way that makes it blow in the wind–it gives off a really cursed atmosphere. The tops are adorned with twisting vines of old ropes and moss with plastic spiders and rats added to the effect.
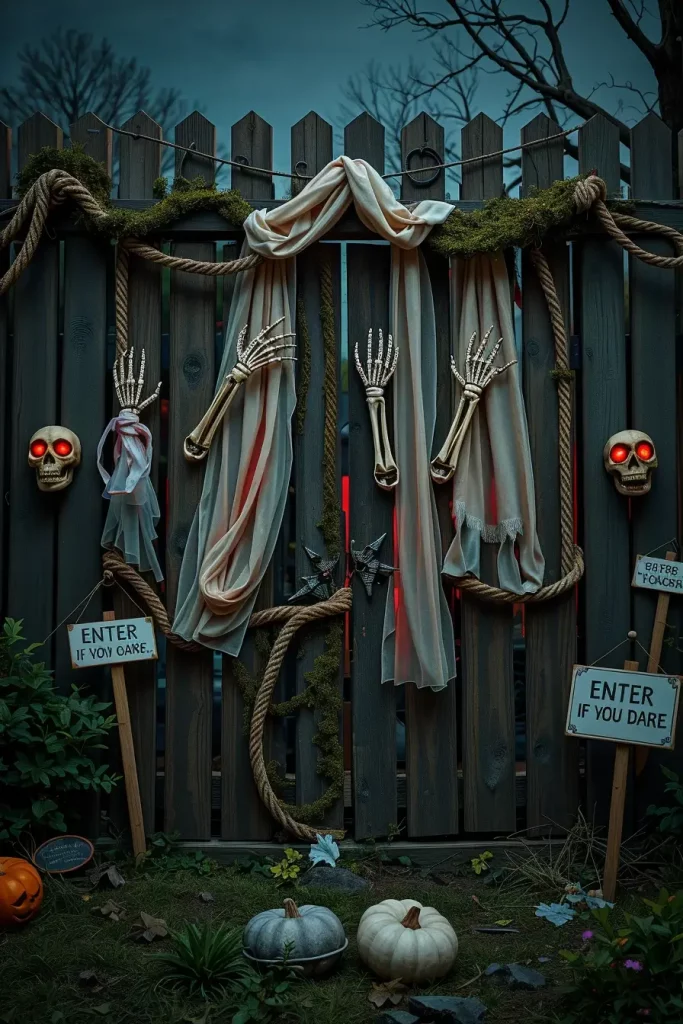
I use reclaimed pallet wood and stencils to attach handmade warning signs such as, Enter if you dare or Witch Crossing. There is a dynamic 3D scare factor by the use of skeleton arms or zombie hands gripping through the slats. This year, I’m also planning to insert glowing red LED eyes through slits in the panels, blinking sporadically as if something’s watching.
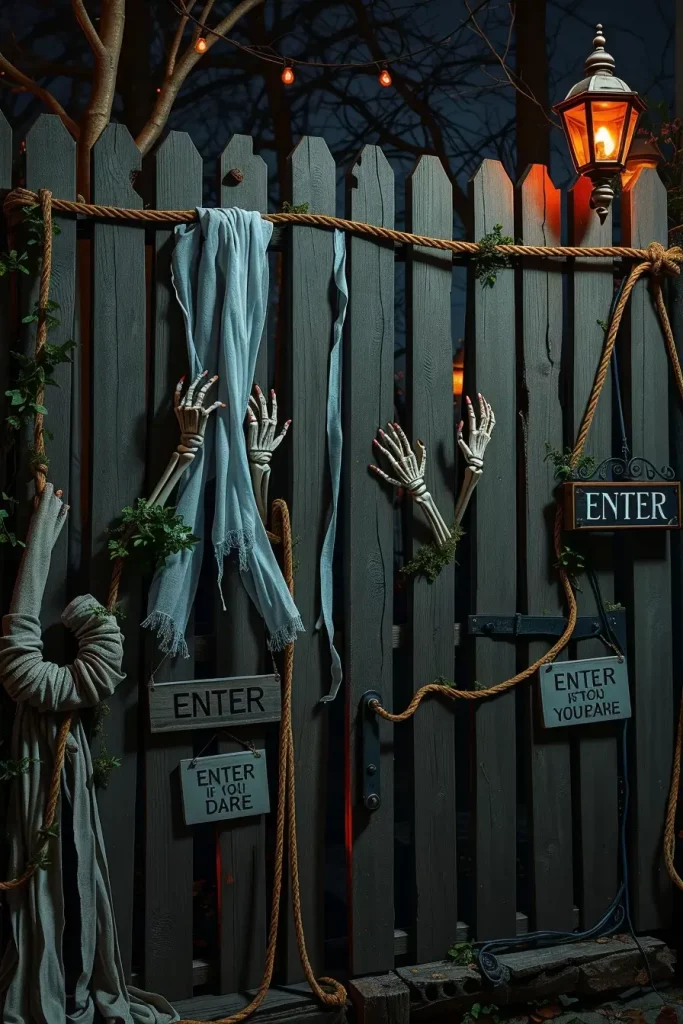
The fence is not supposed to be a wall–it must play a part in your yard scene. I’ve found that varying materials (burlap, gauze, reclaimed wood) gives it a naturally disturbing feel. A stunt I would suggest? Put in some busted-up gate hinges or rusty old door knockers to make it seem real. I might include climbing ivy (faux or real) in future versions for more eerie layering.
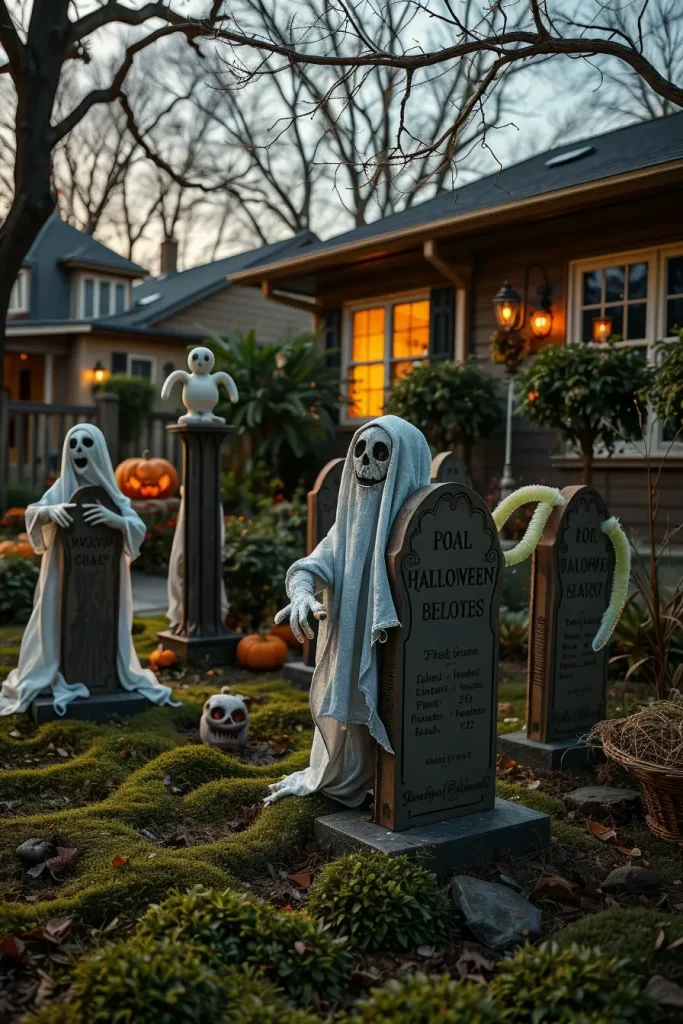
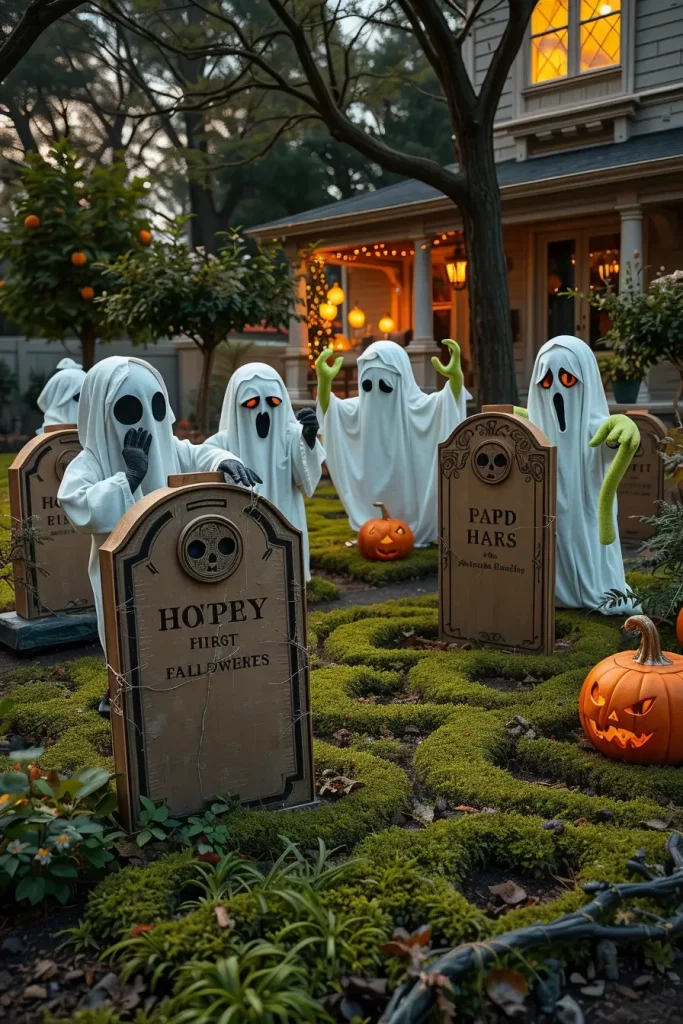
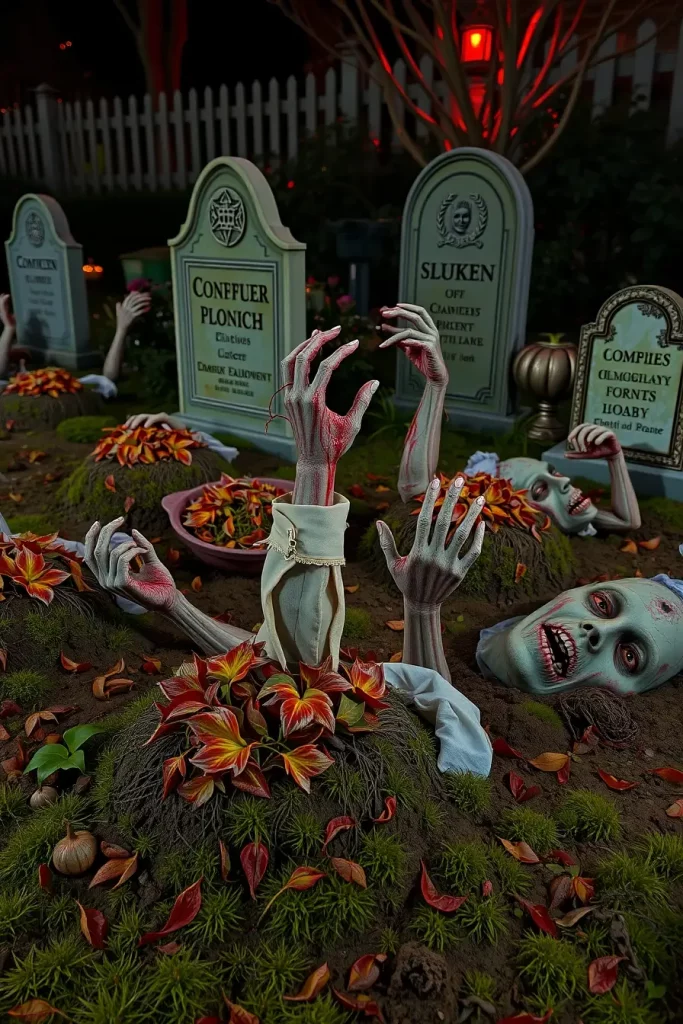
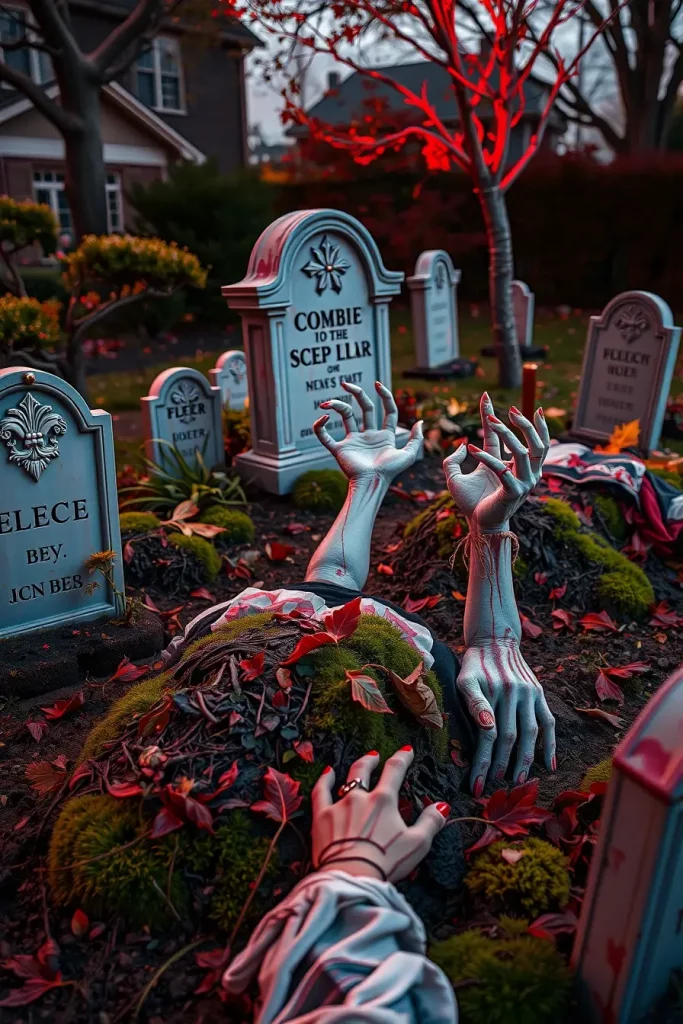
Scary DIY Graveyard Displays
A Halloween staple is to make a graveyard in your yard and I prefer realism. First, I draw a lumpy piece of lawn and pile the earth up in odd lumps. I cut and form tombstones using foam insulation boards, age them using a dremel and gray stone-texture paint. The messages on each stone are varied, going as far as being humorous or ominous.
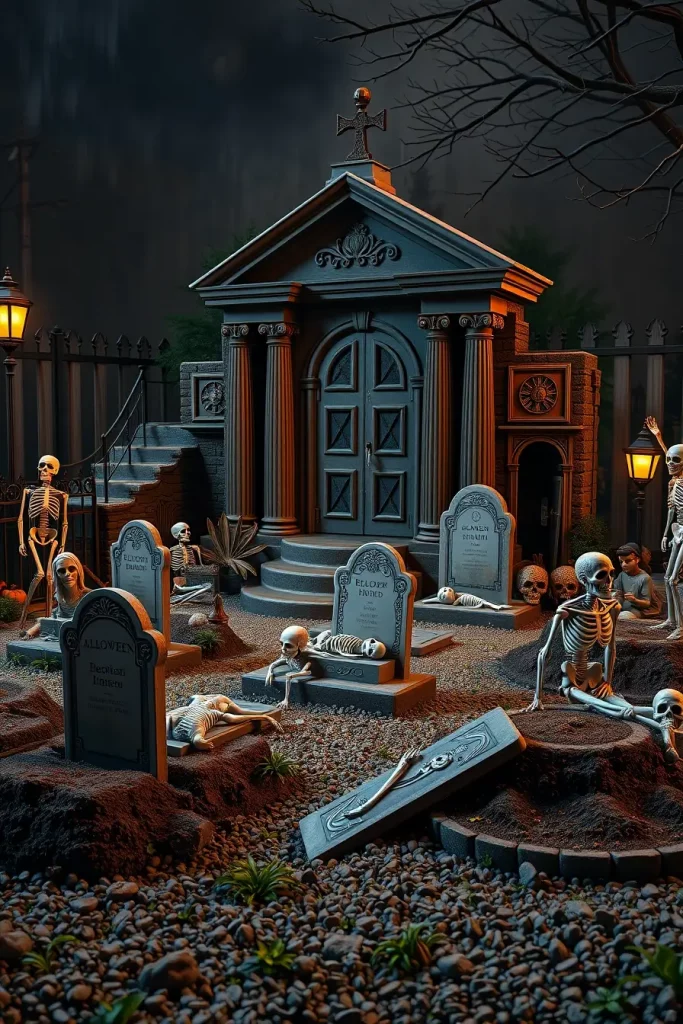
To ground the display, I will set a DIY mausoleum front on the house wall with cardboard and foam paneling, painted to look like broken stone. There is an interactive element with skeletons half-buried in the dirt or crawling out of mounds. I employ also tombstone lighting at ground level–angled upwards–in a theatrical shadow-play.
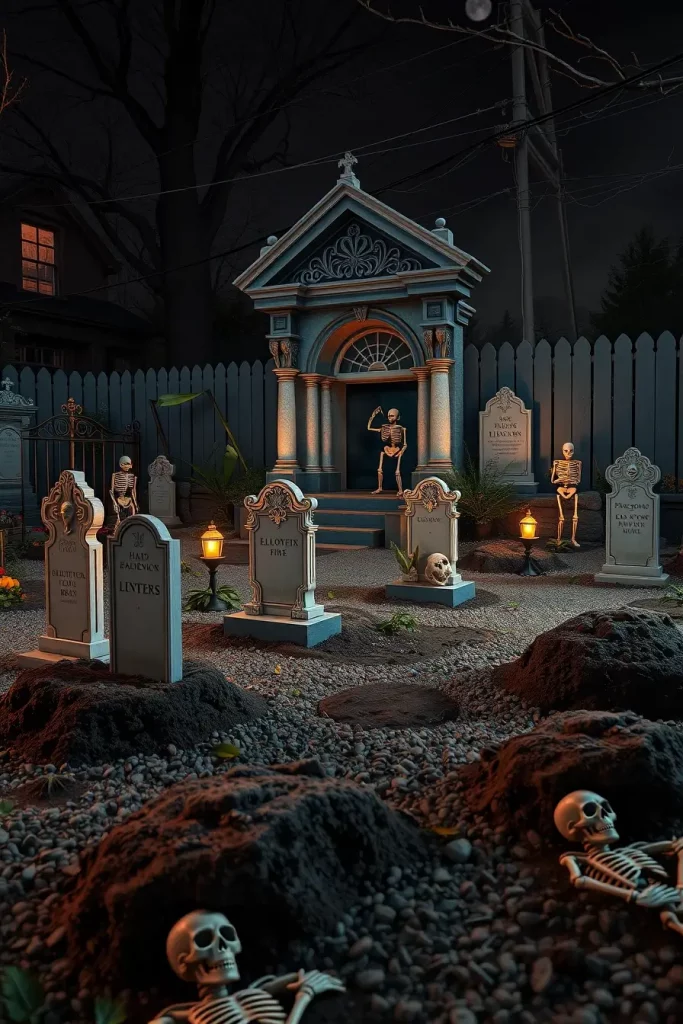
In my experience, such arrangements work better when you avoid symmetry. The uneven spacing resembles old, abandoned cemeteries and the yard is haunted. I like to put crushed gravel around the tombstones to add realism. To take it a step further, I would add a distant soundtrack of low chanting or moaning, it adds immersion instantly.
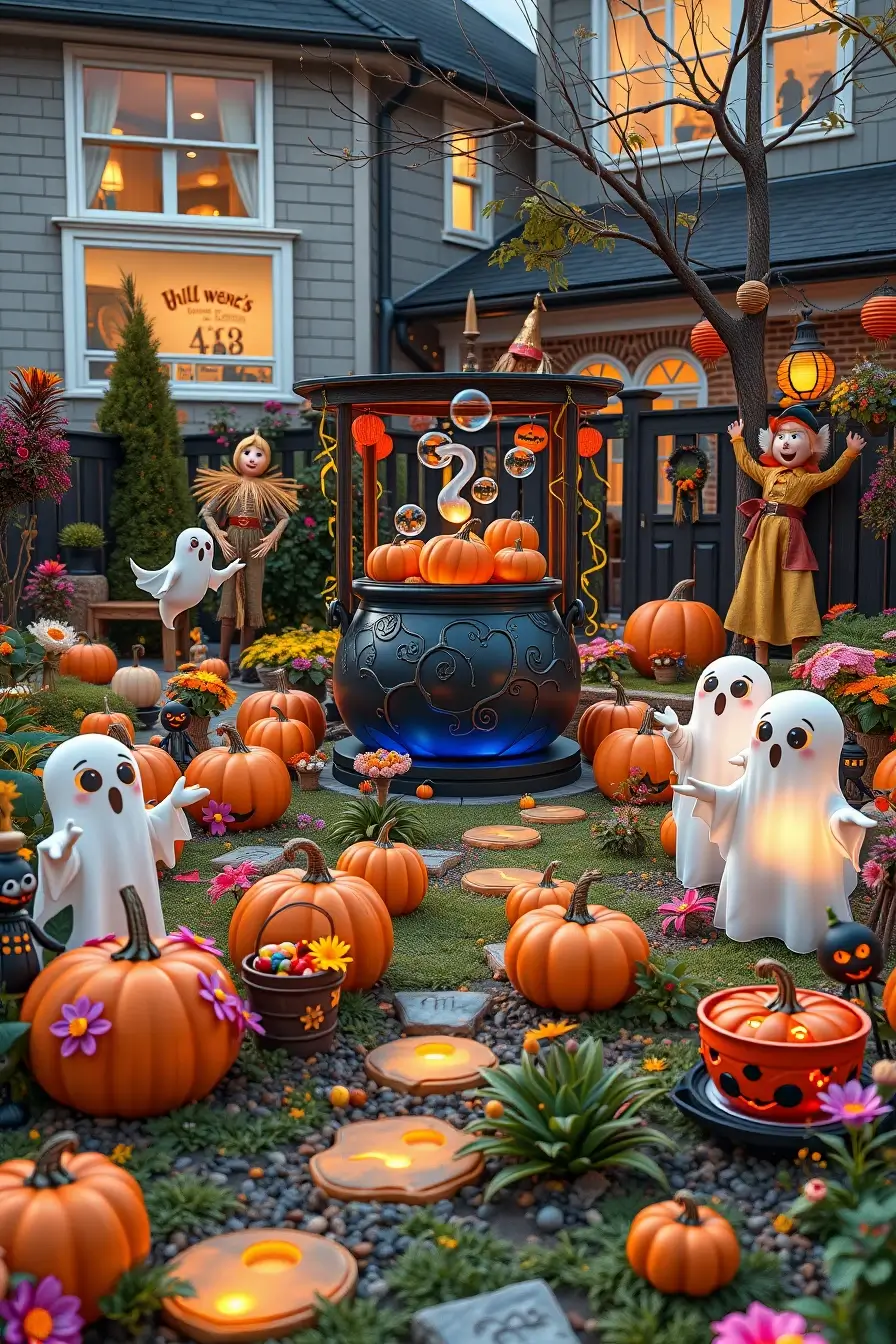
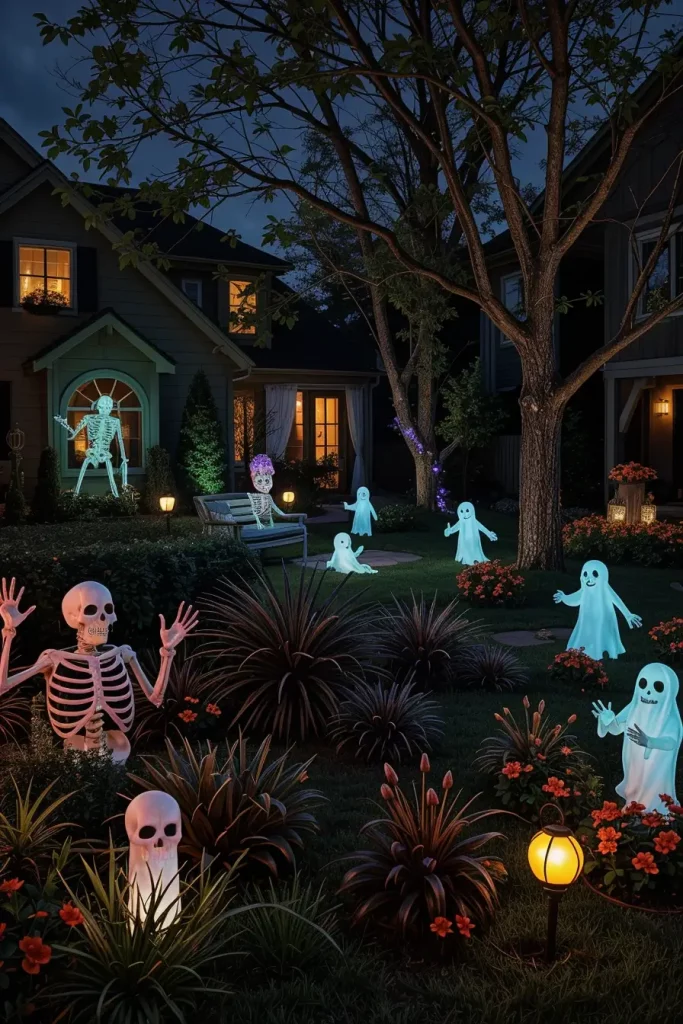
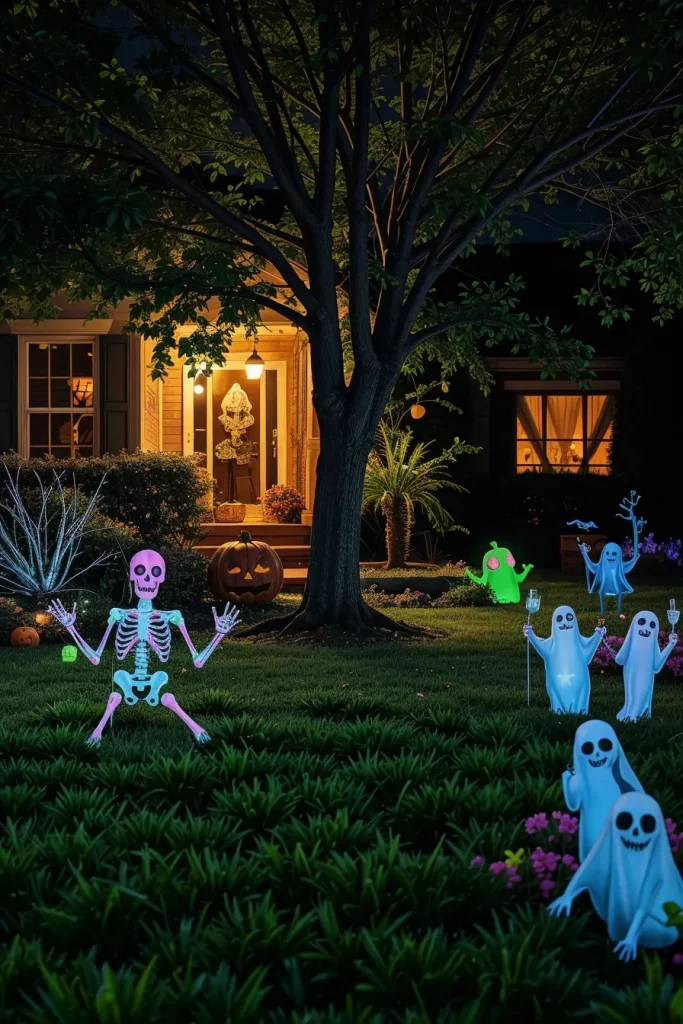
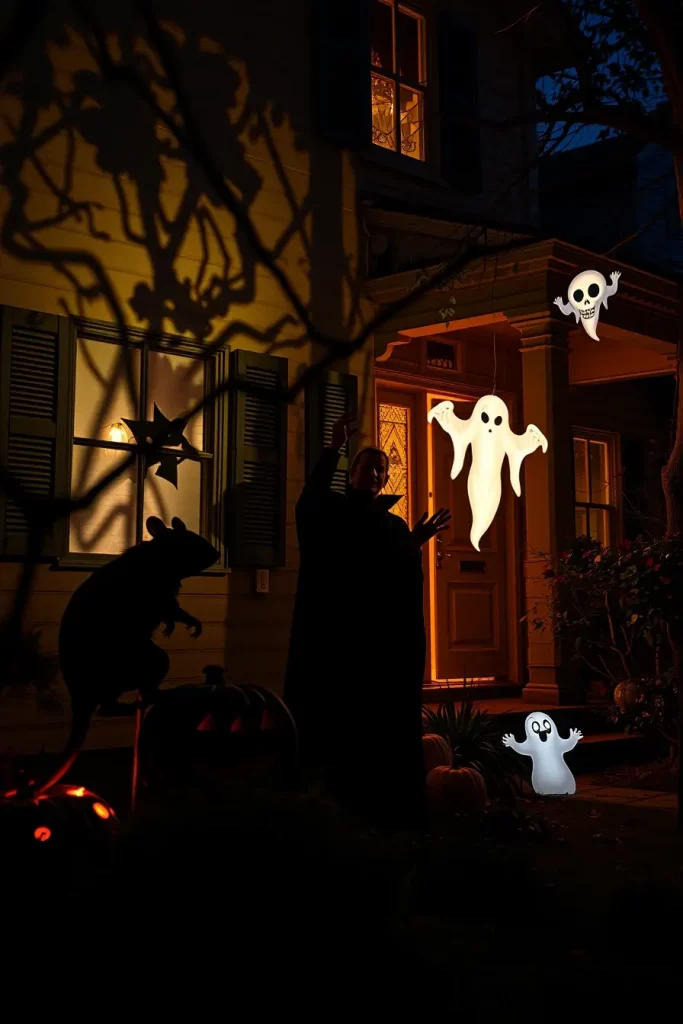
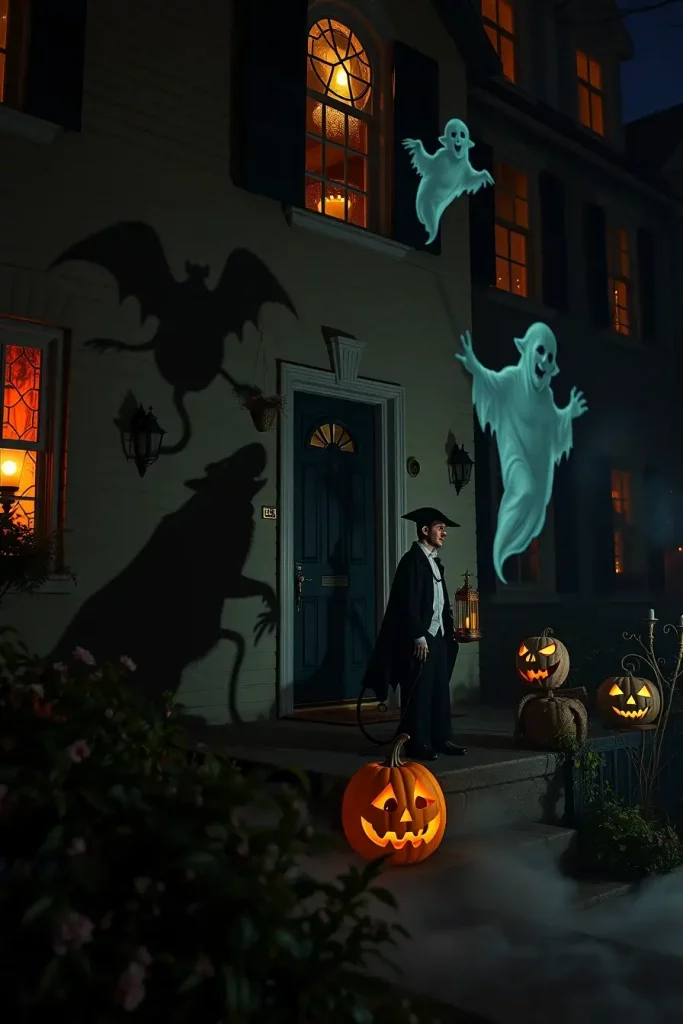
Handmade Ghost Figures For The Lawn
Ghosts are easy but effective- and one of the easiest Halloween DIY yard decorations to make. I employ tomato cages as a base, and cover them with sheer white fabric. The head is a foam ball, and I glue black felt to make the eyes and mouth. I drive a stake through the bottom to hold them against the wind.
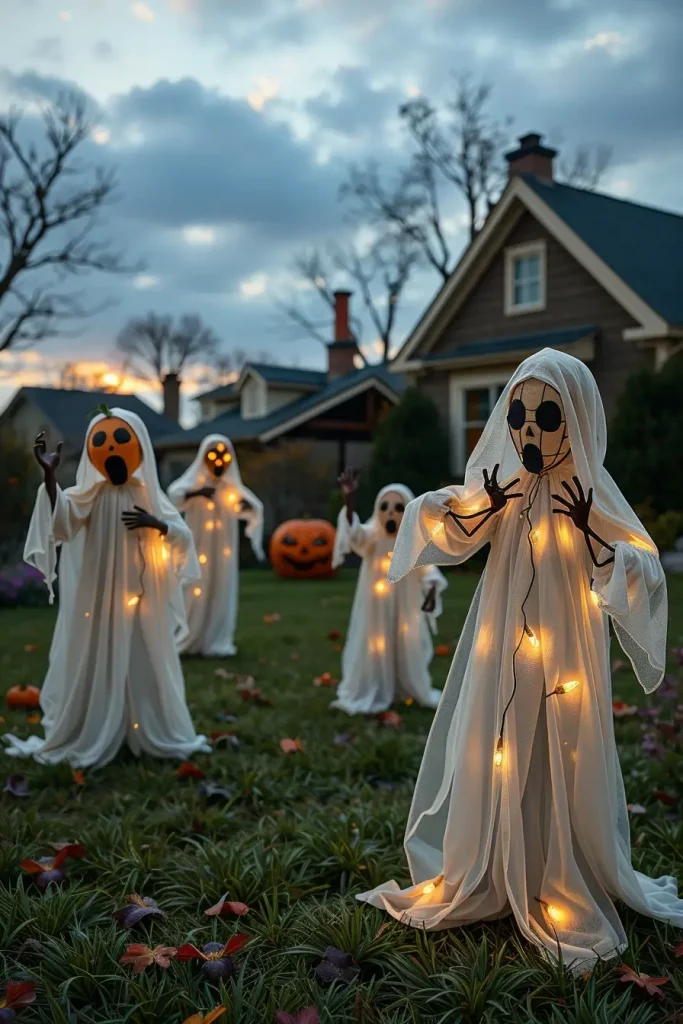
I prefer to mix the size–some of the ghosts are child-size and some are more than six feet tall. To be more realistic, I add bent wire hanger arms so that they can point or reach out. Another innovation I have made in 2025 is to wrap battery-powered fairy lights in the fabric so that they have a glowing, ethereal effect after dark.
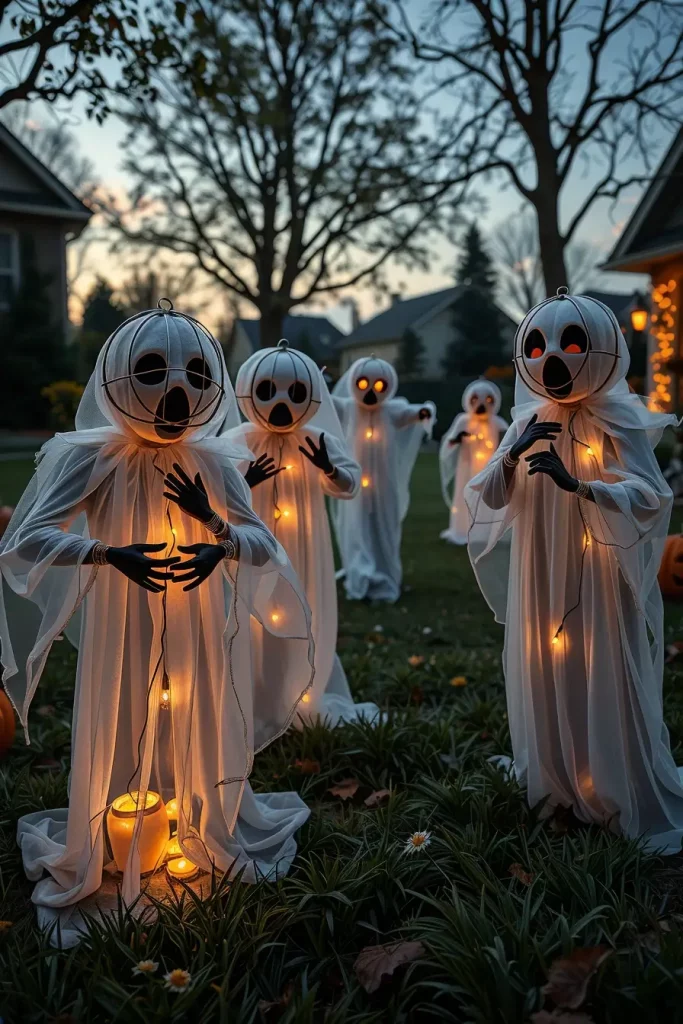
I like that they can be scattered throughout the yard or in theme groups-such as a ghost family reunion or dancing spirits. I really like one of the tips that Better Homes & Gardens give, which is to put a motion-sensor speaker inside one of the figures that will whisper or giggle when somebody passes by. I could then add a floating ghost effect with monofilament and pulley system to add more movement.
Pumpkin-Themed Yard Decor Projects
Halloween is all about pumpkins and I never just carve. In the yard, I spray foam pumpkins in matte blacks, metallic golds and spooky whites, and cluster them in groups of three in different heights with overturned crates and barrels. Stenciled designs or spooky faces can be added so you can forgo carving and still have a detailed appearance.
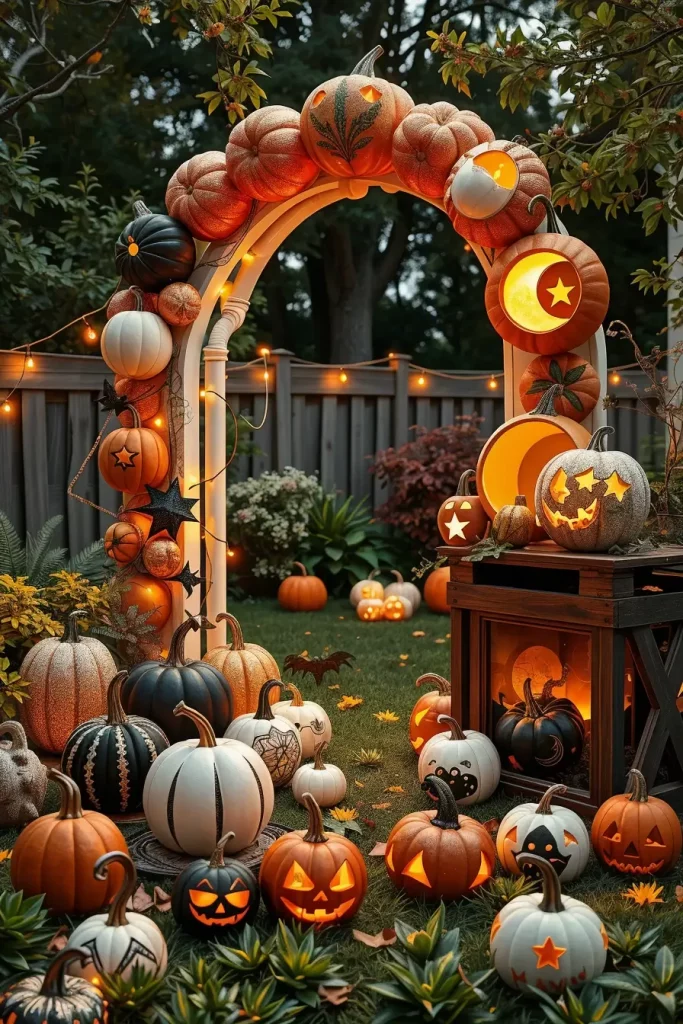
I like a pumpkin archway as one of my favorites. I made it using PVC pipes and zip-tied light plastic pumpkins around it. During the night, the arch has string lights that emit a warm light through carved holes. Smaller pumpkins that have been drilled in the shape of stars and moon serve as lanterns around the lawn.
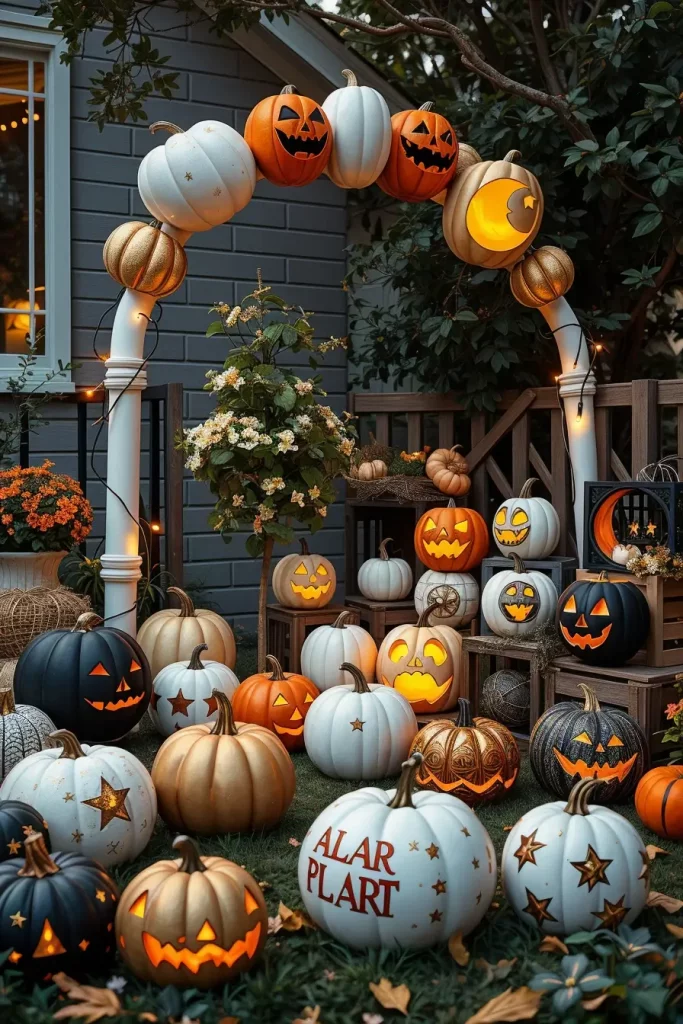
This theme is flexible, either whimsical or dark, your choice of colors. The only thing that is lacking is interactive elements. Next year, I will add a pumpkin witch cauldron, in which a carved pumpkin will be filled with dry ice vapor and lights to create the illusion of brewing potions. That would make the finishing touch to a pumpkin-themed yard.
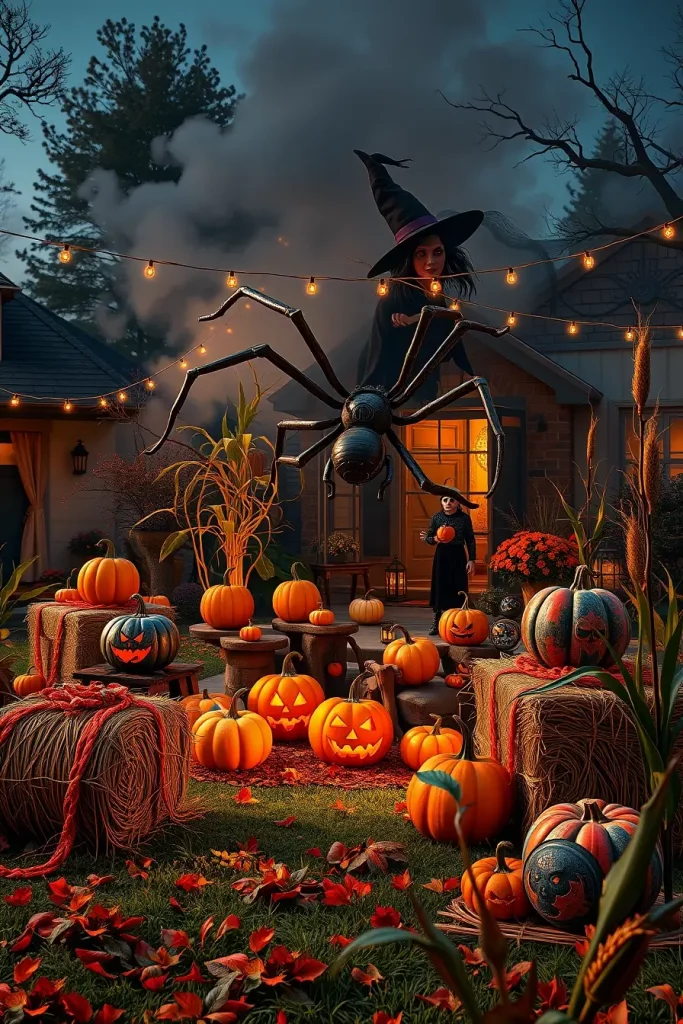
DIY Witch Scenes For Front Yards
When executed well, a witch-themed yard display is a feast to the eyes. I begin with a huge iron-looking cauldron in the middle, which is made out of a repainted plastic planter. I surround it with mannequins covered in cloaks of thrifted black fabric, hats of felt, and wigs of dollar-store yarn. The witches are all differently positioned, one of them is stirring the pot, the other one is pointing at a spell book.
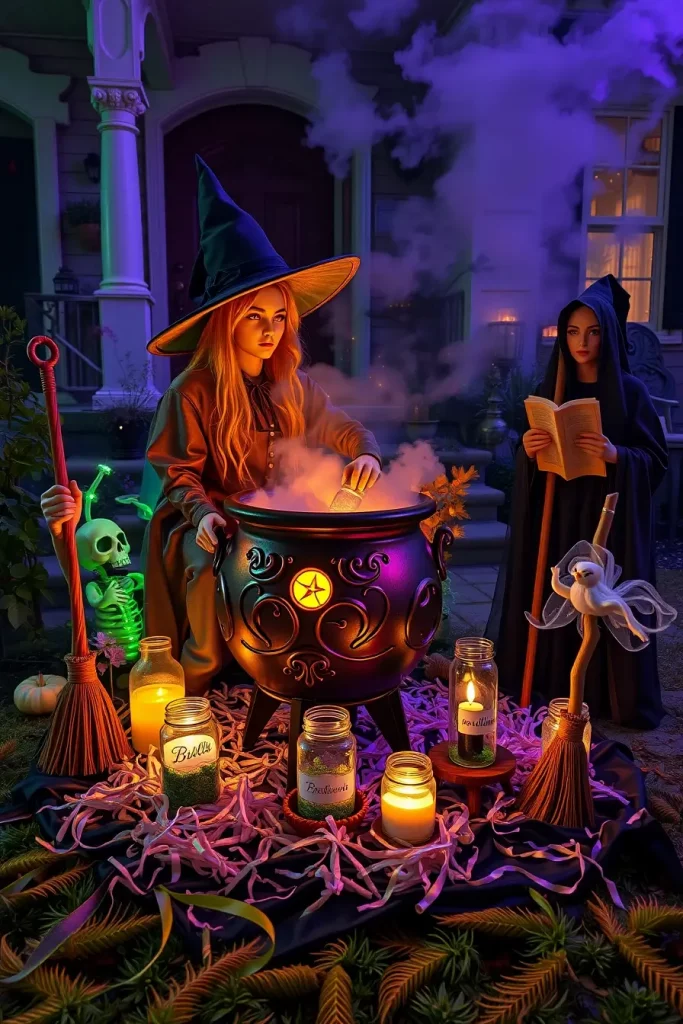
I use props like broomsticks, mason jars converted into bottles of potion filled with colored liquid and creepy labels, and a homemade spell book on a stand. The ground beneath them is littered with torn fabric and fake bones as though something went amiss. The whole display is illuminated by LED spotlights in green and purple that give the display a theatrical glow.
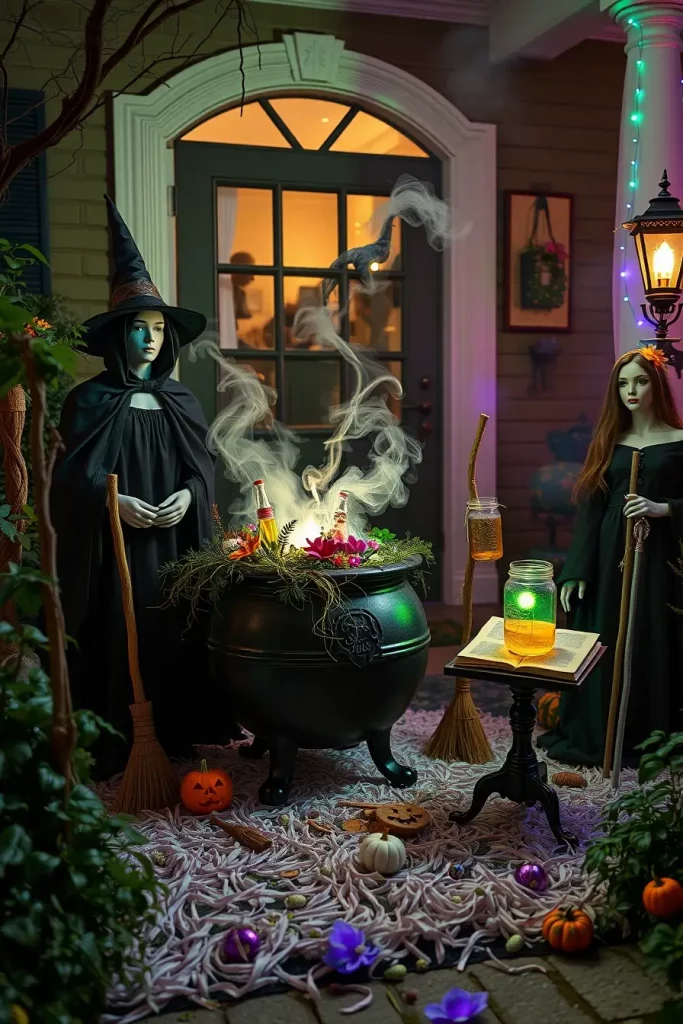
These scenes make a narrative in your yard. I never forget ambient sound, bubbling potions and maniacal laughter via outdoor Bluetooth speakers. My most favorite addition this year was flickering flame-effect bulbs in the cauldron. I would still add some flying witch hats on monofilament lines over the scene to make the magic even more.
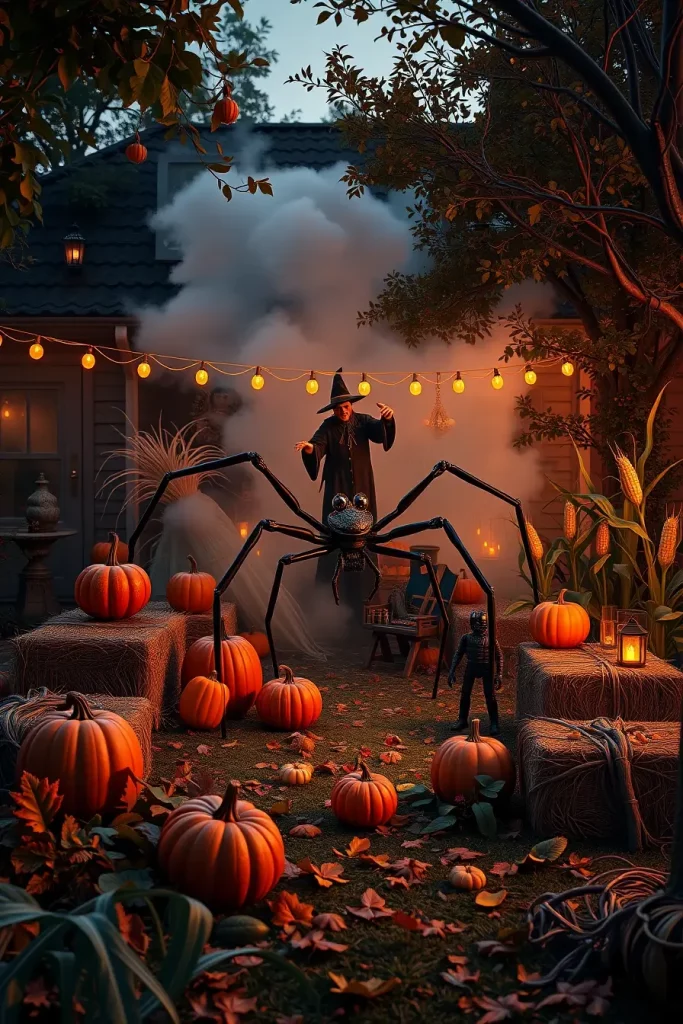
Giant Spider Web Creations
Each year I dare myself to do more, and there is no better way to get noticed than a giant DIY Halloween spider web across the front yard. I make mine out of thick white paracord or weatherproof cotton rope and tie it between porch columns, trees, or fence posts. I make a three-dimensional object that is both striking and creepy by employing a central ring and radiating lines outward like a real spider web.
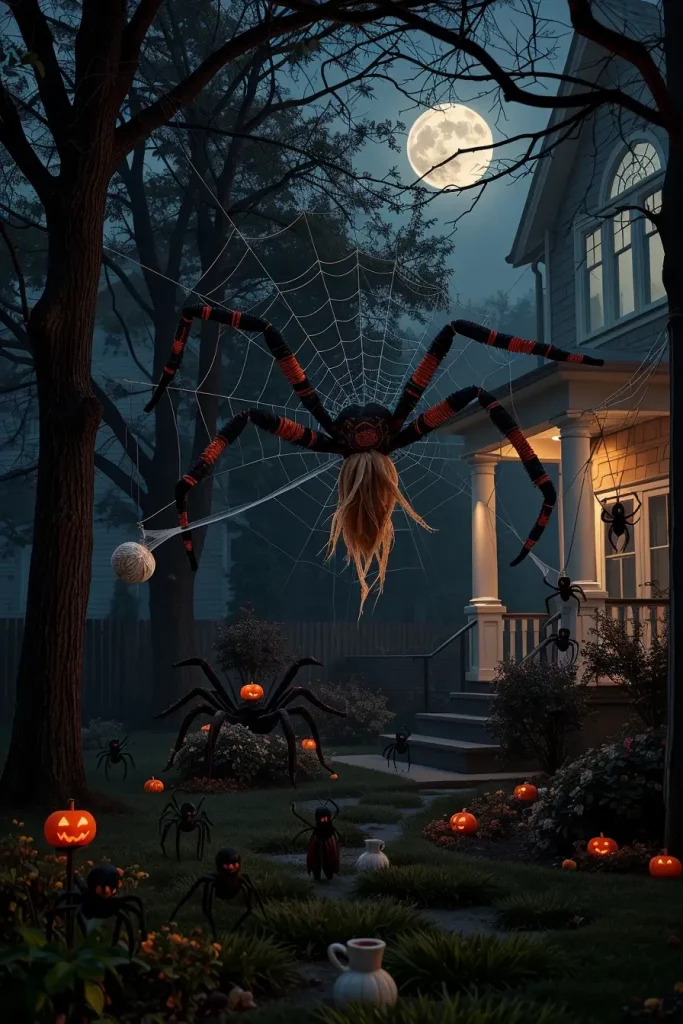
The main attraction, needless to say, is a huge spider. I’ve made several from pool noodles (for legs), a black trash bag stuffed with newspaper (for the body), and googly eyes for a whimsical touch. I put smaller spiders made out of black pipe cleaners on shrubs near the house or on the porch rail. Adding fake webbing material and hanging mini prey figures (like wrapped dolls or faux bugs) completes the setup.
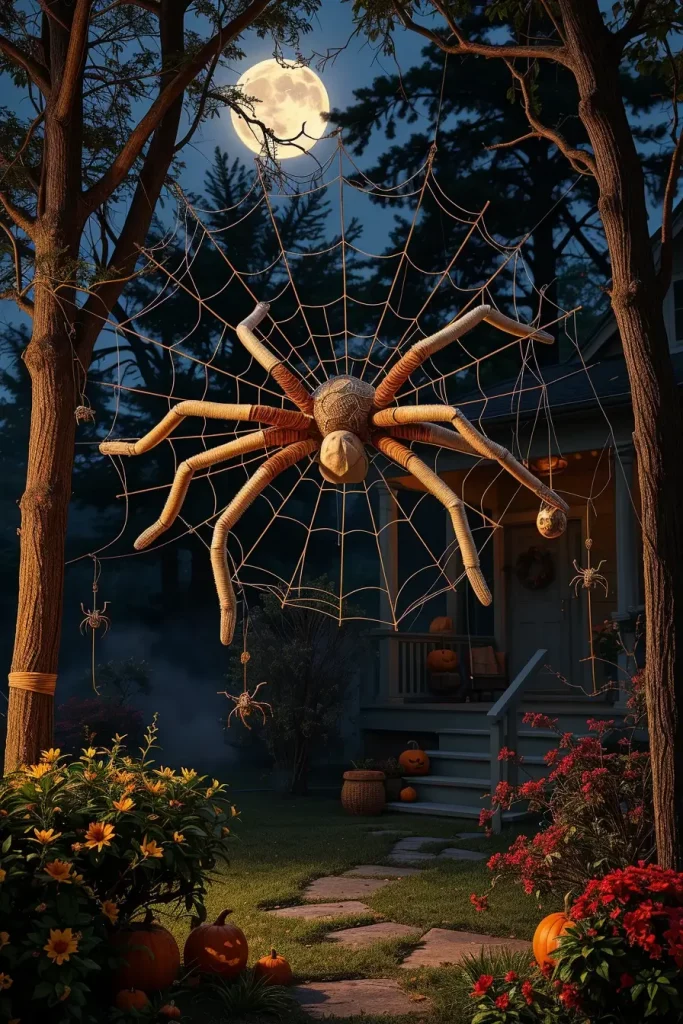
Scale is everything here, I have discovered. A 10 to 15 foot web is cinematic. A pro tip that I have learned in Martha Stewart Living is the addition of subtle lighting behind the web to create dramatic shadows on the house during the night. The only thing I might add to this section would be a secret sound effect of scuttling or skittering to play as someone comes near.
Scarecrow-Inspired Halloween Yard Art
Scarecrows aren’t just for farms—they’re perfect for creepy yard scenes, too. I prefer to make mine myself out of old jeans and flannel shirts filled with straw or newspaper and nailed to a piece of wood. I use burlap sacks, or carved foam pumpkins, with evil faces painted or sewed on, as heads. They are great homemade Halloween yard decorations that can withstand the autumn weather.
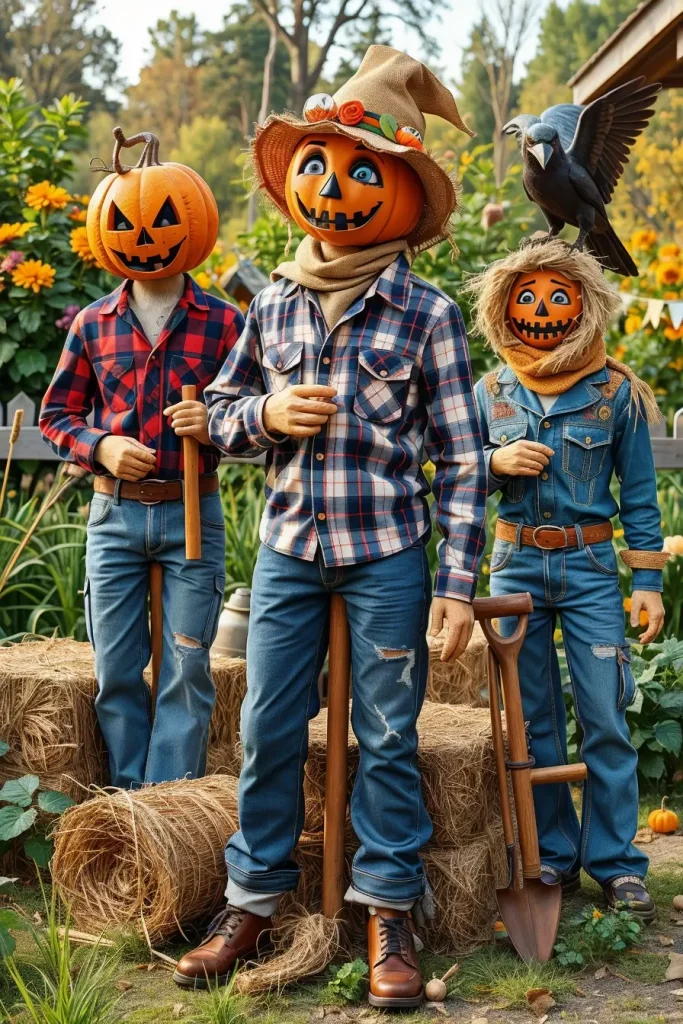
Every scarecrow is given an identity. One may have a rusty shovel and another may have glowing eyes using LED tea lights inserted into the head. To enhance the visual narrative, I have one scarecrow bent over as though protecting a cursed garden and another is in the middle of lunging behind a shrub. It is extra charming to surround the bases with hay bales, broken wheelbarrows, or fake corn stalks.
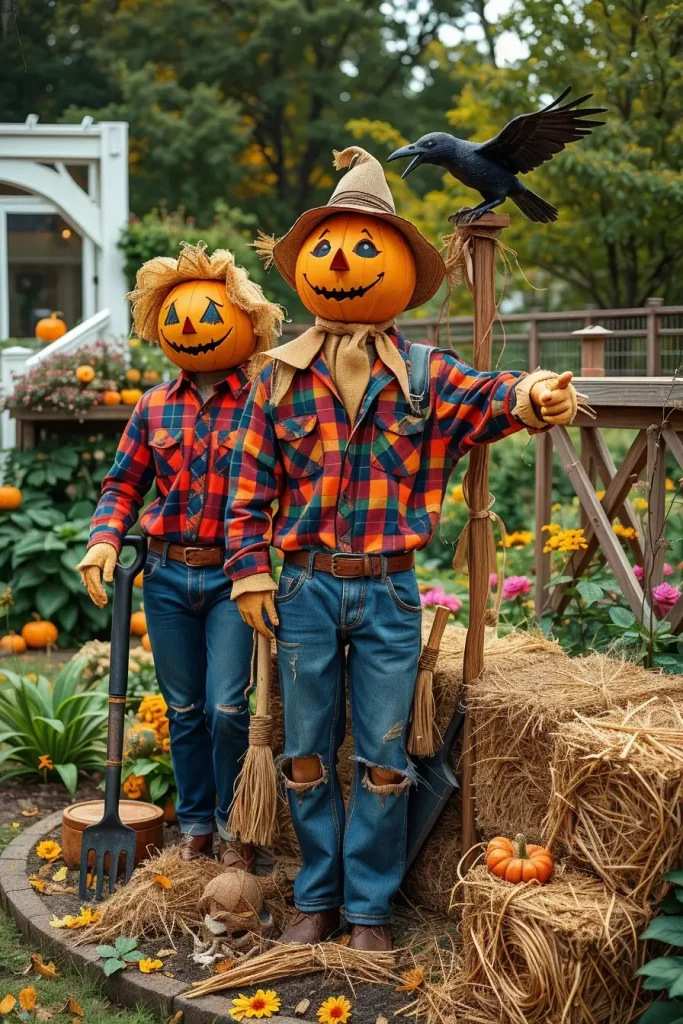
My neighbors never stop asking me how I make mine look so real. I also take care to bend limbs at strange, bent angles–it adds a haunted puppet effect. One of the tips on The Spruce was to have wind chimes with bone or chain sounds in the vicinity, and I tried it and loved it. Next time, I will put a motion-activated crow that caws when someone passes by to get an additional jump scare.
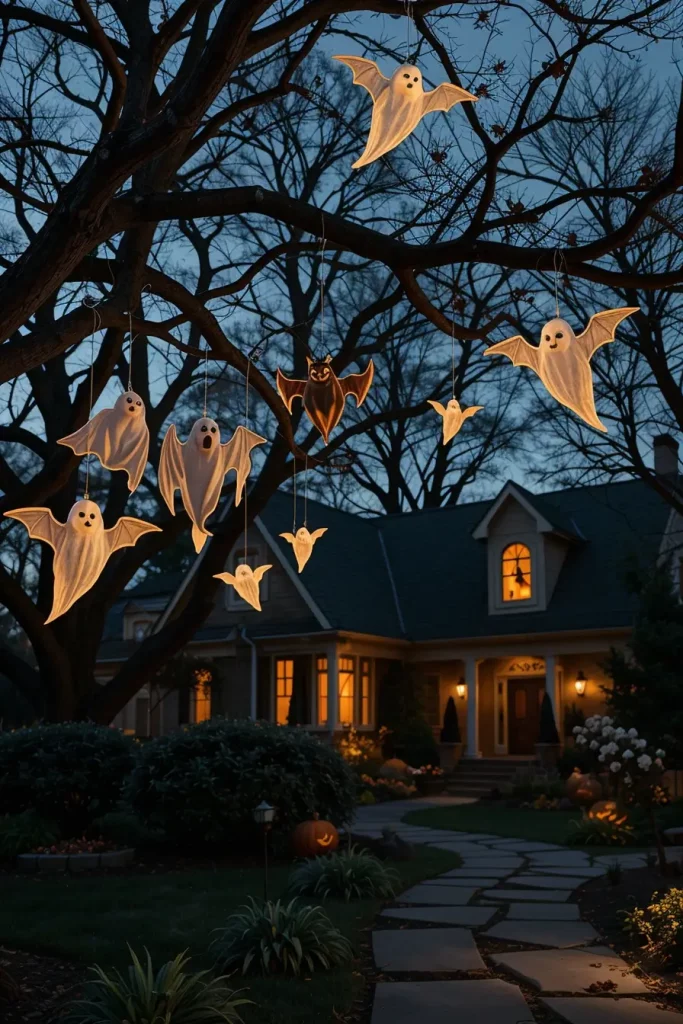
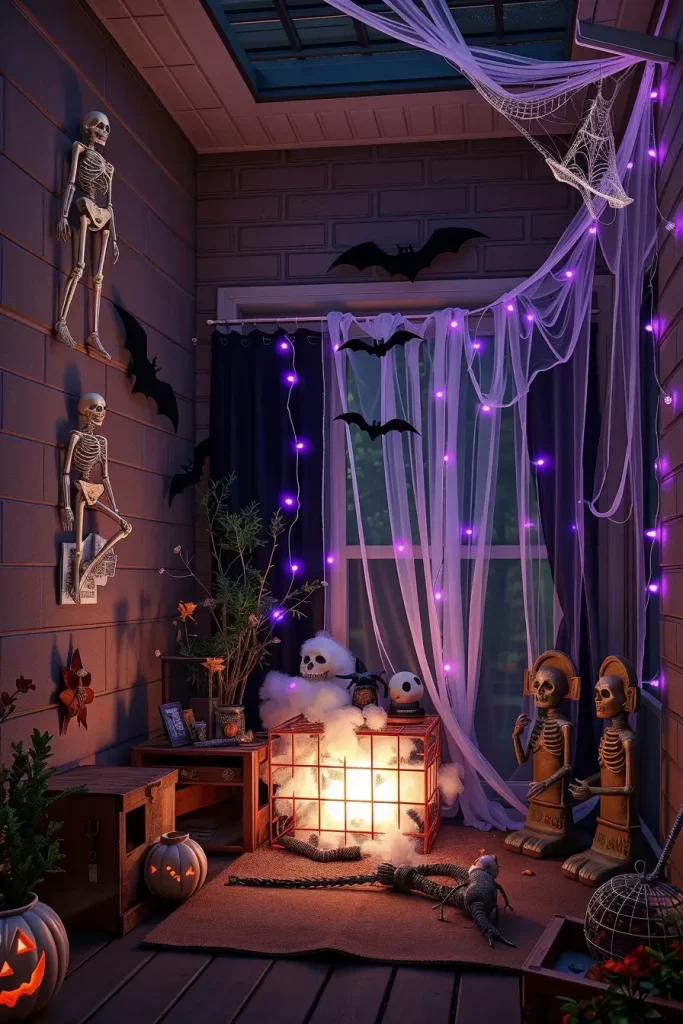
Eerie Tree Decorations And Hanging Props
Halloween yard decor projects are ideal to be performed on trees. I usually begin by wrapping them in gauze or netting dyed gray and black to look like spider webs of the ancient world or shrouds of ghosts. I hang glowing balls of hollow plastic balls wrapped in fairy lights on the branches to give a fairy-like effect at night. Hanging skeletons, bats or witch hats move lazily in the air.
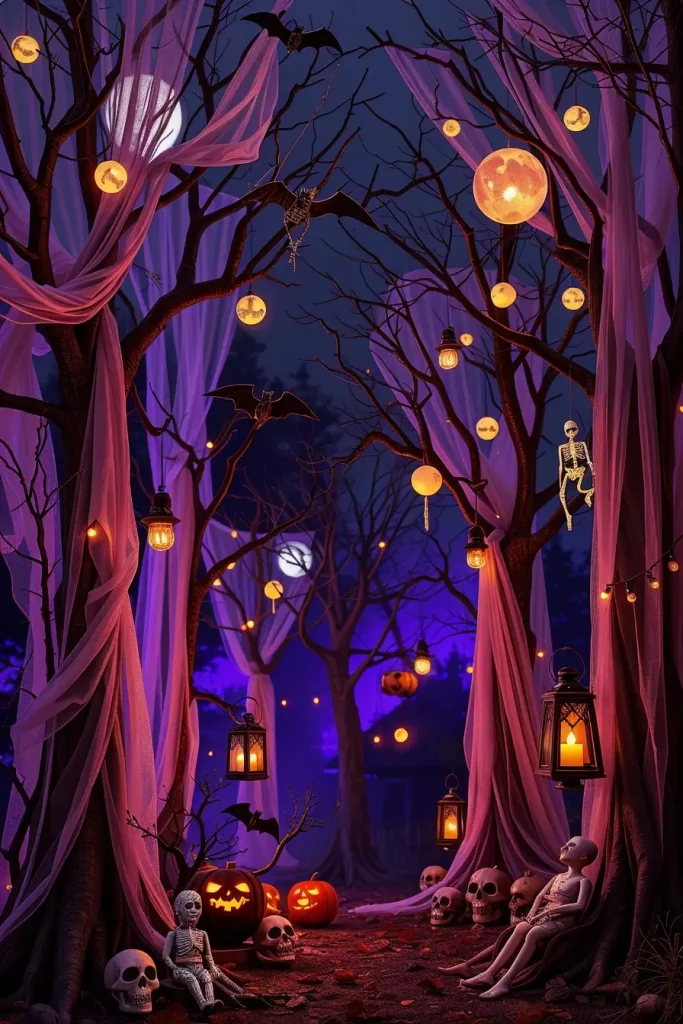
To keep things down to earth, I ring the bases of trees with groups of skulls, bones and flickering LED candles in black lanterns. I also love a hanging cursed doll made out of repurposed toys aged with coffee and painted to appear possessed. This turns into a conversation starter and adds some realism of horror movies to the scene.
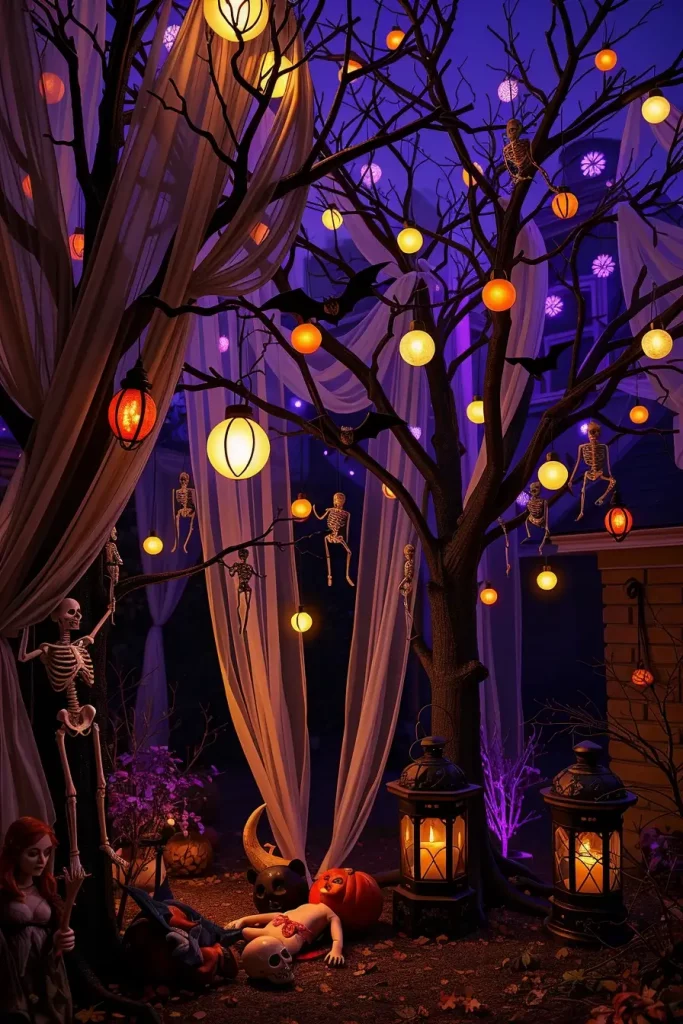
I now know that asymmetry is useful- it is better to decorate one or two trees heavily, rather than attempting to do all of them. Apartment Therapy notes that a few light colors, such as purples, oranges, or blues, will make the appearance look unified and not chaotic. I am thinking of putting in motion lights or strobe effects next year so the hanging props will feel like they are moving even when they are not.
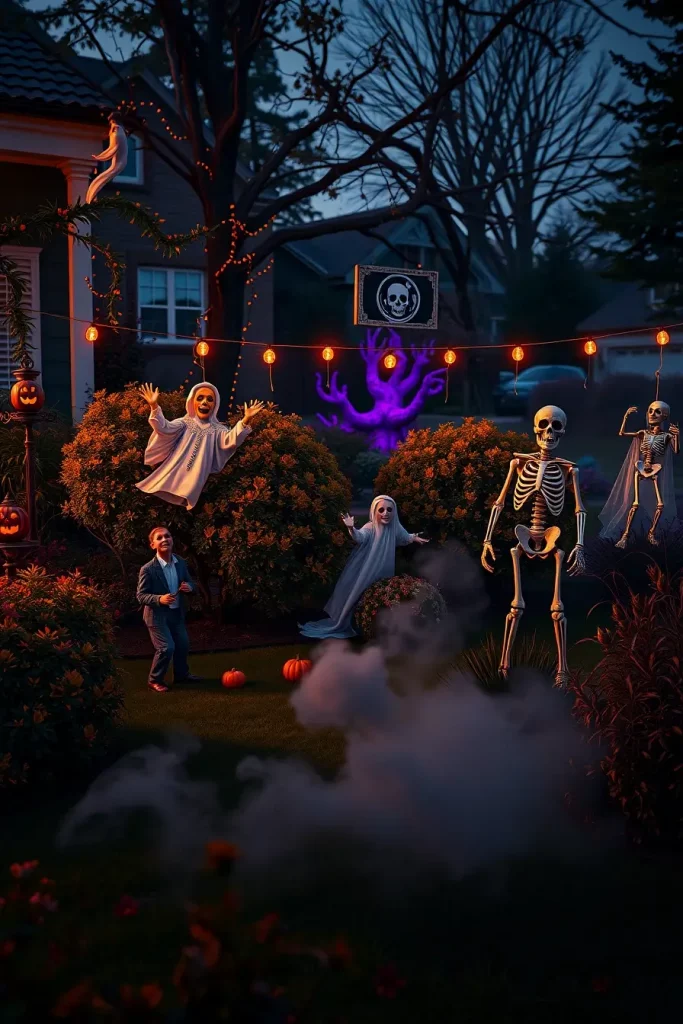
DIY Yard Skeleton Arrangements
In 2025, skeletons are the foundation of most DIY Halloween yard decorations and creativity is the most important. I do not just lie them on the grass, but I put them in comic or disturbing situations. A skeleton may be reading a book on a garden bench, another may be climbing the gutter or sitting at a fake BBQ with a cauldron. I hold joints together with zip ties and wire.
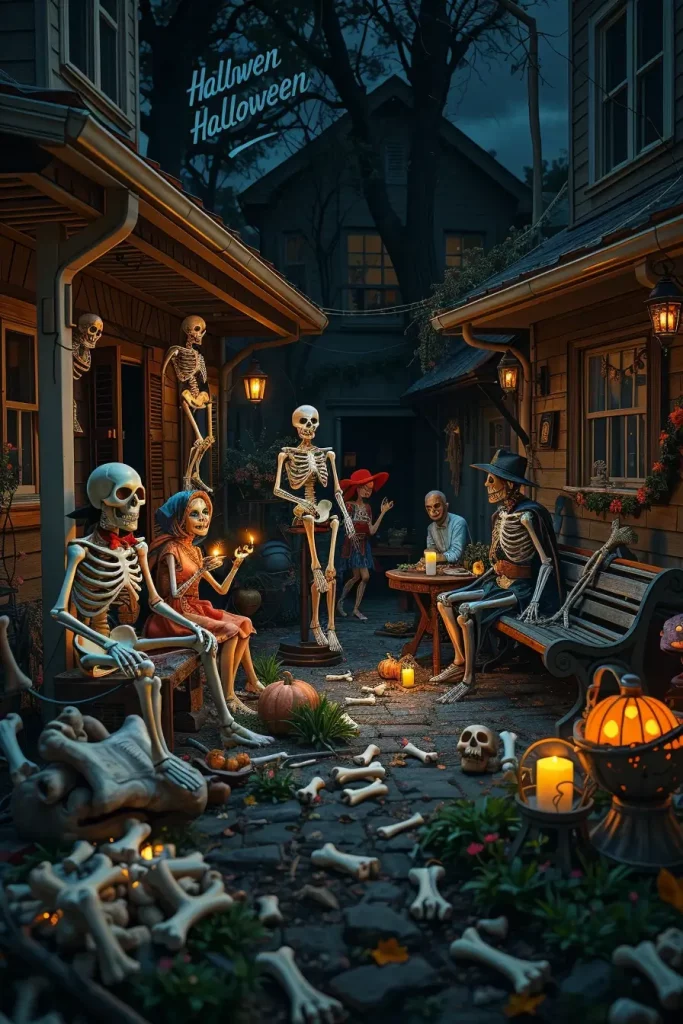
To give these scenes more reality I put skeletons in ragged costumes, a butcher apron with red paint, a pirate hat and eyepatch, or a wedding veil and tux. Lanterns, shovels or broomsticks can be used as props to tell a story. I put bone fragments or skulls in a scattered pattern around each setup to make a more complete tableau.
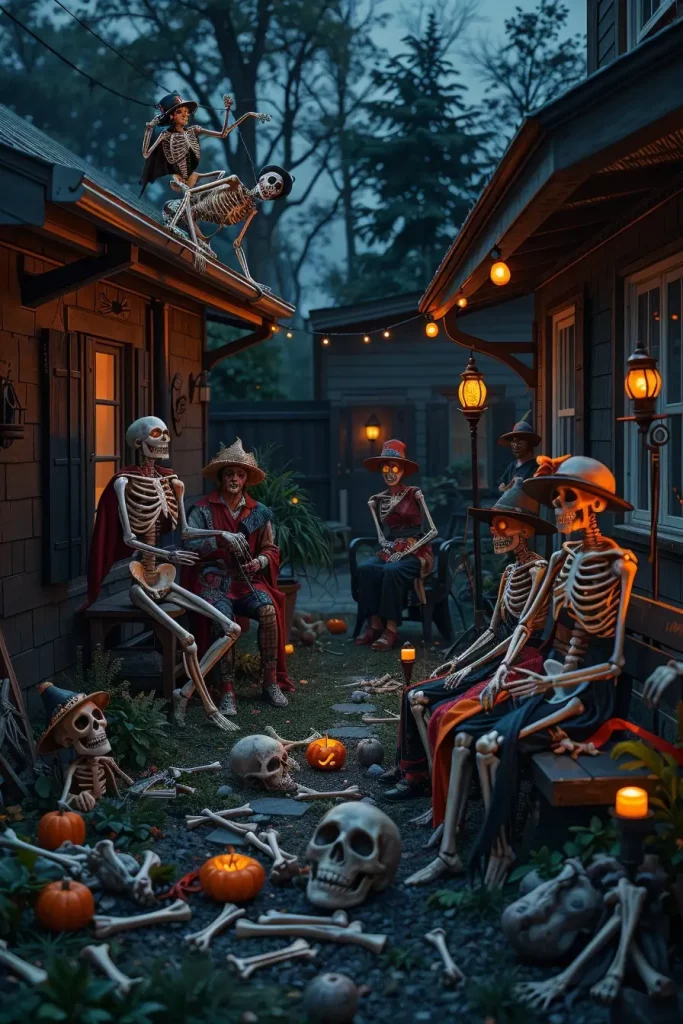
I adore the customization of these displays. Last year I even created a scene of a skeleton selfie with a phone prop and funny face masks. One of the best suggestions I saw in Country Living was to paint the bones with glow-in-the-dark paint so that they could be revealed in the darkness. In case I develop this scene further, I would prefer to include interactive details such as a skeleton band playing music or a scene with moving parts.
Halloween Yard Sign And Banner Ideas
Signs and banners are underestimated, yet they serve as a guide to the guests and create plotlines to your DIY Halloween yard. I do wooden signs in plywood scraps, black painted, and white hand lettered. Such messages as Turn Back Now, Beware, and Haunted Hills Cemetery are among the favorites. I apply a clear matte sealer to make them weather resistant.
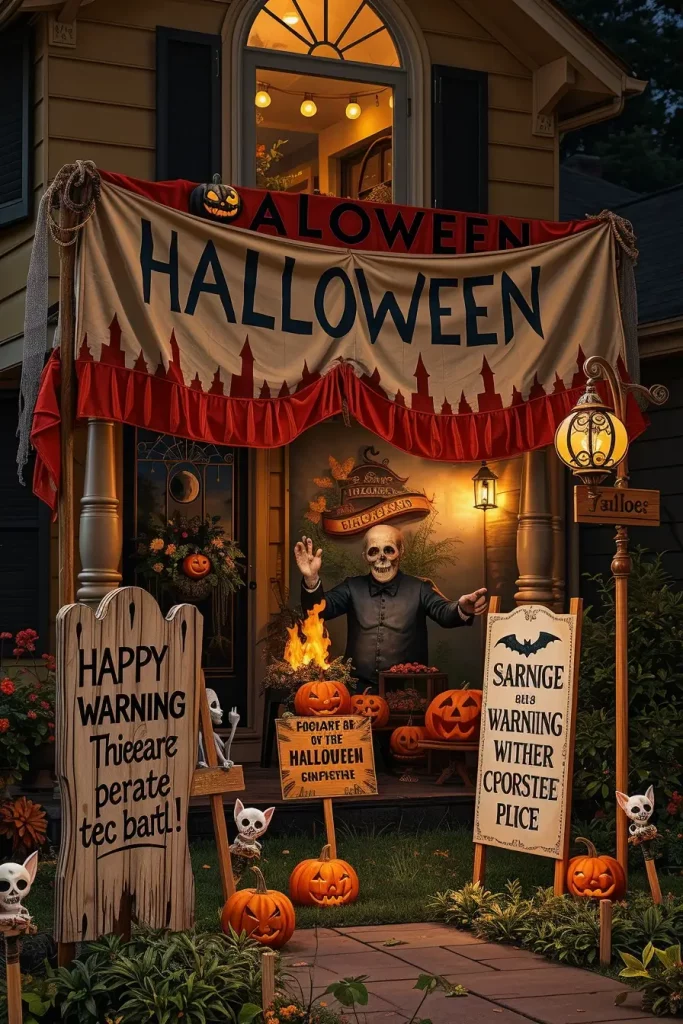
I put signs on stakes, old lamp posts, or fences, and I also add hanging banners stretched across the porch that say, “Welcome Foolish Mortals” or “Witchs Lair.” Fabric banners that have frayed edges are lovely in the wind and create movement. I went so far as to use old bedsheets and fabric paint to make larger, mural-type warnings on the garage door.
The advantage of signage is that it ties your entire yard theme in place. Halloween, haunted mansion, witch coven, zombie outbreak-it all creates context. I follow DIY Network’s advice to layer signs at different heights and angles. I would like to play around with glowing lettering with EL wire next year to be visible in the dark.
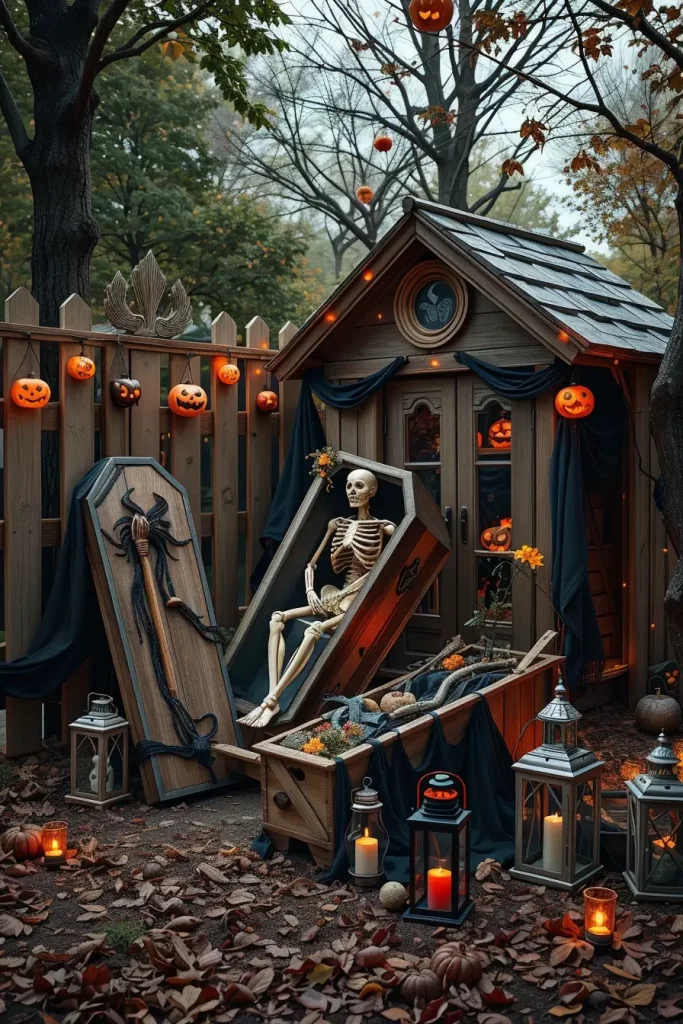
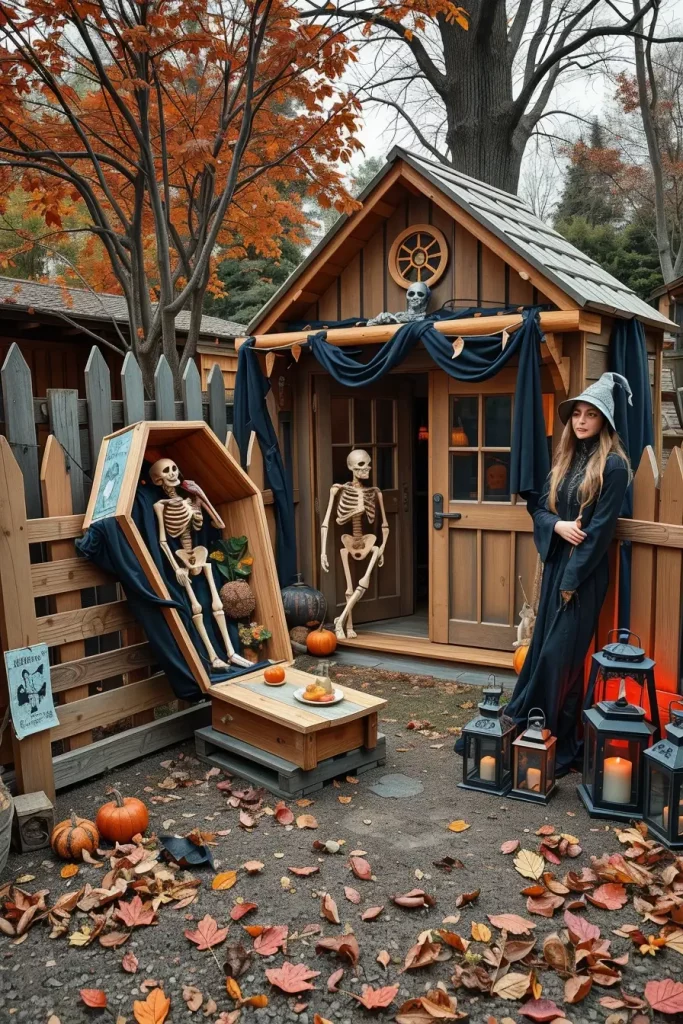
Homemade Coffin And Tombstone Displays
I am fond of the drama a DIY coffin adds to a front yard. I make my own out of plywood and old pallets, cut into the old-fashioned coffin shapes and nailed together with rustic screws. I mar the surface with black and brown paint and then put cobwebs and hinges on it so that it looks old. Other years I crack the coffin open and have a skeleton crawling out to add a little more drama.
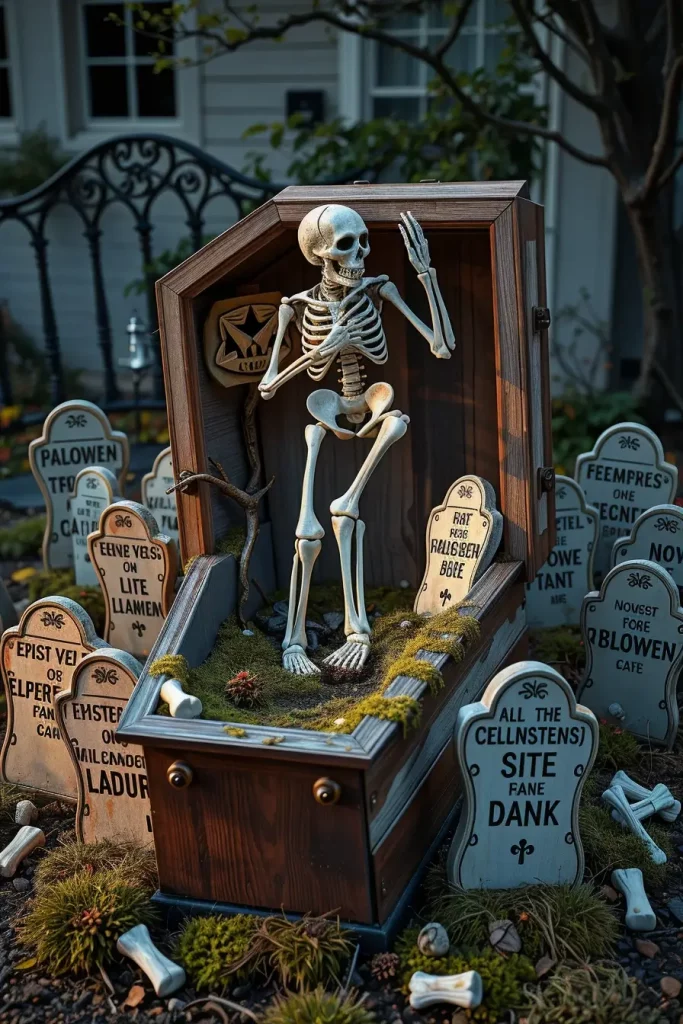
Together with the coffin, I use tombstones made of foam insulation board. I cut names such as I.M. Gone or Boney Stark and make each one different in shape. Then I paint them gray and use a dark wash to bring out cracks and crevices. I sprinkle artificial moss and bones in the bottom and light them up beneath.

An artistic coffin will immediately become the center of attention of any yard. A trick I learned on This Old House was to put a hinged lid on something to scare a guest with a jump-scare skeleton. Next year I am thinking of including a complete grave digger animatronic to be placed next to the coffin to further the story.
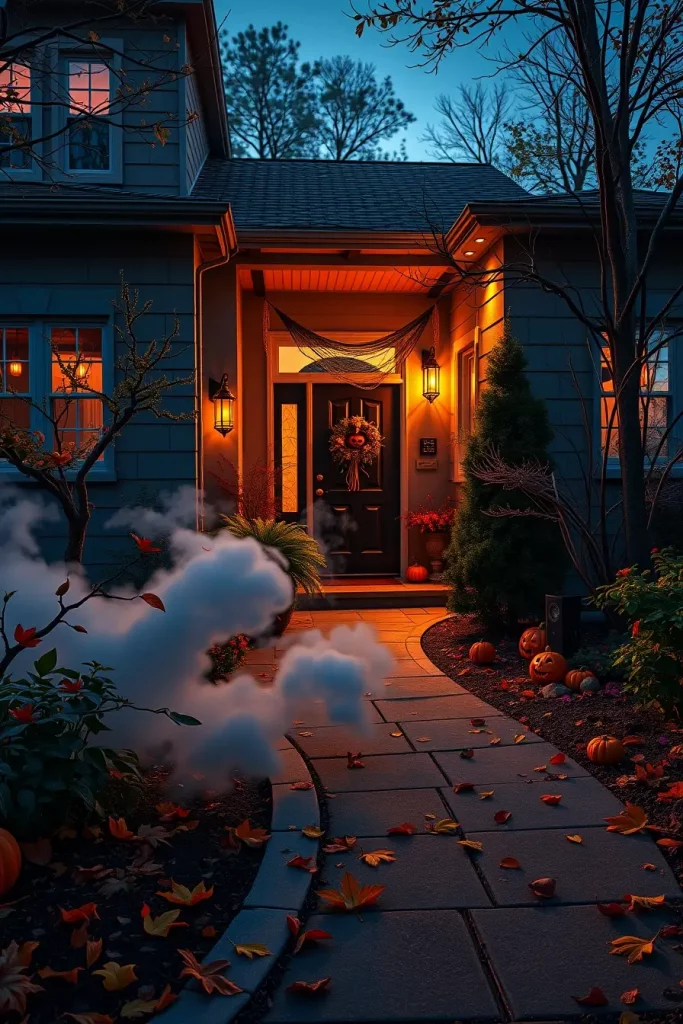
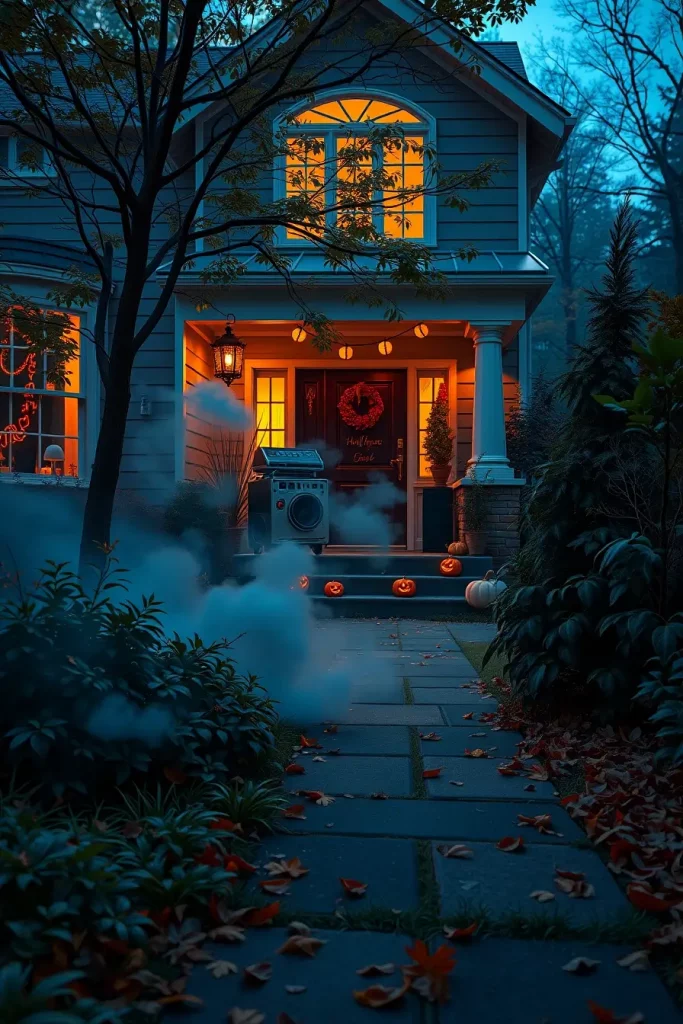
DIY Fog Machine Effects For Yards
Fog is a must in any Halloween yard. I have a standard fog machine set up close to the graveyard or entrance and I place it on a milk crate so that the fog is evenly distributed. I usually control the fog with PVC tubing to make it go to certain places such as the mausoleum or the skeleton set up.
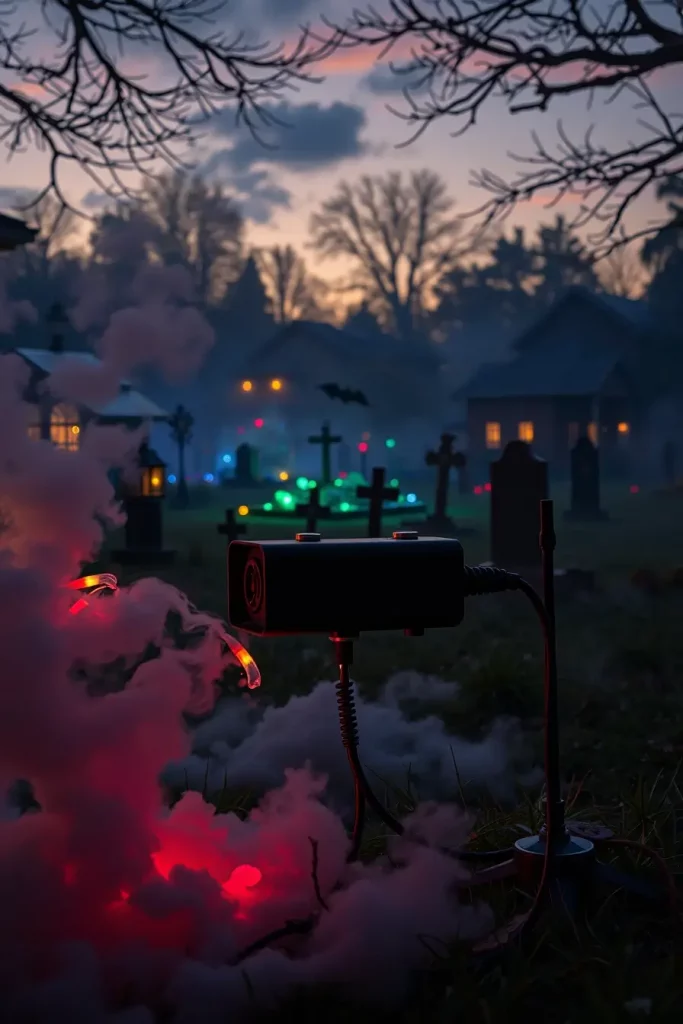
I also include a homemade chiller box with ice and tubing to keep the fog down low to the ground- this makes the mist stick to the lawn rather than rise up. To be safe and in control I have a smart plug to switch the machine on and off through my phone. I also put it on a timer so that it can be consistent all through Halloween night.
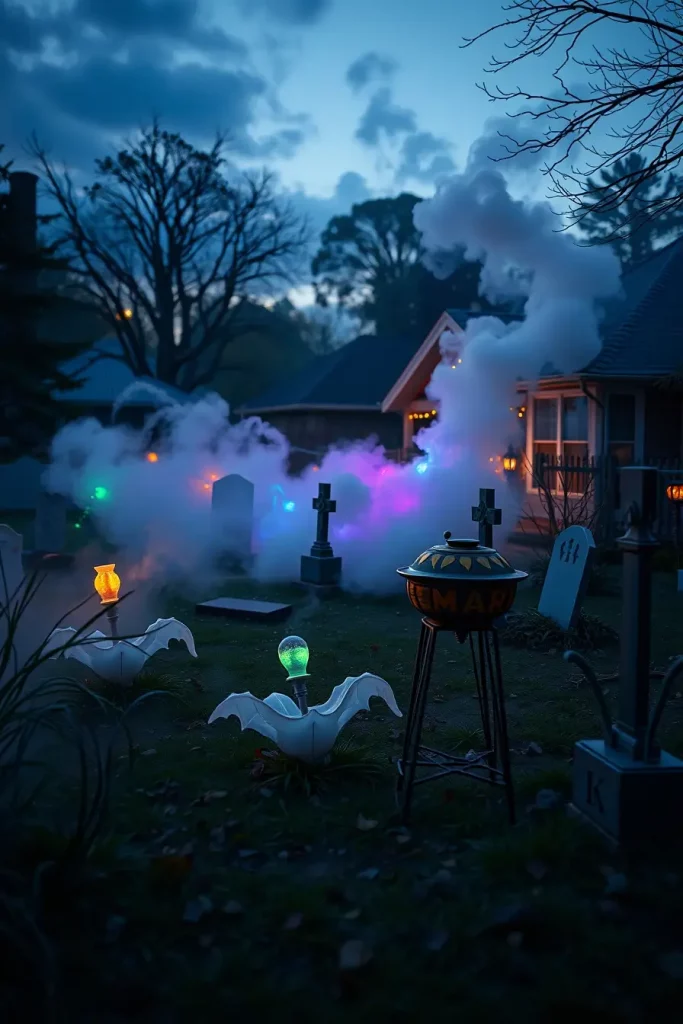
Fog gives cinematic depth to all the other decorations- it emphasizes lighting, smoothes sharp edges and creates a theatrical atmosphere. Popular Mechanics suggests thicker output by adding food-grade glycerin in the fog fluid, which I have found to work. A modification I would like to make next is colored LED lighting within the fog stream to complement the theme of the yard.
Creepy Soundscapes For Outdoor Haunts
Sound is an important part of atmosphere when creating an immersive Halloween yard. I will always begin with ambient audio since it prepares the stage even before the decorations are seen. In 2025, the trend is layered, high-fidelity soundscapes that resemble a forest, haunted mansion, or underground crypt. I hide Bluetooth speakers in bushes or under porch steps to provide the surround-sound effect that is subtle and spine-chilling.
There are strategic elements in each audio set up. One of the speakers in the bushes murmurs low groans, and the other one in the walkway makes the sound of distant footsteps or rustling leaves. When you are using directional soundbars or weatherproof Bluetooth devices, you can isolate effects and make illusions of movement. Sound-activated props that turn on when they hear a sound are also a great idea I would suggest trying out- this is a technology that can revolutionize DIY Halloween yard decorations.
I personally like to use old school horror mixes with thunder claps and werewolf howls, but I like to layer it over more subtle sounds such as dripping water or shuffling feet to make it sound more realistic. Better Homes & Gardens explains that dynamic ambient sound has the ability to enhance any outdoor display at a minimal cost. Just remember to test your volume levels at night to avoid complaints from neighbors!
To make this even better, I’d add low-lying fog and strobe lighting synchronized with the audio. That would finish the sensory effect and make the whole yard seem lively.
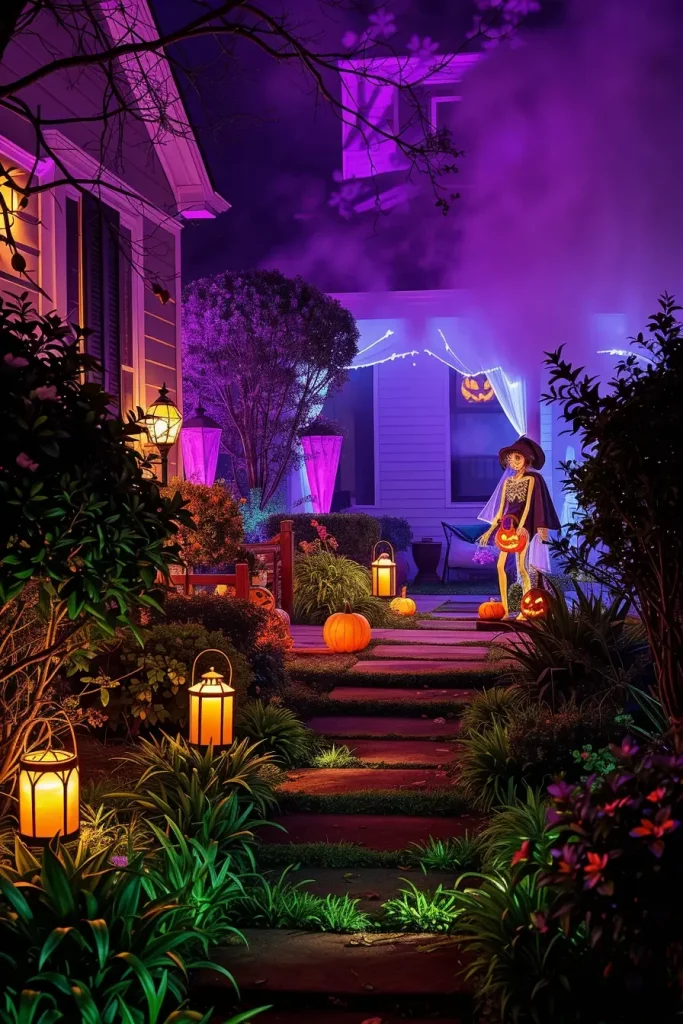
DIY Jack-O’-Lantern Light Installations
Pumpkins are Halloween standards, but I enjoy going beyond the porch. I make clusters of jack-o-lanterns on the lawn, on the fencing, and even on tall poles. LED puck lights or fairy string lights inside each one provides that fiery glow without the risk of fire. It is a must in my home-made yard Halloween decorations and it never fails to attract attention.
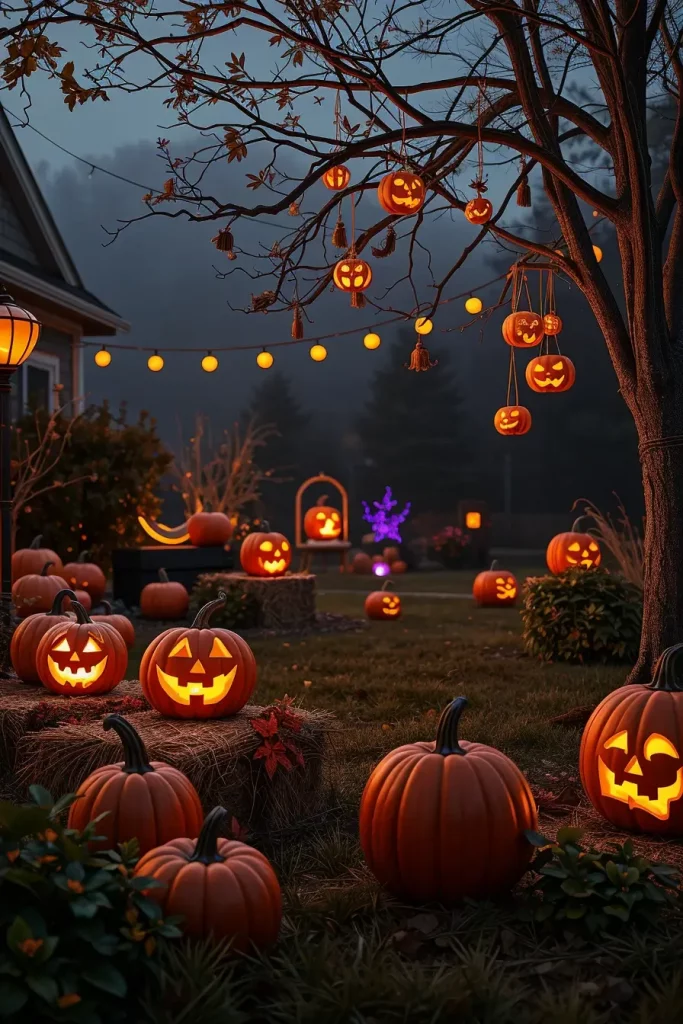
I work with real and faux pumpkins on these installations. The diversity is achieved by carving a combination of traditional scary faces with more contemporary, innovative designs, such as geometric cuts or skeletons. I also stack them by size: the large pumpkins on the ground, the medium-sized ones on hay bales and the smallest ones as lanterns on tree branches. I prefer orange-and-purple string lights or flickering LEDs that are battery-powered and look realistic at a distance.
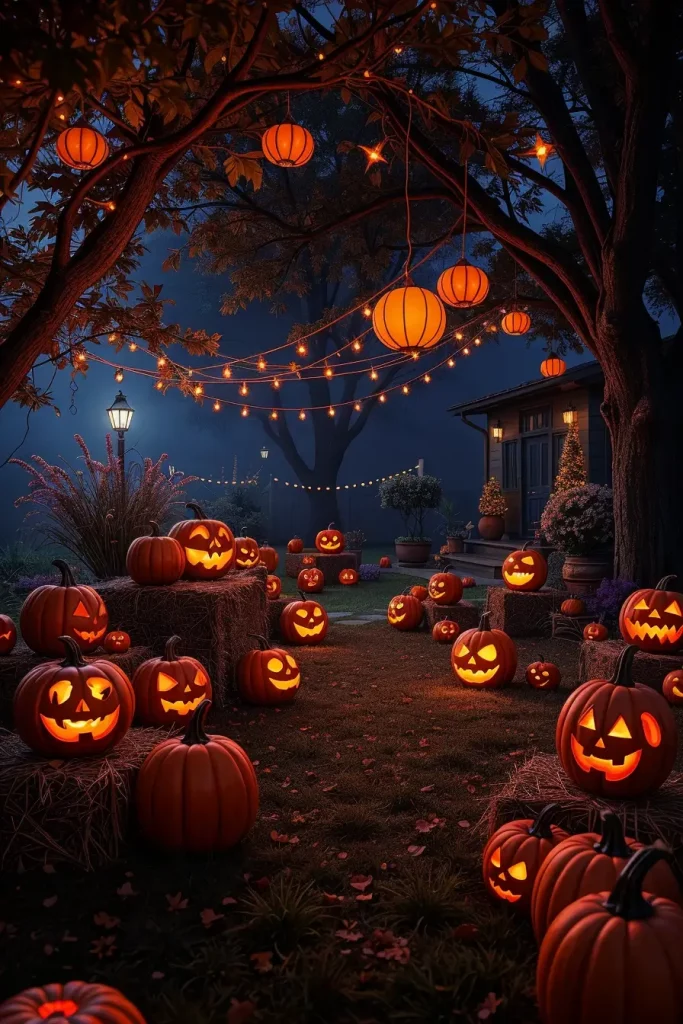
As one can learn through experience, the more asymmetrical and chaotic the arrangement, the more interesting it is to look at. The design team of Martha Stewart suggests carving pumpkins on black iron stand to create contrast and height and I totally support this idea as it gives your display elegance and height.
I would also recommend putting moss or black fabric beneath the groupings of pumpkins to ground the visuals. It gives depth and makes the display more textured and layered.
Creative Pallet And Wood-Based Yard Props
Reclaimed wood and old pallets are ideal to make spooky Halloween structures. I have built creepy fences, DIY coffins and even a tilted facade of a witch shack in my yard using them. Not only does this kind of set up use recycled materials, it adds a hand-built authenticity to your scene. And the best part of it all–it is cost effective.
I usually strip pallets and re-build them in a distressed finish. An easy black-and-gray dry brush aging technique makes the wood look old in a snap. Props- I will nail some slanted coffin with a skeleton sticking out or stack pallets to make fake gravestones or barricades. You may even make a scarecrow cross out of the posts left over and dress him in torn flannel.
This rustic style evokes to me the designs you would see in Spirit Halloween store set ups, industrial, dirty, and detailed. Pallet-based props, when combined with other aspects such as cobwebs and red LED lights, create a haunted farm atmosphere, which is very fashionable in 2025.
To go one step further, I would place flickering lanterns at the bottom of the wood props so they could be seen at night and cast dramatic shadows.
Glow-In-The-Dark Halloween Lawn Features
Lighted ornaments are a stopper at night Halloween parties. I also enjoy painting rocks, skeletons and signage with glow-in-the-dark paint throughout the yard. The greatest thing about it? They are normal during the day, but at night they are illuminated in creepy green or electric blue colors.
The trick is location. I usually draw phantasmal footsteps on the path, glowing bones protruding through the lawn and haunted eyes peering through hedges. UV reactive paint is fantastic when used under blacklights and you can easily attach them to the railings of your porch or the trunks of trees. And when you use foam boards or plastic skeletons, a couple of coats of phosphorescent paint will do.
One time I cut out glowing ghosts out of foam and poked them into my flower beds. It was creepy and adorable. HGTV claims that one of the most effective ways to make a wow-effect in any Halloween yard is to layer UV-reactive decorations with concealed blacklights.
Given the extra space, I would certainly add some glowing signage, such as a sign to a haunted inn or graveyard, hung between two trees to make the yard more immersive.
Animated DIY Props For Spooky Effects
The difference between simple decor and full immersion yard haunts is animated props. I make my own with motion sensors and simple motors- swinging ghosts, twitching zombies or spinning witches on broomsticks. These homemade Halloween yard decorations do not need to be expensive, particularly when you reuse the materials of the old projects.

An example is that I created a shaking tombstone using an old oscillating fan motor. I have also reused talking Halloween candy bowls as sound activated zombie heads peeking out of bushes. It takes some creativity to turn such things as PVC pipe, duct tape, and old clothes into frightening scenes.
My neighbors are still telling about how I set up a crawling skeleton last year that would move toward anybody who stepped on the front path. The Spruce suggests using these props along with sound effects and low light to create tension- and I couldn’t agree more.
To extend this idea I would include a light-sensitive trigger that will only trigger animations after dark, so that the yard has a living quality that changes with the time of day.
Halloween Yard Projects Using Recycled Materials
The concept of sustainability collides with horror in one of my favorite decoration styles recycled materials to make Halloween builds. This is not only environmentally sound but also cost effective and provides a raw creepy look. Broken tools, cardboard boxes and plastic bottles are ideal foundations of innovative yard designs.
I have made gravestones out of cardboard painted with stone spray paint, ghosts out of old bed sheets, and limbs of monsters out of pool noodles and plastic grocery bags. Even broken umbrellas can be turned into collapsed bat wings! It is all about texture and contrast, paint, fabric, lighting, to transform trash into treasure.
Weathered, beaten-up materials are spooky in themselves. I remember Apartment Therapy advising that even simple props can be made to feel haunted by the use of aged textures. I have been doing the same and never miss tea marks or burn marks to be more realistic.
To go even further, I would add a recycling bin display that is possessed, arms or slime oozing out, and make sustainability part of the theme.
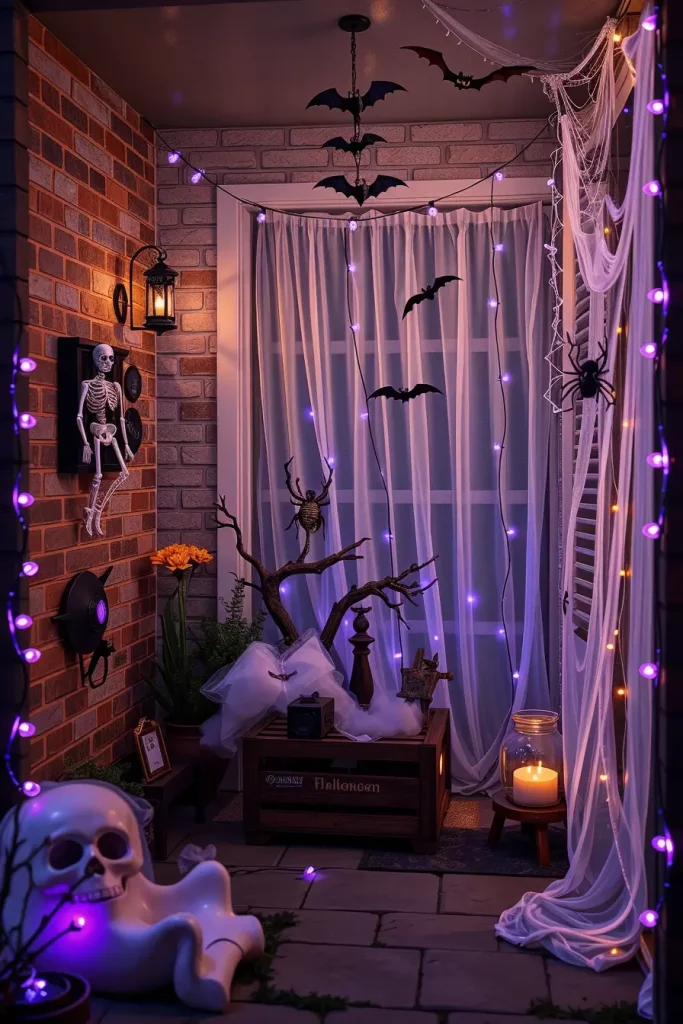
DIY Hanging Bats And Flying Creatures
Decorations that are suspended are the best way to generate aerial tension. I never fail to hang bats, ghosts and witches on the branches of trees and on porch rafters to give motion and surprise. In 2025, I’m experimenting with translucent fishing line and lightweight materials to make flying creatures look like they’re gliding in mid-air.
In my case I make winged silhouettes on foam board, spray them matte black and bend the wings to add depth. I stagger them at varying heights with eye screws and monofilament on the branches. I have some hanging upside down, too, like real bats, under the awning. Cheesecloth or gauze ghosts are a great touch blown around by the wind and they provide that haunted forest effect.
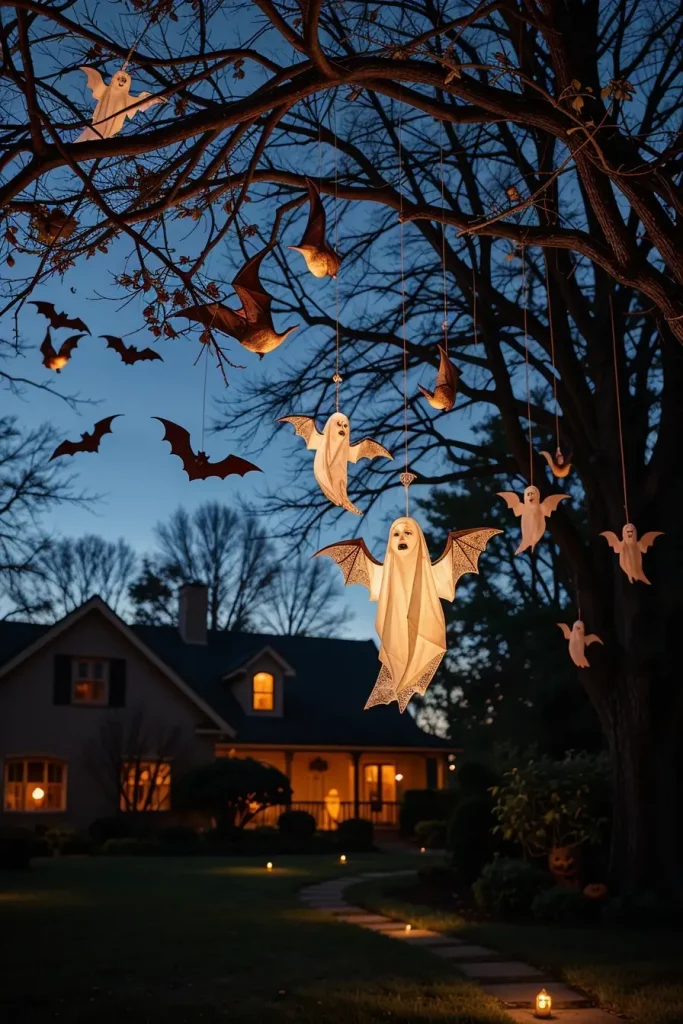
Country Living professionals recommend variable heights and threes groupings to create a visual effect. I have followed that suggestion and began to make small groups of flying bats to give more movement to them.
To make this even more dramatic I would introduce some subtle uplighting beneath to cast creepy bat shadows on the house facade or the trees.
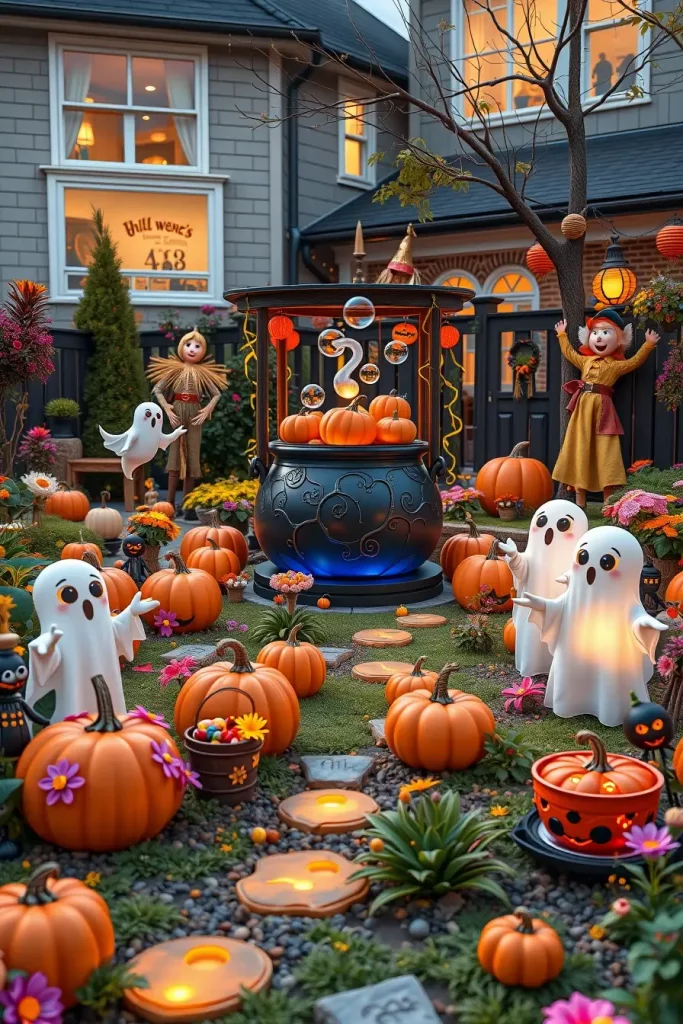
Cauldron And Potion-Themed Outdoor Scenes
Bubbling cauldrons and potion set ups in a yard display have a timelessly creepy feel to them. In my Halloween designs, I always attempt to set aside a corner of the lawn or porch to a complete witch brewing station. It assists in creating a storyline, which is critical in Halloween yard decorations. To resemble an open flame arrangement, I put a huge fake cauldron on a firewood and brick platform, and surround it with bottles of glowing potions and creepy labels.
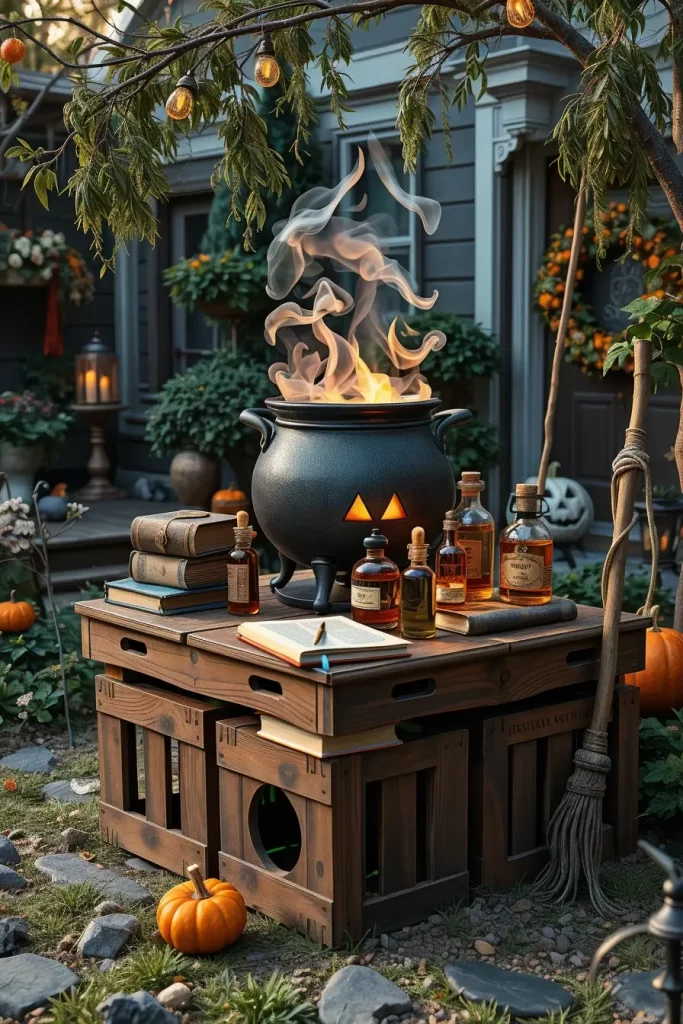
I add DIY potion jars of recycled glass bottles with colored water and glow sticks. Putting them on shelves or crates around them gives depth. I have put expanding foam (black-painted) in my cauldron and inserted green LED lights into it to make it look like bubbling slime. Faux spellbooks, herbs strung up, and a broomstick finish the scene. Sometimes I will put a speaker in there with witchy cackles and bubbles.
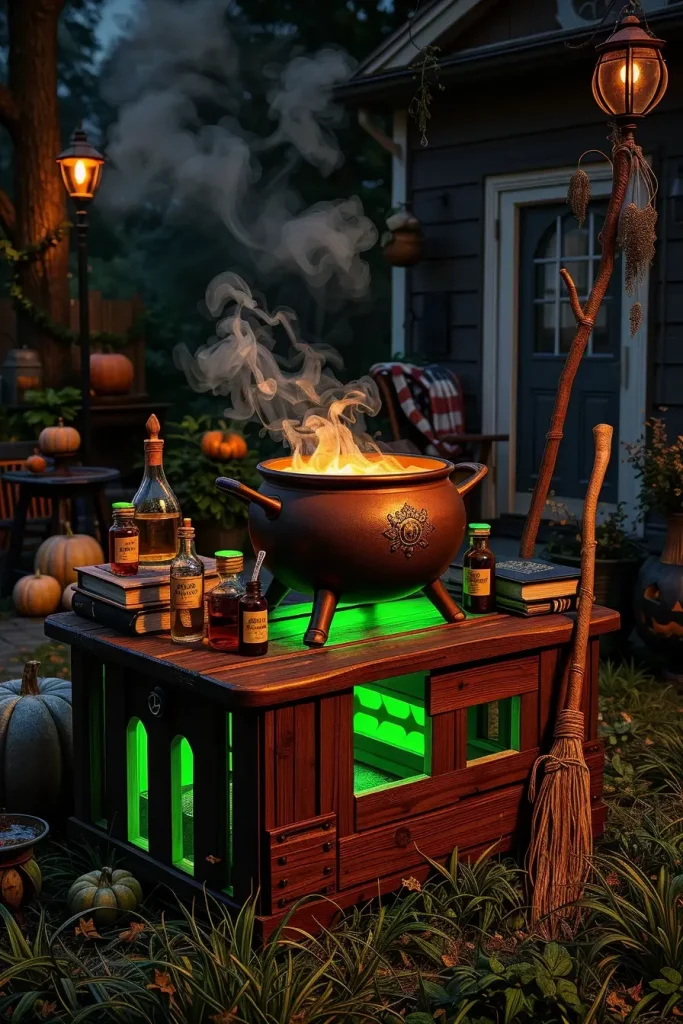
Good Housekeeping has taught me one trick about potions: to combine matte and glossy textures. That makes the liquids in bottles more realistic. I also put cling wrap on the top of some jars to give the impression of a gelatinous surface. It is the little details that count.
To improve this area, I would like to put a glowing magical circle painted on the grass with neon chalk paint and UV lights. That would give the display a visual ground and bring the mystical feel up.
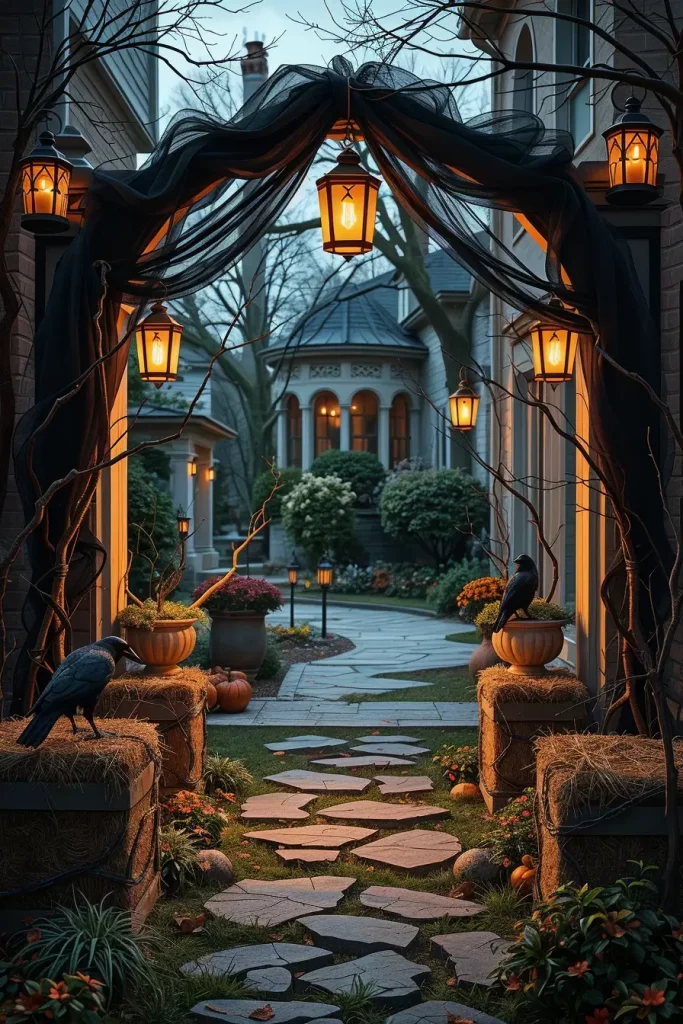
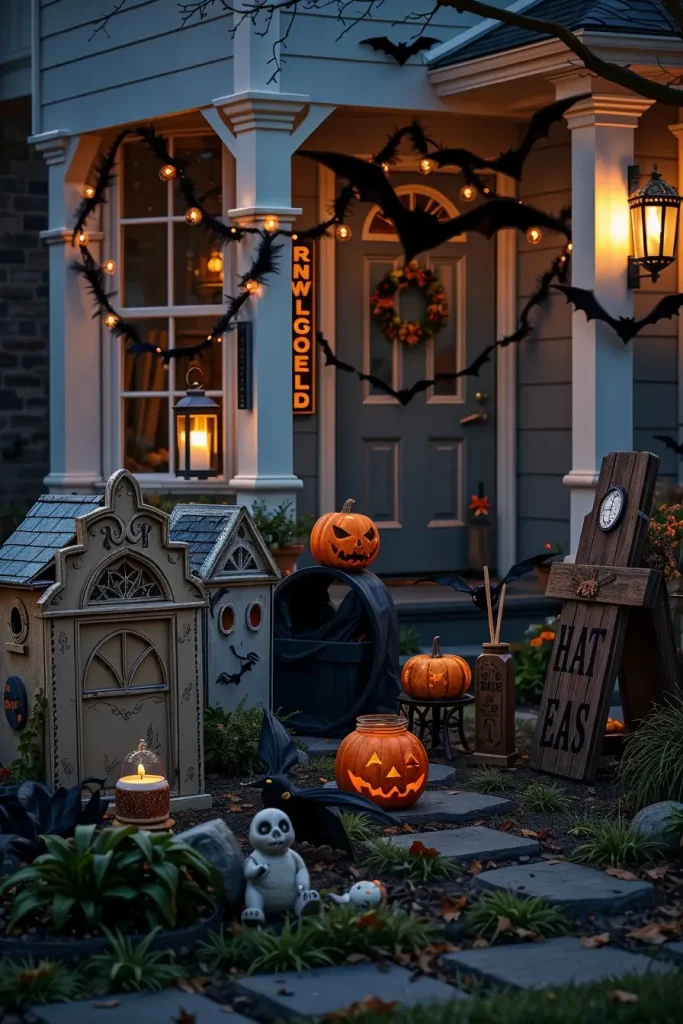
DIY Haunted Gate And Archway Designs
A gateway establishes a mood, and I make a haunted gate or archway at the front of my yard display every year. It indicates to the visitors that they are in a changed environment. I usually start with a PVC pipe framing, covered with dark fabric or faux stone wallpaper. The building has gothic forms and torn curtains fluttering in the wind, which makes it appear haunted and worn.
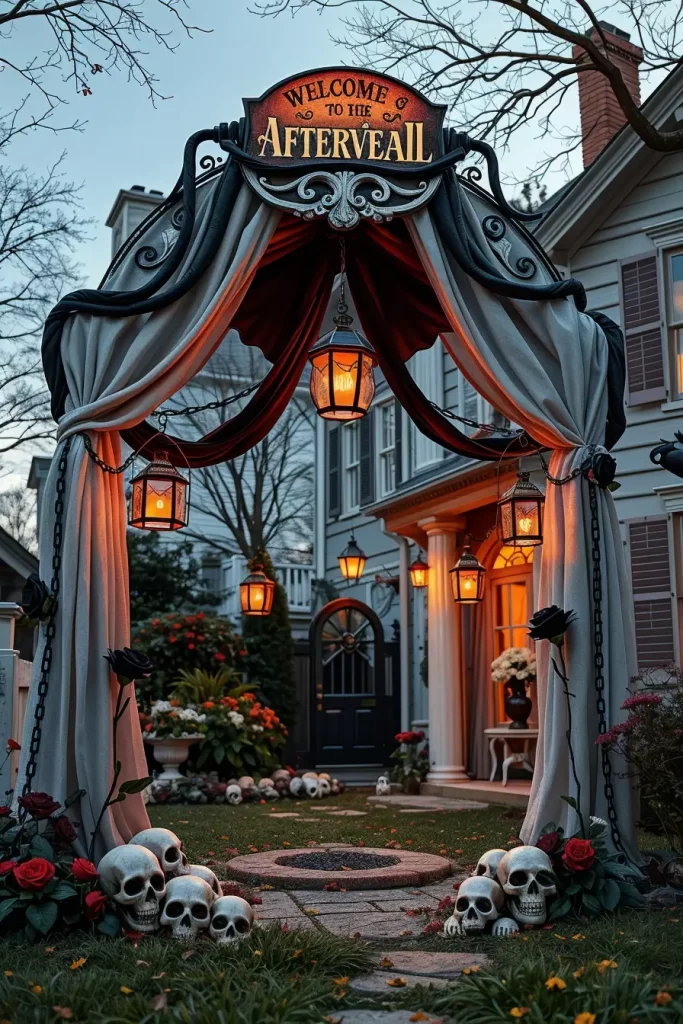
In this arrangement, details are what are important. I have foam skulls and lightweight tombstones all the way along the base of the arch, and old lanterns hanging on each side. The top is finished off with a foam Welcome to the Afterlife sign or creepy ironwork style cutouts. I also put flickering red LED bulbs to simulate smoldering embers or haunted watchlights.

I did what House Beautiful suggested last year and put some black roses and rusted chains around the structure, those little gothic accessories made a difference. I added some ambient sound over the arch as well to welcome guests with a whisper or moan.
Given more time, I would incorporate motion sensors which would cause the arch to fog up when people pass through it. That would make it impressive to unforgettable.
Lighting Tricks For A Haunted Yard
In a Halloween yard, everything is lighting. I do not ignore it since it determines where people gaze and what they experience. By 2025, I am going to be embracing concealed sources of light, uplights behind props, under-glow lights under bushes, flickering effects that are reminiscent of candlelight. This detail makes your yard more film-like.
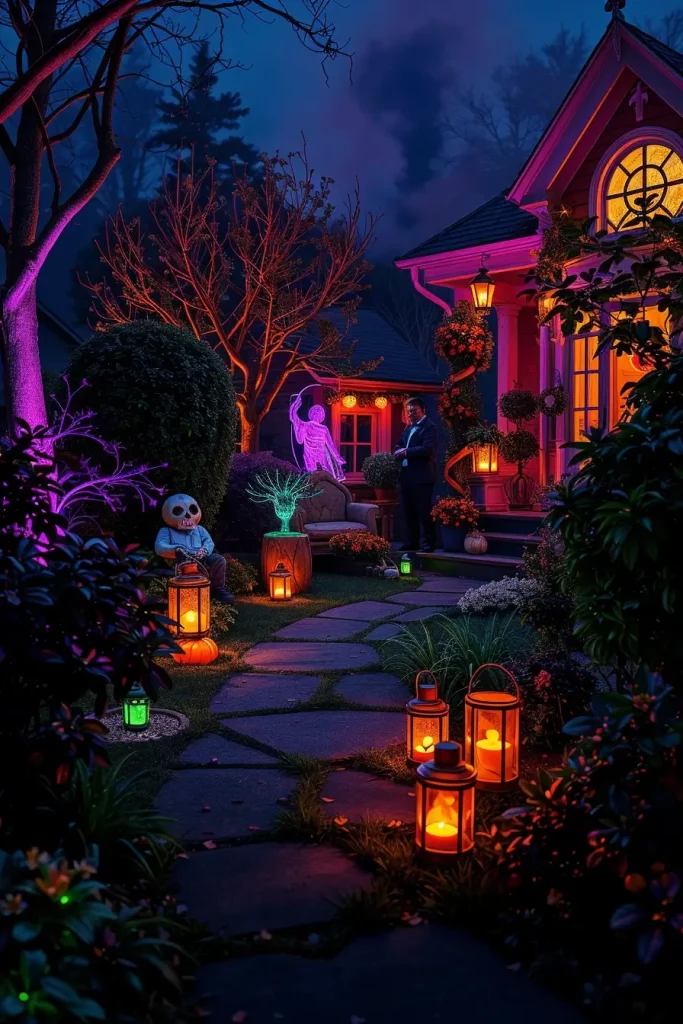
I have outdoor-rated LED flood lights in purple, green and amber to create a creepy glow. Path lights tend to be orange or red and I hide solar-powered flickering lanterns behind big decorations such as tombstones or witches. A trick I particularly like is to put a strobe light in a bush so that the flashes are concealed but there is a continual visual surprise. Spider webs and fog are spectacular under this method.
Bob Vila recommends backlighting to produce powerful silhouettes, and I could not agree more. I have placed mini LED strips behind my monster cutouts and the shadows are more effective than the props themselves. It is a matter of mood and visual narration.
To make this setup better, I would purchase programmable lighting strips to synchronize flickers and colors on various props. Such cohesion would create the whole yard into a single immersive haunted experience.
Spooky Shadows And Projection Effects
One of my most favorite DIY tricks in the past years is to create spooky shadows. It is simple, cheap, and so dramatic when done right. I have simple floodlights or projector bulbs and set them at low angles to provide long, over-the-top shadows of my Halloween yard decorations. Whether it’s a scarecrow, witch, or skeleton, the shadow often looks scarier than the object itself.
Painting cardboard cutouts matte black and affixing them to walls, fences or house exteriors is one of my trademarks. I have done giant rats, towering vampires, and gnarled trees this way. Then I shine a light on them so that their shadow is on the side of the house. To create moving effects, I have a small Halloween projector with animated graphics such as ghosts, bats or flickering characters.
Family Handyman blog suggests using projections together with fog or mesh to blur the image and create motion. I have done that and overlapped my projections with mesh curtains on my porch-it works beautifully.
To take this part up a notch, I would add a rotating base to the light or prop so that the shadow gradually changes, giving the visitors a more disturbing experience.
DIY Zombie-Inspired Yard Scenes
Zombies are timeless and in 2025 I will be betting on DIY graveyard scenes with partially buried undead. I begin with the fake tombstones of foam, bury them into the lawn and sprinkle the skulls and limbs emerging out of the ground. To make body mounds, I stuff plastic bags with leaves and then cover them with torn clothing–enough shape to indicate that there is something underneath.
Every zombie prop has a different pose. I create them out of PVC skeletons or even plain old mannequins with old clothes on them. They are painted in gray-green color on the hands and faces and covered with fake blood or moss, which makes them even more gruesome. I also have old shoes on the ground and the path of handprints leading to the walkway to create drama.
DIY Network gave me one tip that is to apply Vaseline on zombie flesh and then paint. It provides a shiny, decaying effect that actually sells the appearance under nighttime lighting. I have applied this method and I strongly encourage anyone who wants to be realistic to use it.
To make the scene more effective, I would add some low growls or breathing sounds effects that will be concealed in the flower beds. That would bring the zombie vibe to not just visual but full immersion.
Handmade Monster Cutouts For Lawns
Monster cutouts are also a good idea to go big but not break the bank when it comes to lawn focal points. I used jigsaws or utility knives to cut my designs out of plywood or thick foam board. Then I paint them bright colors–greens and purples and blood reds–with UV-reactive paint so they glow at night. Frankenstein, swamp creatures, or giant bugs are good monsters.

After painting and sealing them, I put them on stakes and fix them firmly in the ground. I prefer to place them along the ways or partly behind bushes so that visitors are surprised by them. Designing claws or tentacles that are larger than life and wrap around trees or signs makes them move even when they are not.
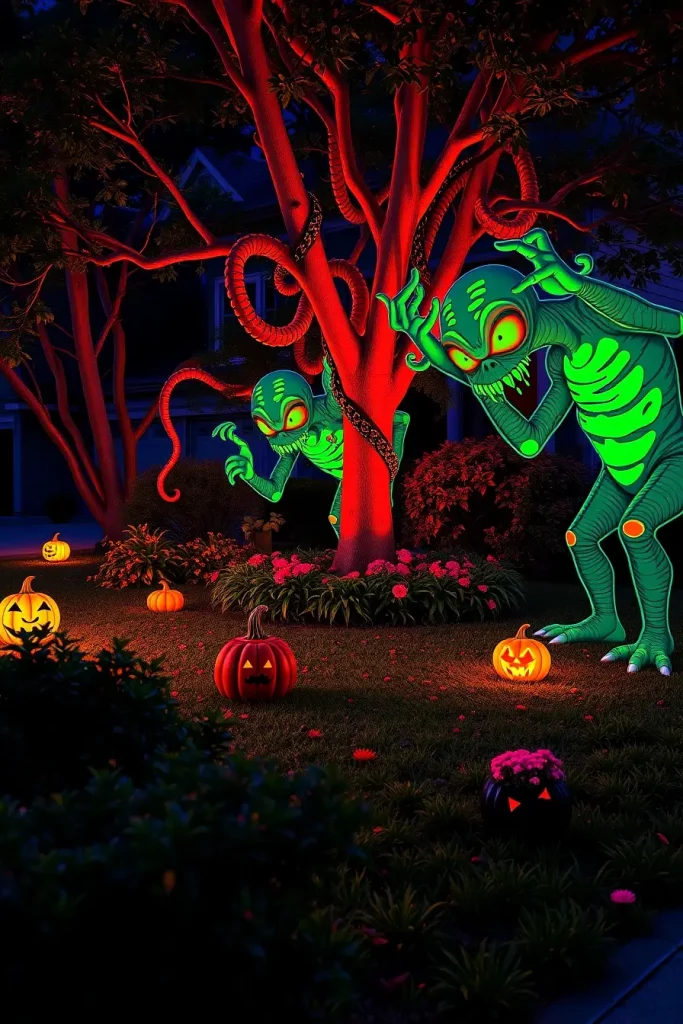
HGTV says that a monster cutout with proper lighting can be more effective than inflatables. That has been my experience–and besides, you can make them any shape or size you please. The sky is your limit but you are only limited by your imagination and cutting skills.
To enhance this arrangement, I would be so glad to have articulated joints to make them poseable. In that manner, I would be able to change their posture every night so that it would not be so monotonous.
Yard Lanterns And Candlelight Walkways
To tone down all the horror, I always include yard lanterns and candlelight along walkways, to give it a softer touch. Not only does this lead visitors safely, but it creates a flickering, moody atmosphere. I combine solar lanterns, battery-powered LED candles in mason jars and vintage-style lamp posts converted to Halloween.
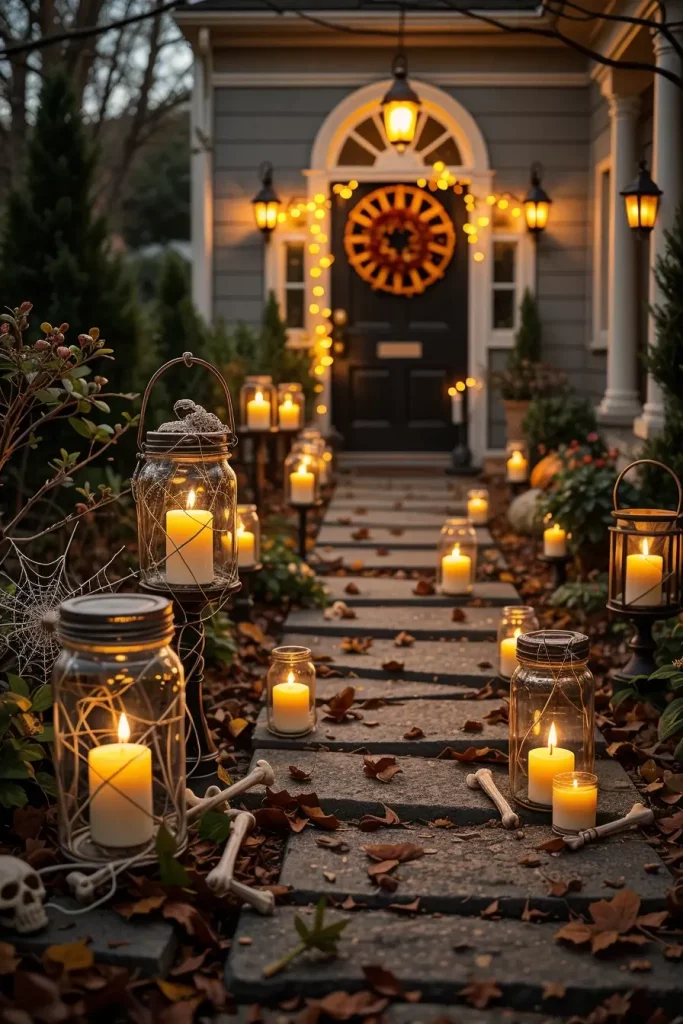
I set these lights every so often along the walkway and around key areas such as the cauldron or zombie mound. To be realistic, I cover them with spider webs, or put silhouettes such as skull cutouts into the jars to cast shadows when illuminated. I also add fallen leaves and bones at their bases to add additional character.
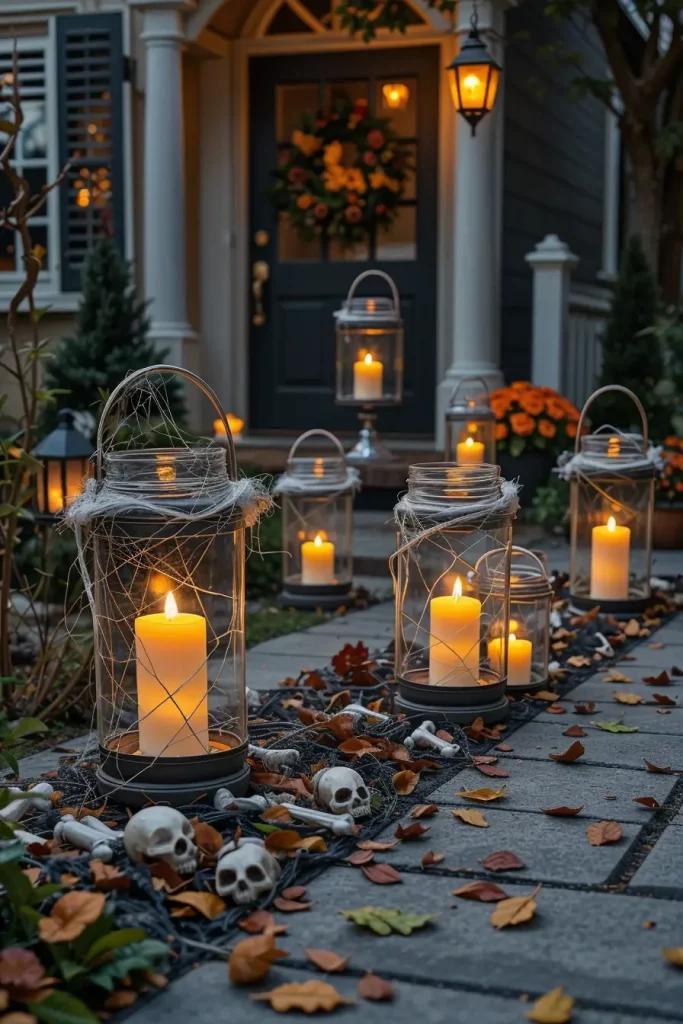
The staff at Martha Stewart recommends lanterns of different heights to give a more natural, whimsical appearance-and I have implemented this in my own designs. The idea to cluster lanterns in threes at various levels actually works to dispel the monotony and creates a decorative rhythm.
Given the budget, I would add smart candles that flicker to the sound effects to make the experience more sensory.
Halloween Yard Ideas For Small Spaces
A small area can be as effective as a large lawn to create a spooky yard-I have done it myself and have seen fantastic results. The key is in vertical layering and lighting. Once I am working in smaller yards or apartment patios, I concentrate on creating height by using hanging ghosts, window silhouettes or faux fences using lightweight PVC. These concepts do not consume floor space but provide a rich visual depth creating the illusion of a bigger, haunted atmosphere. It is all about taking advantage of every inch of ground, wall, and air to make your Halloween yard decorations.
To give it a unified appearance, I use foldable lanterns, skeletons mounted on the walls, spider webs in the corners, and narrow tombstones made of styrofoam. Felt and wire hanging bats utilize vertical space and small LED spotlights can be concealed behind planters to provide dramatic shadows. A mini fog machine is hidden under a wooden crate and does not occupy a lot of space but adds mystery. All these items are DIY-able- paint your tombstones, cut your own silhouettes, or use dollar-store items.
I have also discovered that the most important aspect in my own space-challenged yard is lighting. I would recommend string lights in orange or purple color, hung over balconies or fences. It was a brilliant idea in a Real Simple magazine once, to use sheer fabric and string lights to make a ghost curtain, and I have done so ever since. It provides small yards with a glowing, creepy atmosphere and is incredibly easy to put together.
To make this layout better, I would recommend adding sound, small motion-sensor gadgets with sound effects such as howling winds or cackling witches. These miniature devices can be placed anywhere and instantly improve the mood without occupying the visual field.
Kid-Friendly DIY Yard Halloween Decor
Safety and fun should be the first consideration when designing DIY Halloween yard decorations to children. More parents in 2025 are going with the friendly, whimsical themes instead of the traditional scares- and I concur. I always focus on non-scary elements like pumpkins with silly faces, plush ghosts, glowing path lights, and character-driven setups such as “witch school” or “monster tea party” scenes. This is to inspire wonder, not worry.
Some of my go-to pieces include large cardboard cutouts of favorite characters (painted and weatherproofed with sealant), plastic cauldrons filled with motion-activated bubbles, and handmade scarecrows with cute rather than scary faces. I put these on low platforms or even on the ground so that kids can interact. Recycled stepping stones with LED lights inside the recycled jar lids are a massive success, particularly when children were involved in the decoration process.
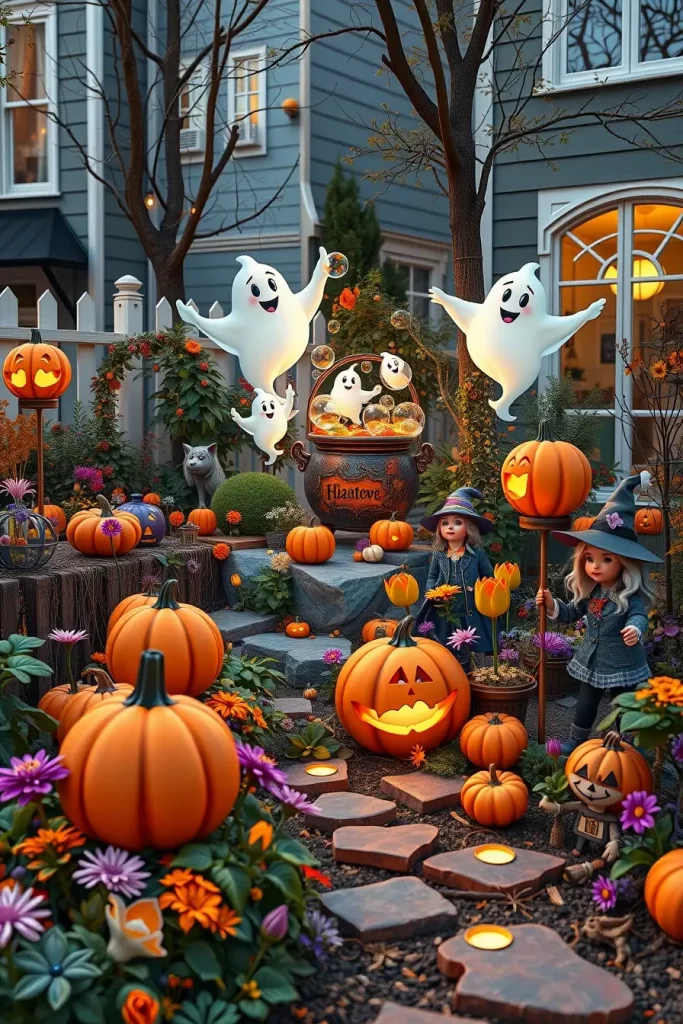
I assisted a neighbor one Halloween in making a candy garden of felt and pipe cleaner flowers and mini buckets at the bottom to collect candy. The children enjoyed it. HGTV says that interactivity is a big difference to kids and I couldn’t agree more. See what you can add to your yard with a basic ghost ring toss or pin the tail on the black cat corner.
What I would add to this setup is a little storytelling area—a hay bale with a blanket and a spooky (but friendly) storybook. It encourages families to spend some time and interact with your space.
Budget-Friendly Outdoor Halloween Projects
Halloween decorations need not cost you an arm and a leg. I have completed whole yards on less than 30 dollars by paying attention to recycled materials, DIY construction and smart lighting. In 2025, some of the hottest yard aesthetics are also the most economical. A yard can be filled with painted cardboard gravestones, tattered sheet ghosts, and upcycled jars turned into lanterns without leaving your wallet empty. It is all about creativity not cost.
Regarding materials, I frequently recycle black trash bags to make hanging bats, cut-out rats or twisted witch silhouettes. Glow-in-the-dark-painted mason jars make creepy lanterns when lined up a walkway. Scrap lumber is also recommended to use in haunted signs, painted with such phrases as Beware or Witch Crossing, and they look rustic and real. Layered detail is provided by a series of homemade garlands made of felt or paper.
I used a lot of Dollar Tree items in my early decorating days and I continue to do so. A bit of paint and glue, and those things are good enough to be on a centerpiece. It does not matter what you use, but how you use it as Better Homes & Gardens proposes. That mindset helped me turn old curtain rods into spooky gateposts once—and it looked amazing!
To strengthen this section further, I would recommend the use of movement. Just a couple of dollar-store wind chimes or creepy-design flags add dynamic energy at no extra cost.
Final Tips For Crafting The Perfect DIY Halloween Yard
Having years of assisting friends and clients in planning their DIY Halloween yard decorations, I can tell you the best advice is to plan ahead and layer your decorations. Consider your yard as a stage: begin with a theme, supplement it with supporting props, lighting and accents. I never construct without drawing a layout first-you can end up with too much or too little, or it can look like a mess, and in 2025, people are becoming more creative than ever.
Begin with base lighting such as orange string lights, solar powered stake lights, or concealed spotlights. Then include some static props such as fences, faux stones, and backdrop materials. After putting those, add the decorations: skeletons, witches, pumpkins, and webs. I suggest that one should cluster together similar items rather than scattering everything; it will make the design appear purposeful.
To make it look more natural, Martha Stewart Living professionals recommend using such natural materials as real leaves, sticks, and hay bales. This is one of the tips that I religiously follow–it is one of the simplest ways to make a store-bought piece look custom. Last year I added dried cornstalks and orange gourds to my project to give it a farmhouse-haunted theme, and the neighbors were shocked.
What I would still append? A centerpiece something that pops out like a huge spider crawling out of a smoky corner, or a homemade animatronic witch. Just a single high-impact piece can bring your whole yard up.
DIY Halloween yard decorations in 2025 are not only a fun seasonal project, but also a chance to show your creativity, impress your neighbors, and make lifetime memories. Whether you’re working with a small space, decorating for kids, or sticking to a tight budget, there are endless ways to bring your spooky vision to life. Do you have ideas or tips of your own? Share them in the comments—we’d love to see how you’re turning your yard into a Halloween masterpiece!