Have you ever thought how you can create an open, organized and stylish small bathroom at once? Are you the person who has a problem of storage without getting things in your small room dirty? In the lower part of the article, I shall present you some realistic, professional, and classy tips to improve the design of your small bathroom. We’ll go through real, achievable strategies—from using light colors and mirrors to picking the right furniture and layouts. There is the smart functionality in each tip are there to make stunning visual content that portrays each design thought.
Maximize Vertical Space With Tall Storage
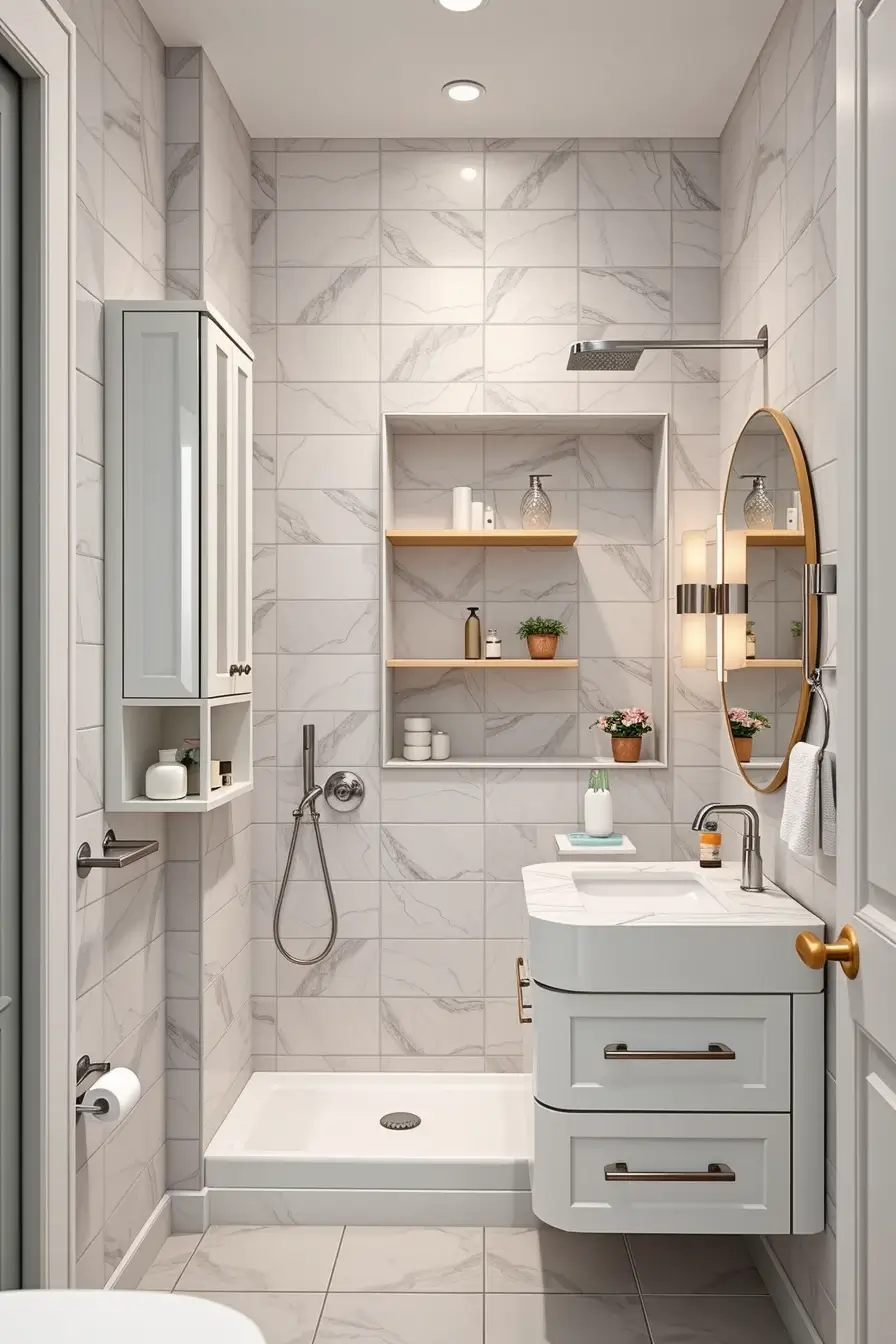
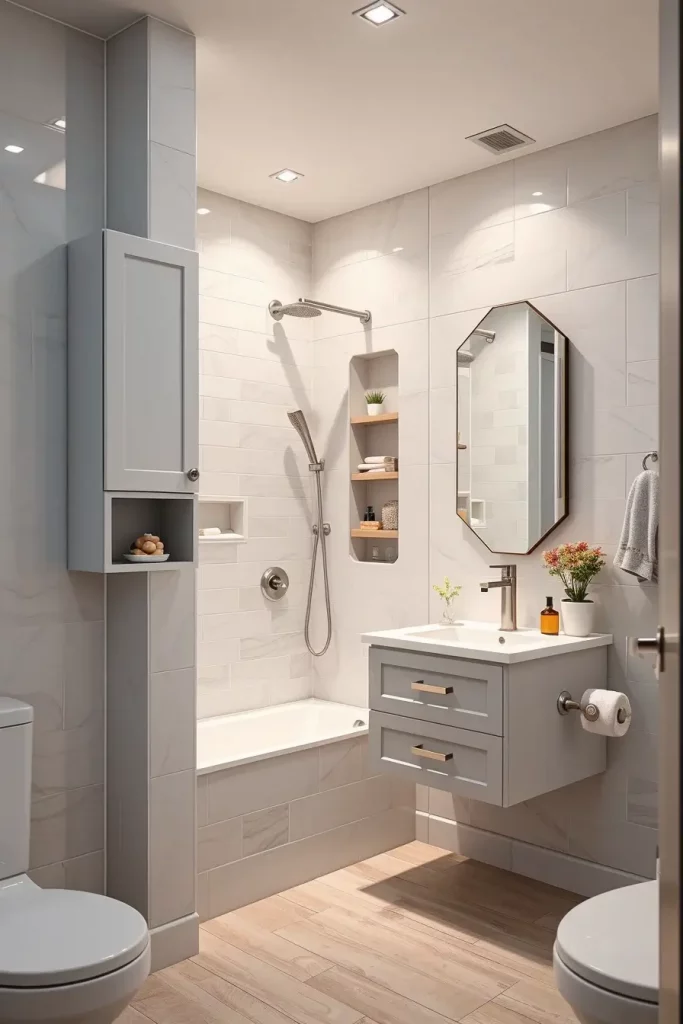
I have always looked up first, when made to work on a compact layout. Utilization of heights will maximize space and still keep a large floor area with storage needs. In this design, I tend to use tall and narrow cabinets or stacked shelves that go up to the ceiling. Such vertical additions give the impression of a higher and extended space – something a small bathroom may use quite well.
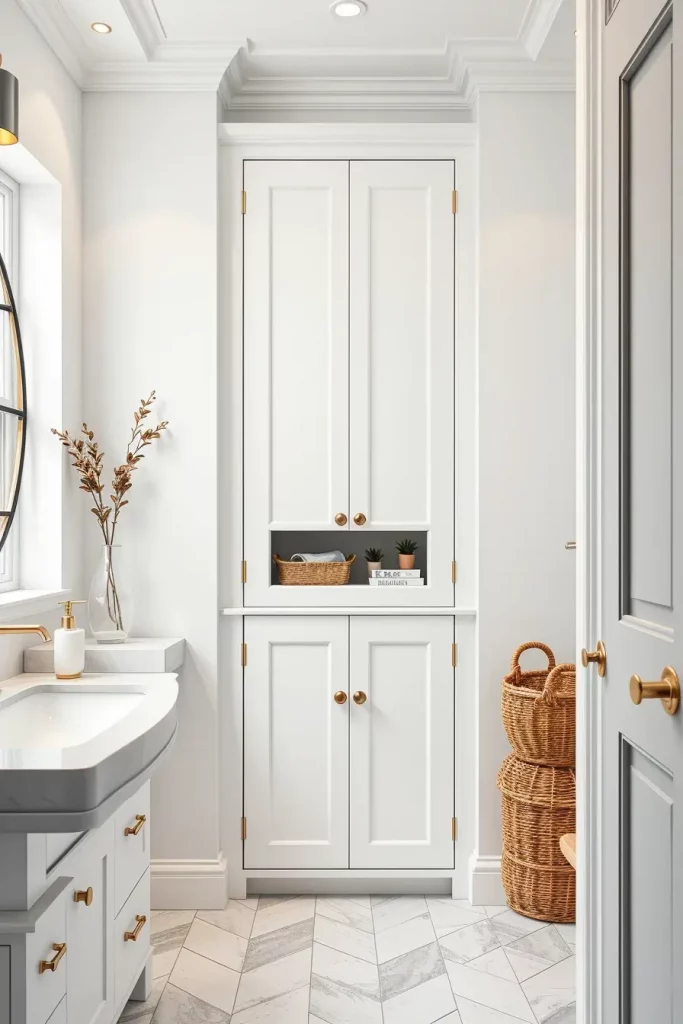
A tall linen cabinet, ladder-style shelves or built-ins with no cabinets above the toilet can work wonderfully. I usually select cabinetry which is the same color as the wall so that it does not cause clutter. Top shelf is open-faced and very light and airy, and the rest of the storage is concealed behind closed doors. One more way I would involve using the woven baskets or glass containers to store the toiletries on a neat pile.
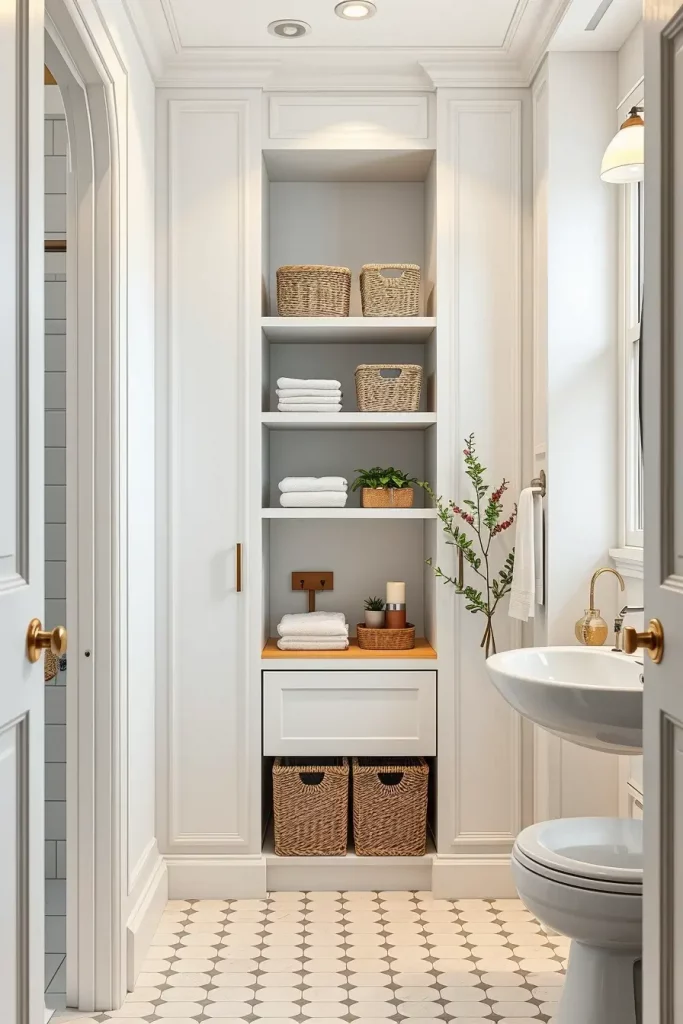
Personally I have employed this method with clients living in small apartments either in the city, and the effect is spectacular. Another vertical design to enhance height suggested by the interior designers of HGTV is the vertical shiplap or tall board and batten panel. It is a pretense that can actually work.
In order to improve on this area, I would also add such features as narrow hanging cabinets with the mirrored front or wall-hanging towel racks. These members support the purpose and the visual lengthiness.
Use Light Colors To Open Up the Room
The correct color palette selection can help change a small interior into a welcoming airable place of relaxation. Lighter colors also reflect more light and this is needed in a small bathroom. My recommendation would be soft whites, pale grays, cool blues, and light beige colors on the walls, the ceiling and tiles. Such tints make the room look longer and draw a continuous effect.
I may rely on white subway tiling as the foundation of space and combine it with a gentle gray vanity and brushed nickel fixtures. This light scheme can be adopted even to the floor tiles. Wherever possible I would use matte finish to have a modern appearance, semi-gloss will also suffice where light reflection is essential. Using similar colors in tones that are applied layer on top of each other also makes the room seem connected.
In my own renovation, I simply repainted the walls navy blue to soft dove gray and that transformed the whole scene immediately. Designers from Better Homes & Gardens have long recommended sticking to one or two light tones for a small bathroom design, and I couldn’t agree more.
I suppose there may be something lacking, but I would suggest a touch of natural wood or bamboo props that will bring the warmth without the dominating colour over the soft palette.
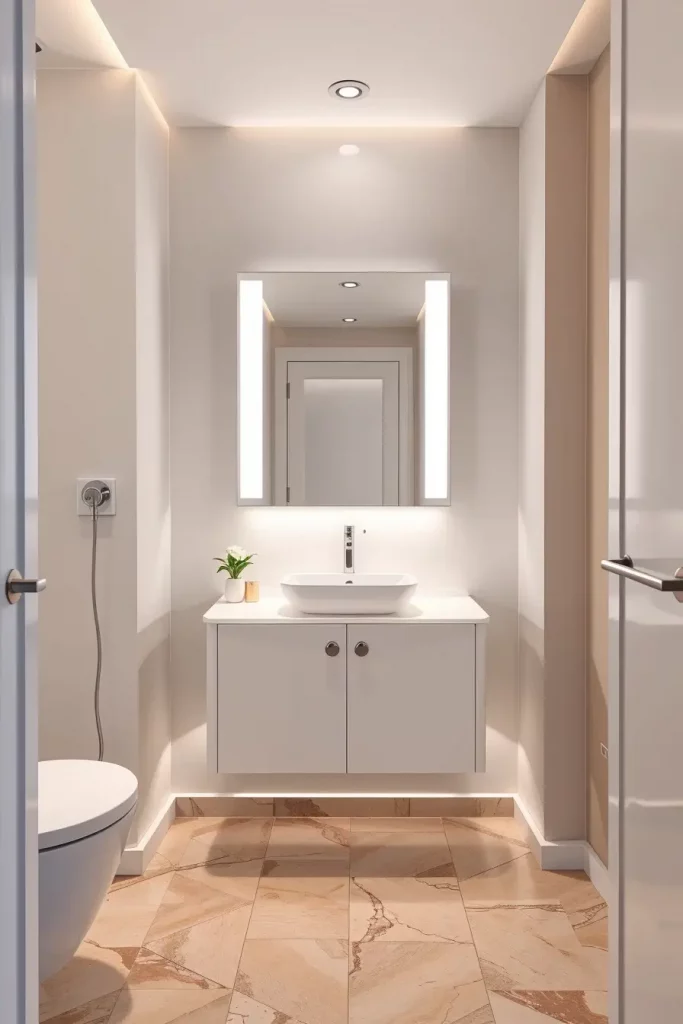
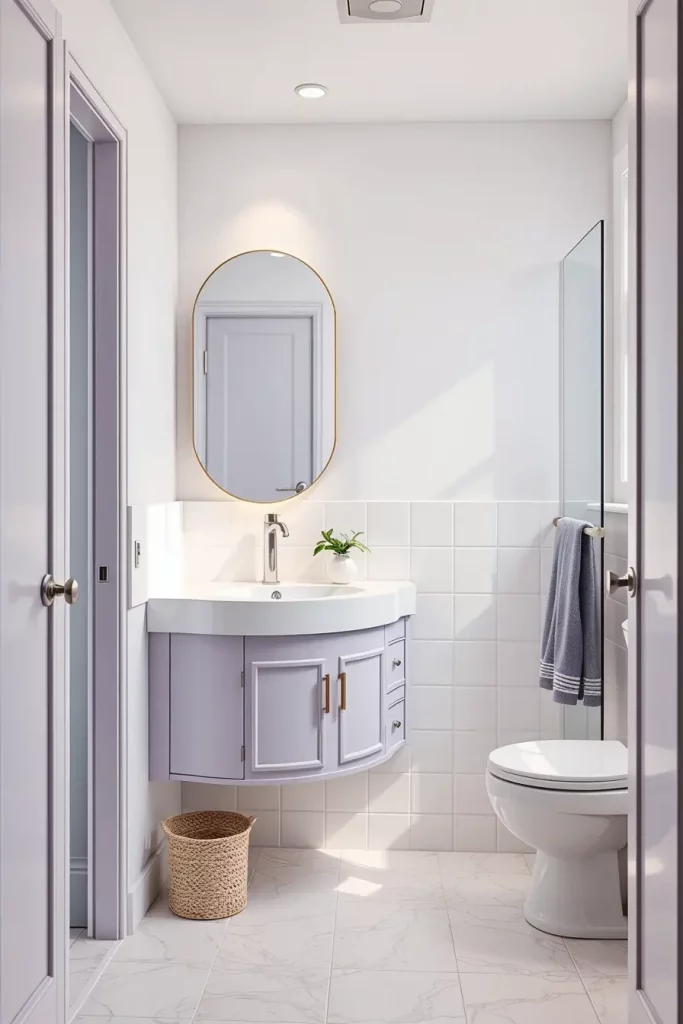
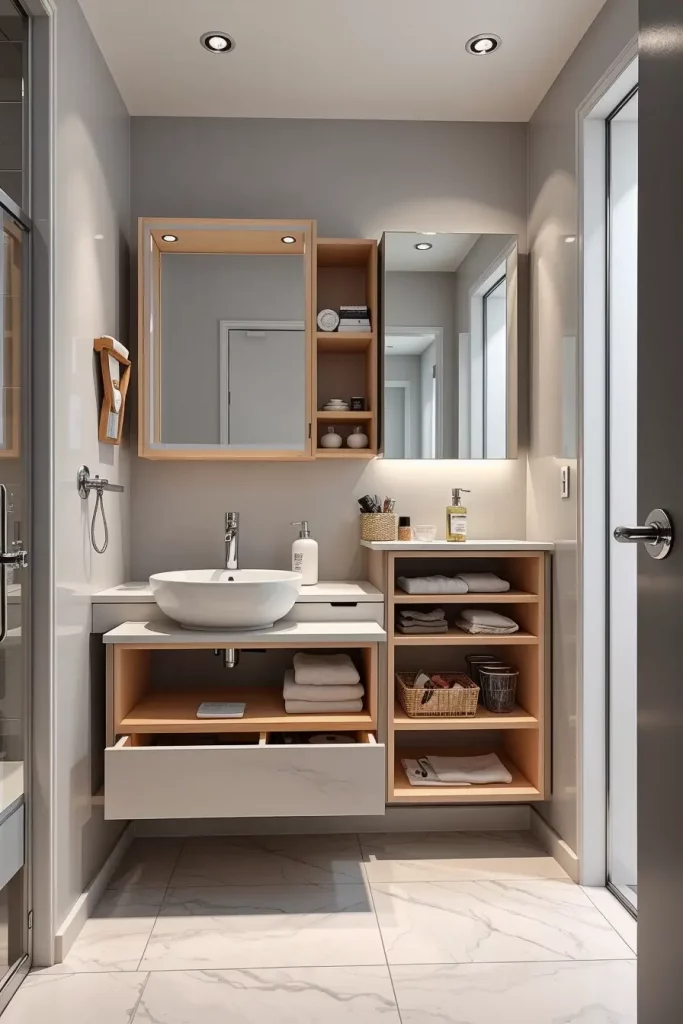
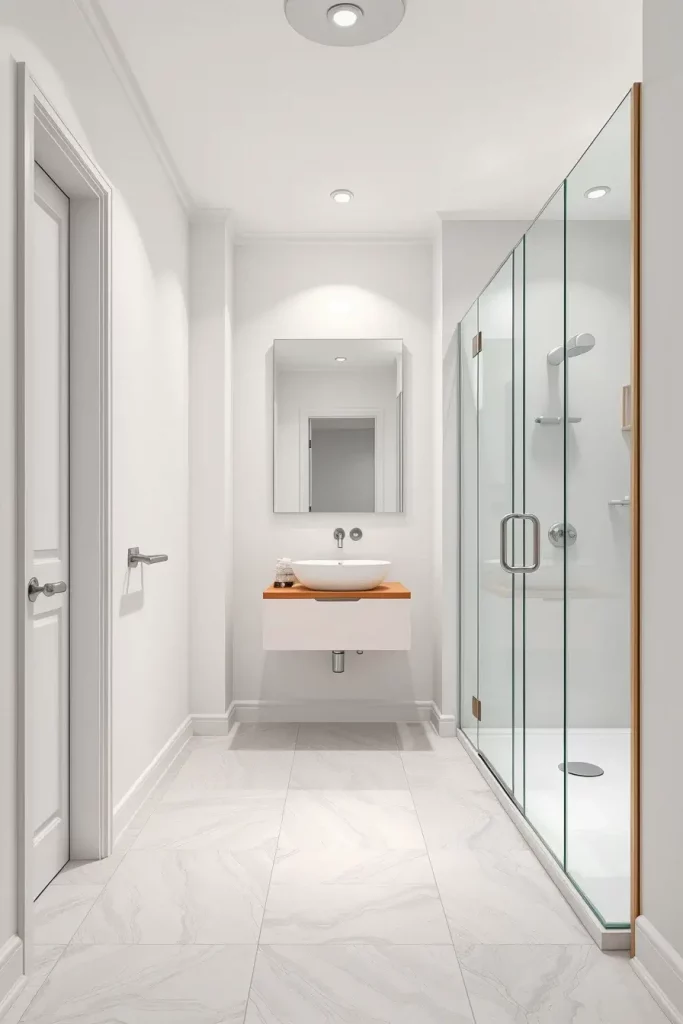
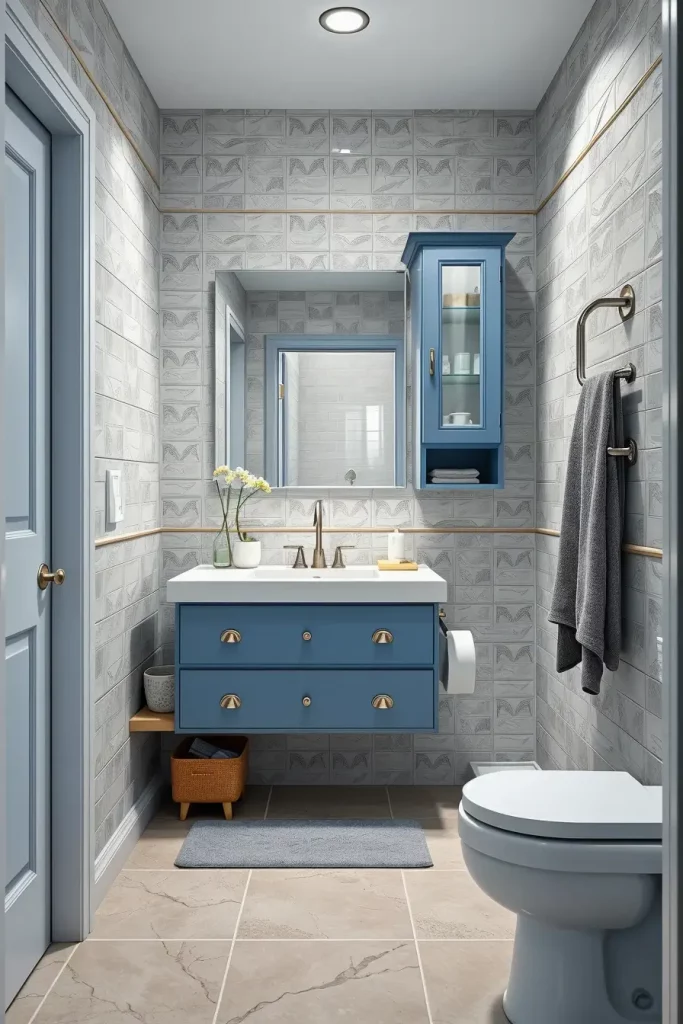
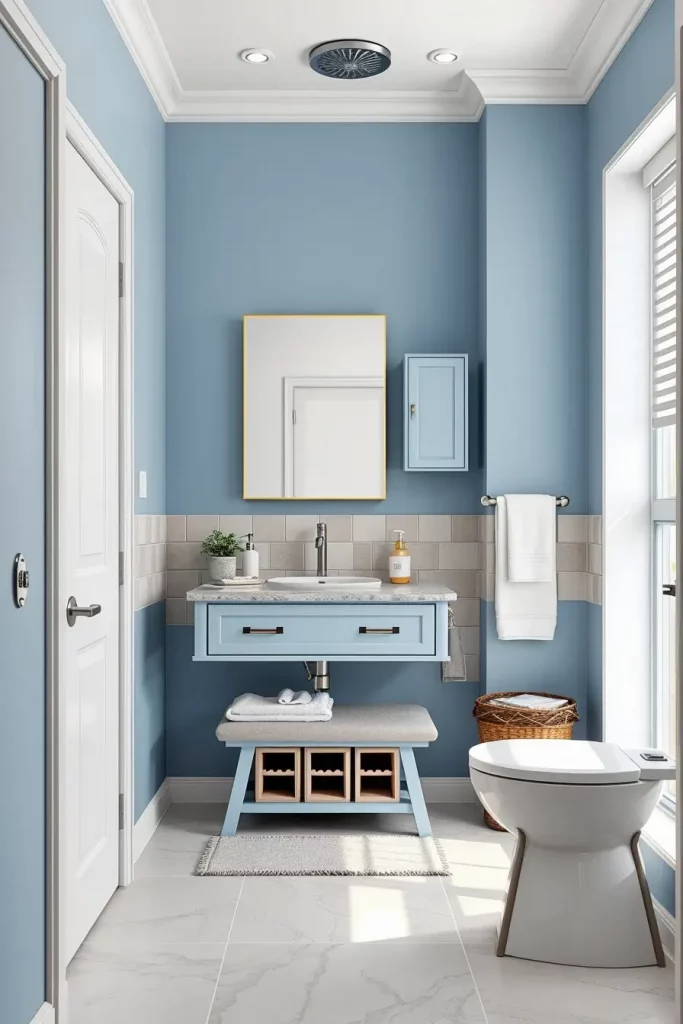
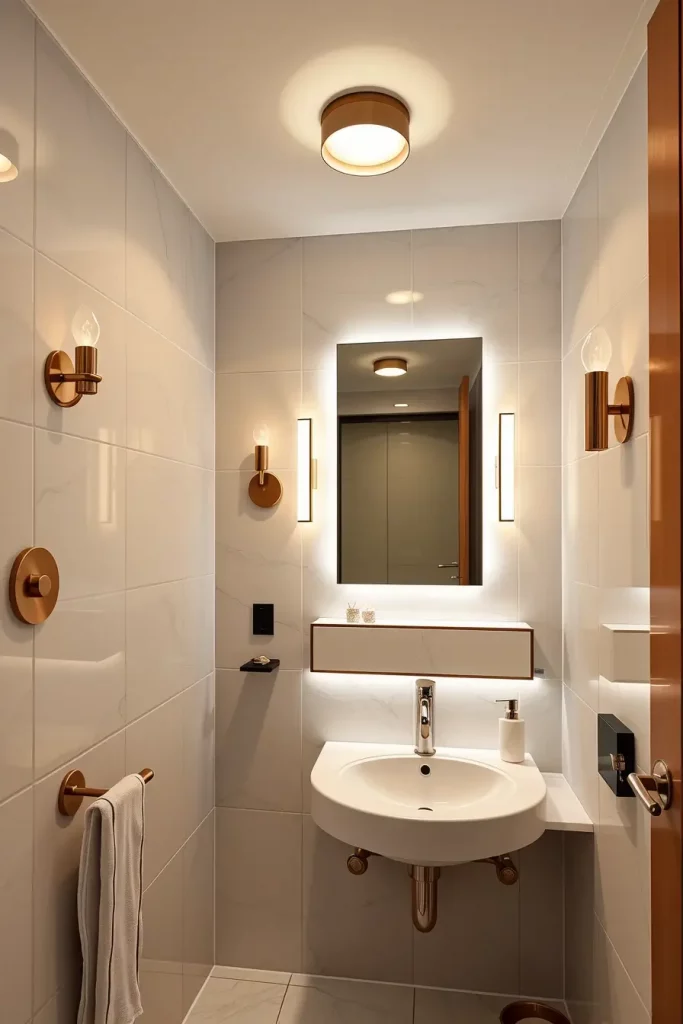
Choose Floating Vanities To Free Floor Space
A floating vanity creates an illusion of space because it shows the floor underneath the dresser. It is a ready-to-go solution I apply to give the small bathroom less boxed and lighter feel. Floating designs not only look modern but are also very practical.
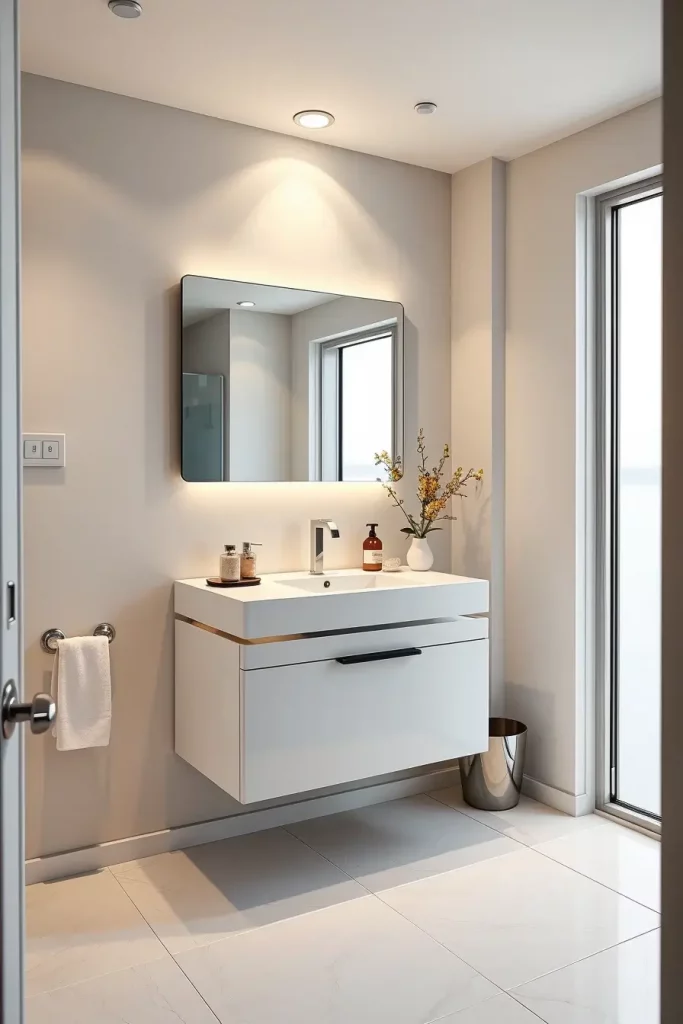
I suggest walled locating vanities most of the time with inbuilt sinks and storage drawers. These come as particularly handy in the city or in guest bathrooms where there is limited space. I appreciate using them with sleek-shaped faucets and under cabinet LED lights to give a bit of accentuation on the open space underneath.
Customers usually speak to me of how they have always wanted to see the floor show through the sink cupboard, it truly cheats the eye. When it comes to making a bathroom appear larger and yet still retaining all the utility, architectural experts with Architectural Digest laud the use of floating vanities as it has been found out to be one of the best options.
To make this area more elegant, I could include a floating shelf besides the vanity or a wall-hanging towel bar to reinforce the visual effect that this area has.
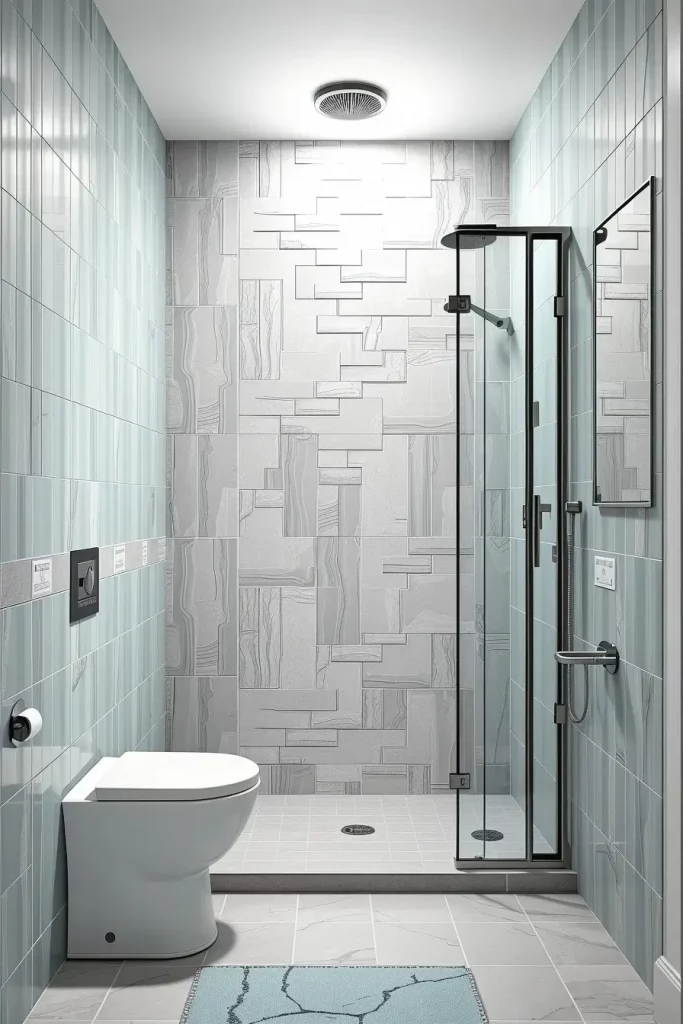
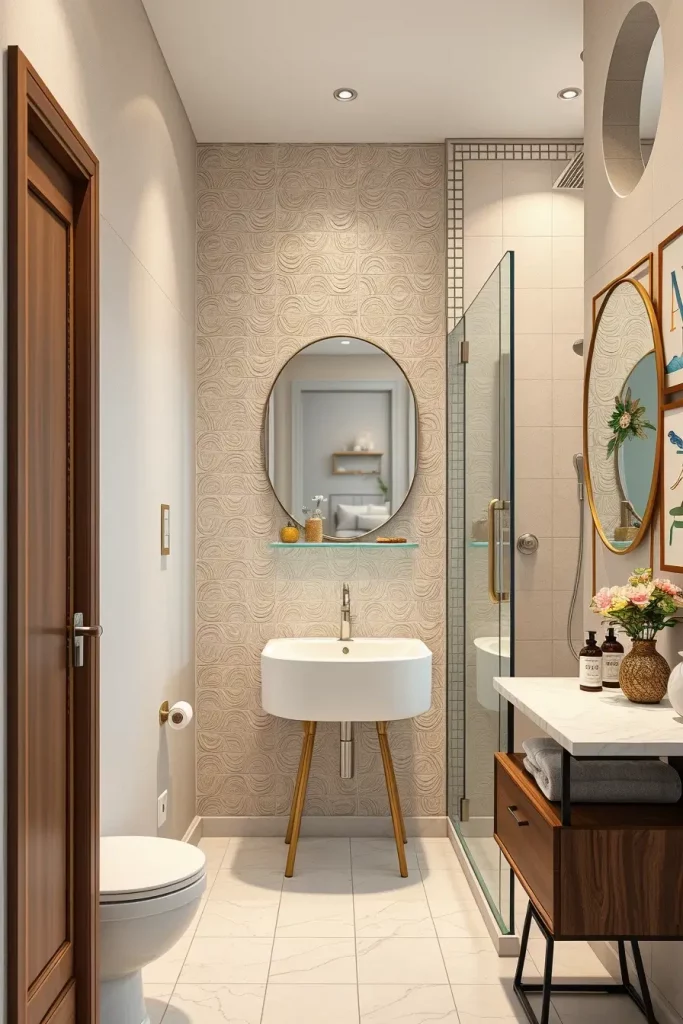
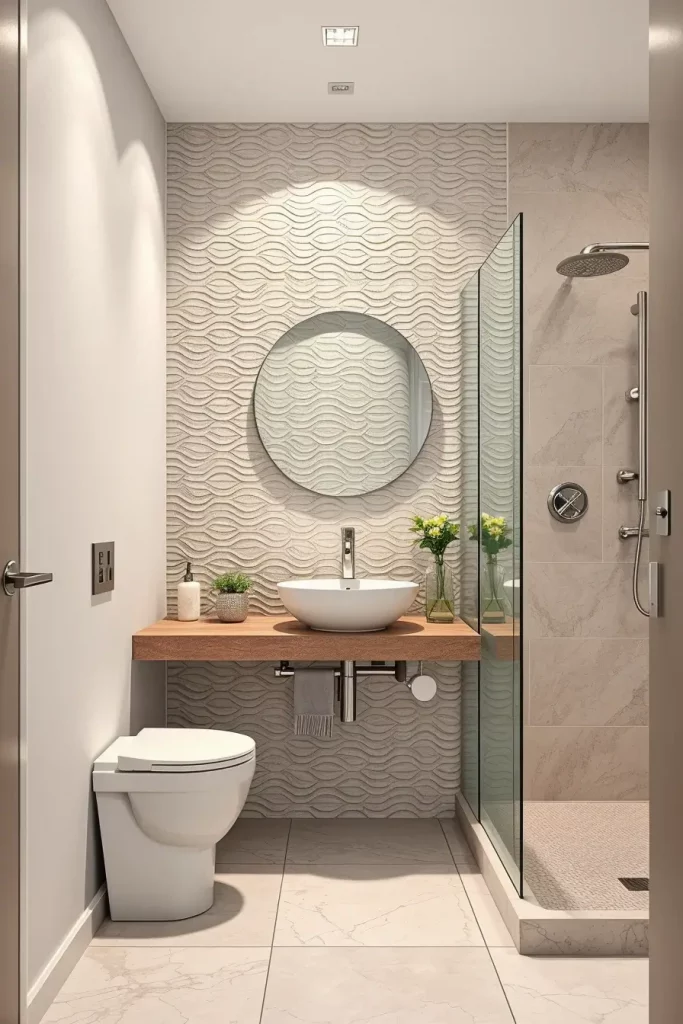
Go for Glass Shower Enclosures
A small bathroom can be fully opened by glass enclosures. I would always advise frameless or semi-frameless glass shower as it transmits light to the shower without hindering the visual of a given space. It has no heavy curtain or partition that cuts the flow- it has the sleek, flowing appearance.
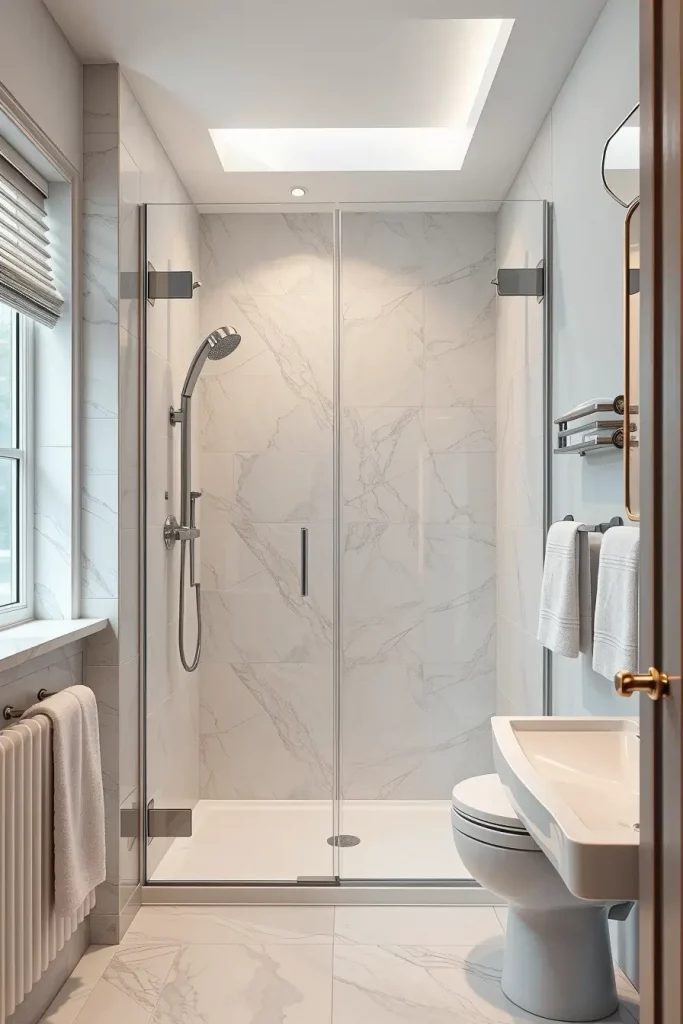
I usually combine them with low-profile shower pans or tiled floors which could go well with the rest of the bathroom. I prefer clear tempered glass to use and minimal hardware matte black or brushed gold so as to give the small touch. Sliding or hinged doors are suitable depending on your plan. A curbless shower pan will provide accessibility and give it a luxury look.
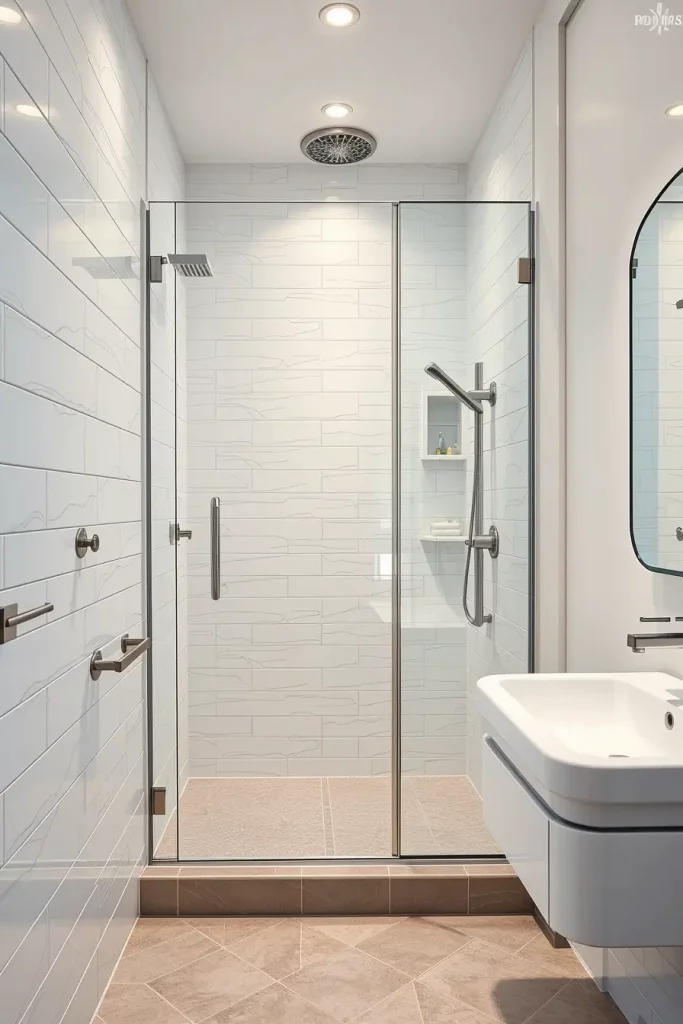
There was one time when I redesigned a very small bathroom whose centerpiece was a typical tub that occupied majority of the bathroom. The substitution of the same with a walk in glass enclosure created the space to appear twice as spacious. This design is commended by Elle decor as it helps to improve the light spread and achieve refinement even on narrowest spaces.
The only thing that I would add to this is a niche in the shower wall where you can put your toiletries, a bit compact, a bit built into the structure and simple to clean.
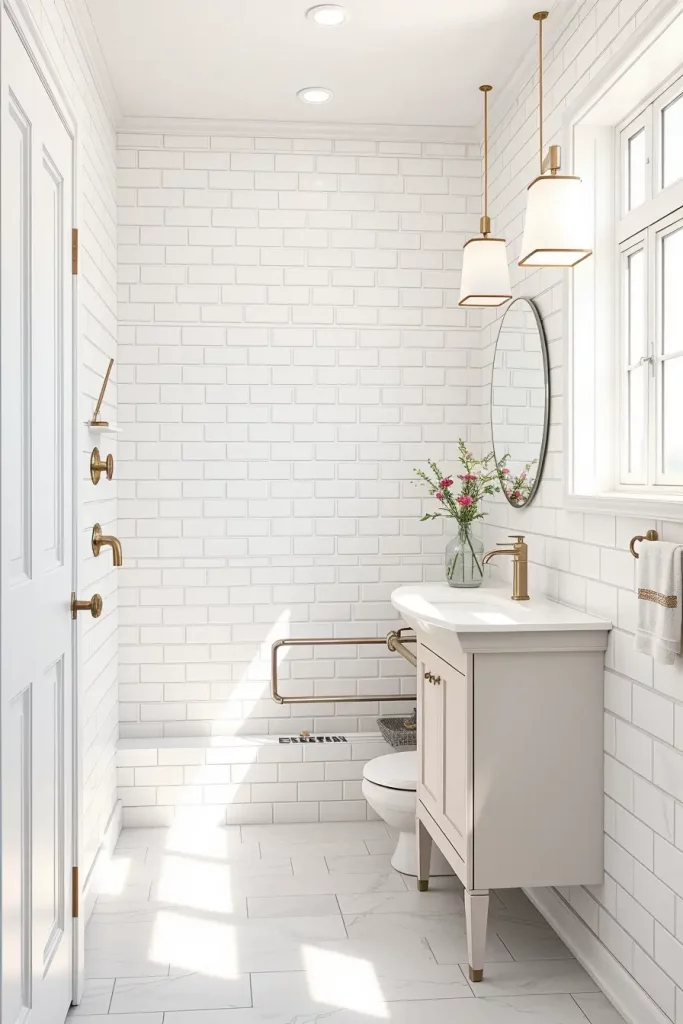
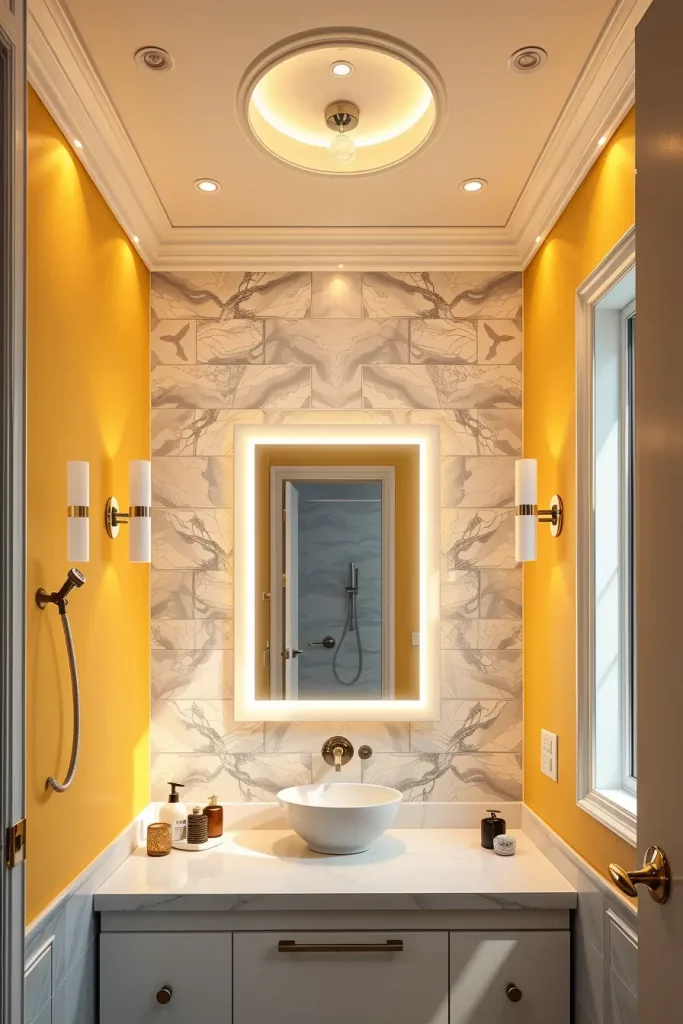
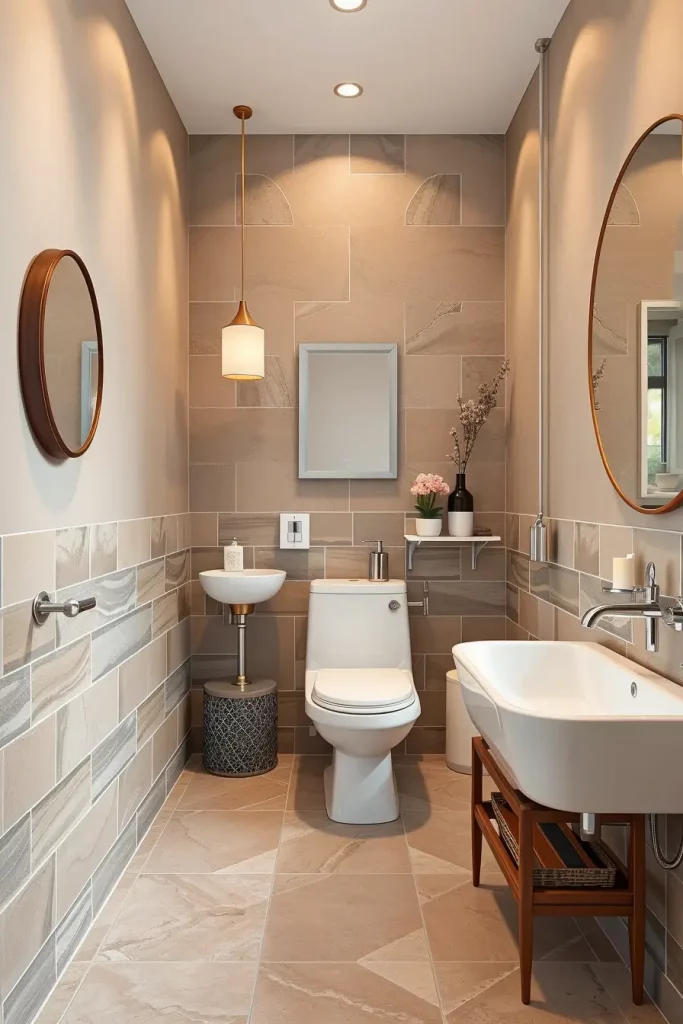
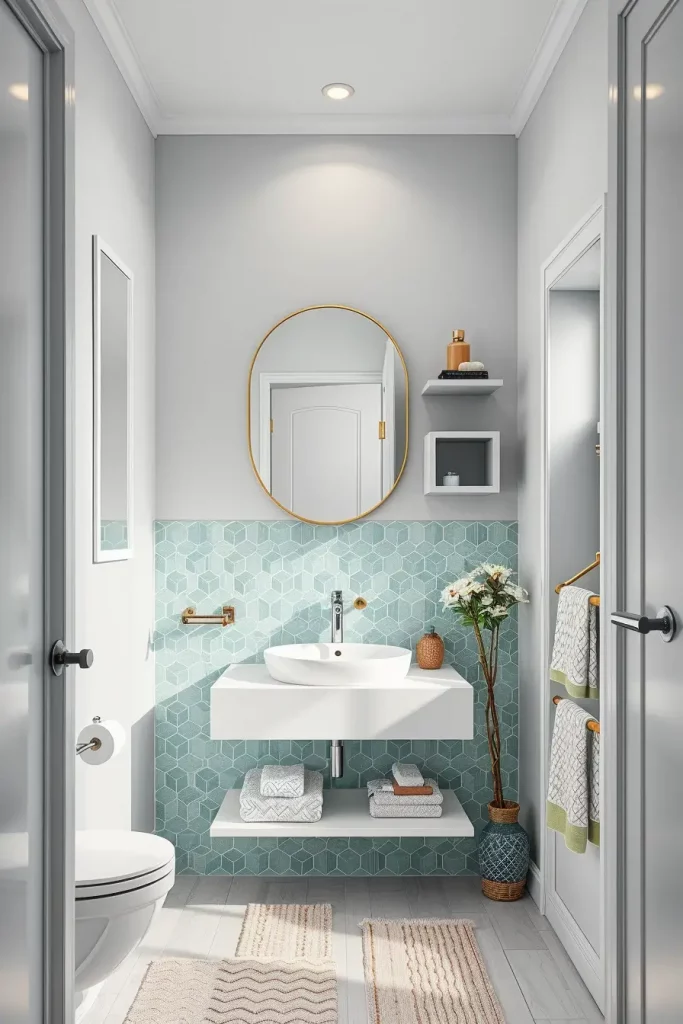
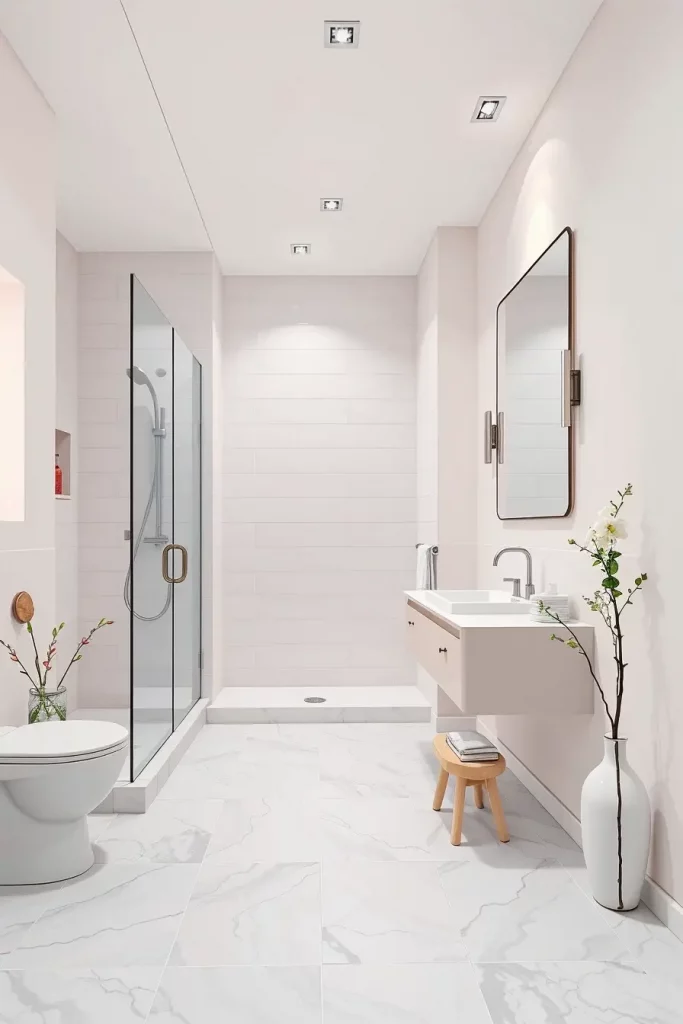
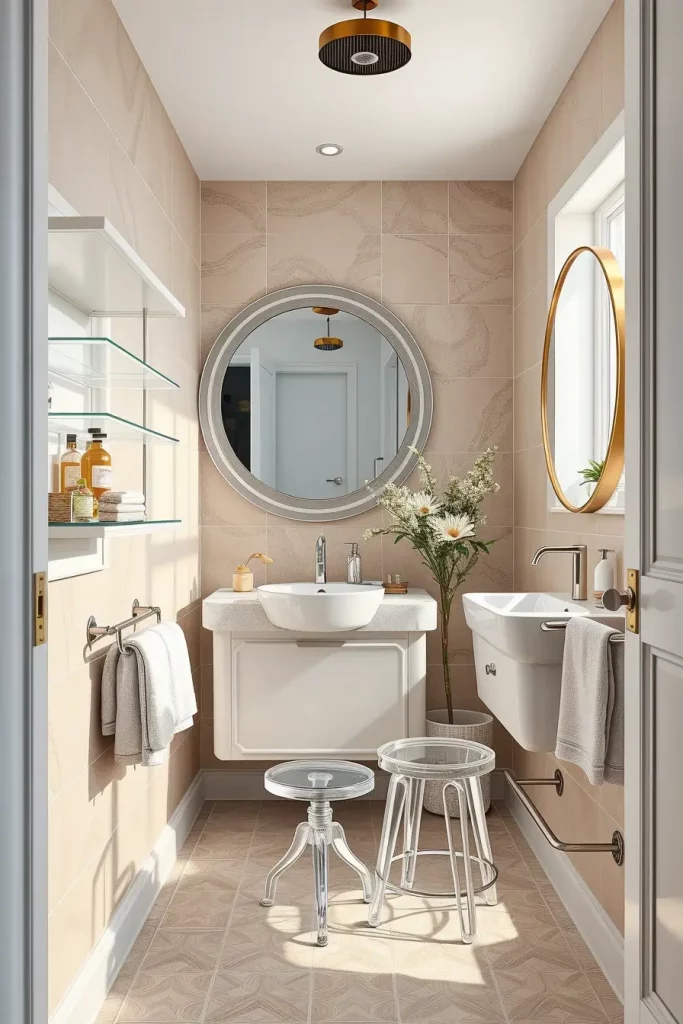
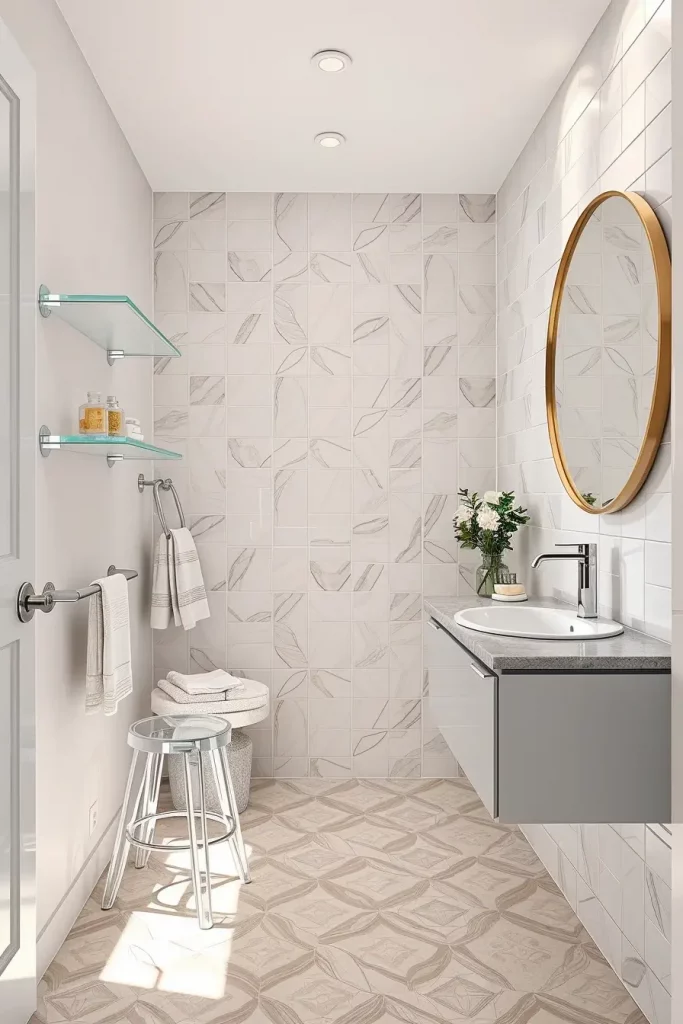
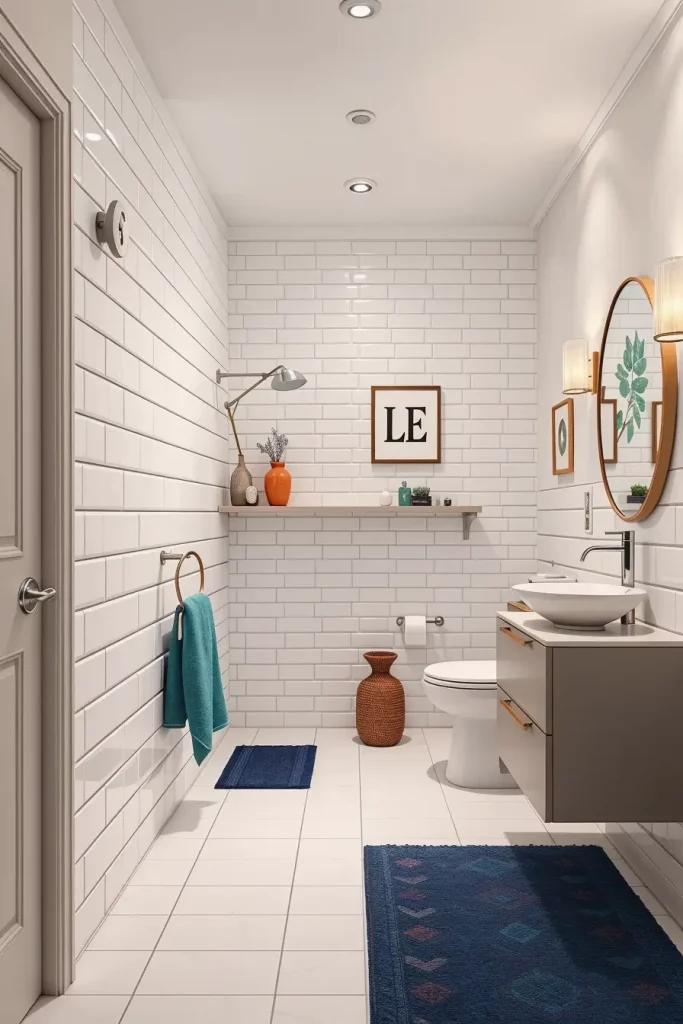
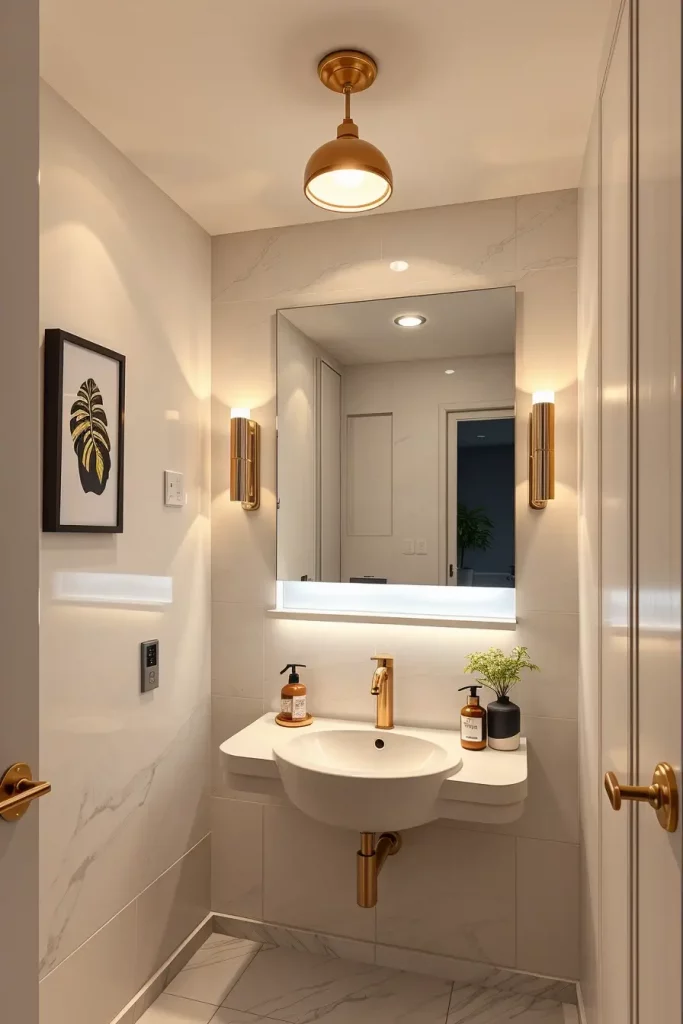
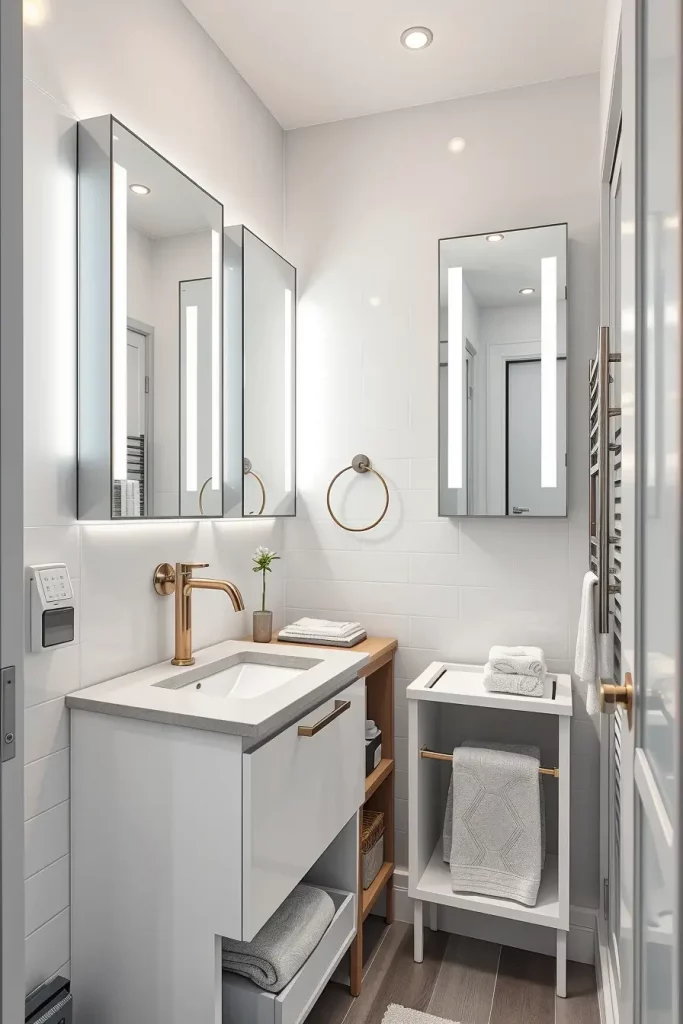
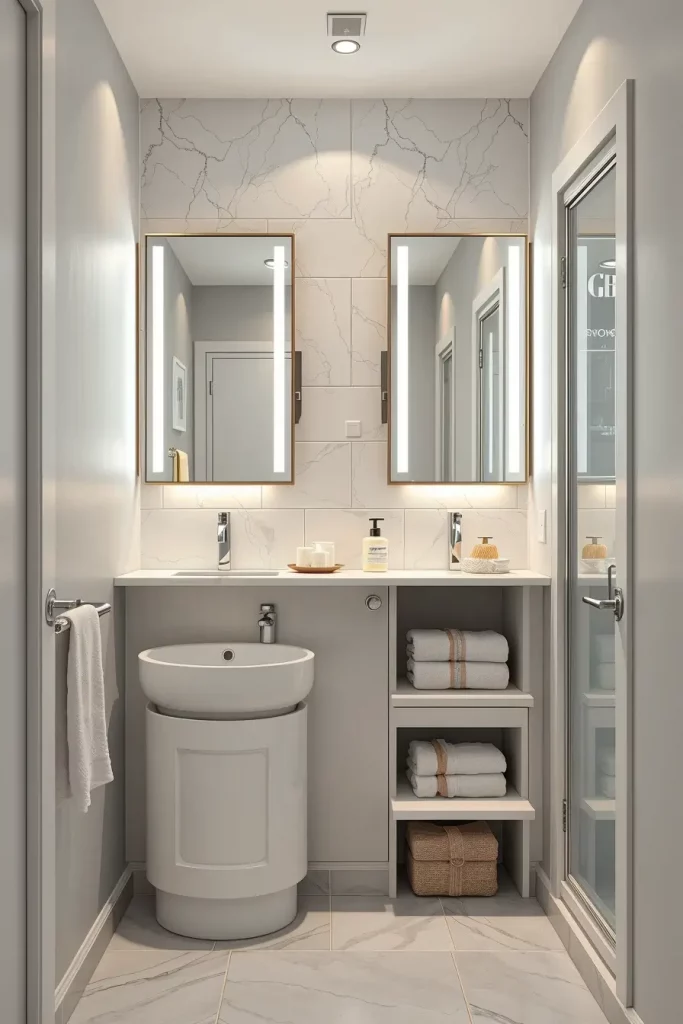
Add Large Mirrors To Reflect Light
One of the oldest and most universally successful tricks in the world is a huge mirror. I have found that just popping in a mirror that covers the whole width of a wall can go a very long way to lightening up a minuscule bathroom and making it twice as big to the eye. It is not merely useful, it is revolutionary.
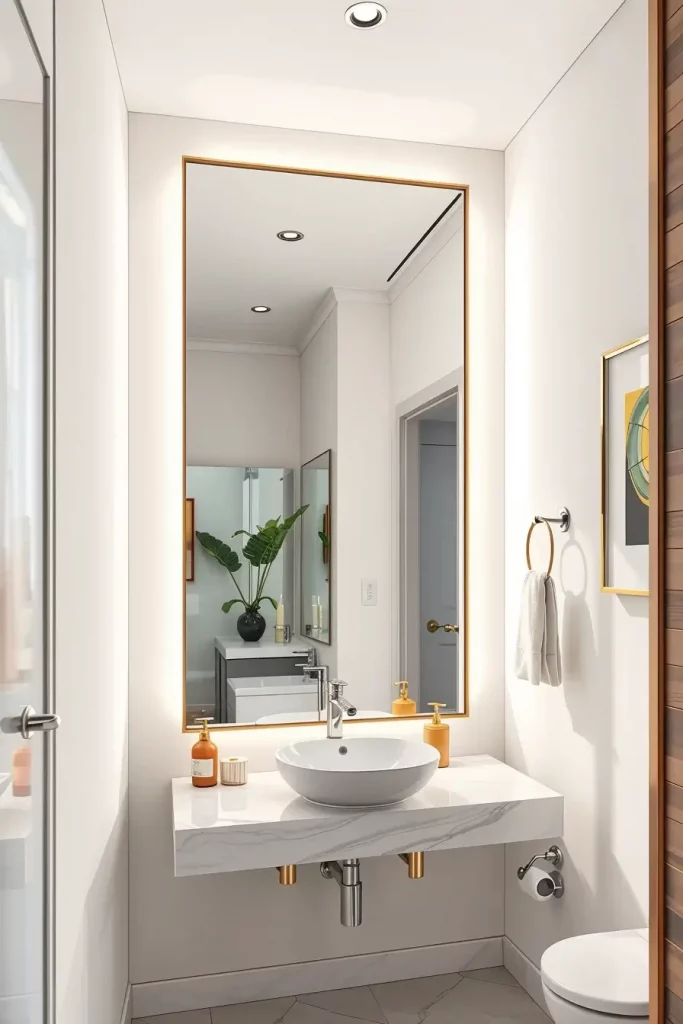
I prefer to have back-lit mirrors or framed mirrors over the vanities, which allow reflecting the light, be it artificial or natural. Mirrored medicine cabinets are an excellent 2 in 1 solution provided that space is available. A small contrast can be provided by the bronze or black trim when the rest of the palette is light.
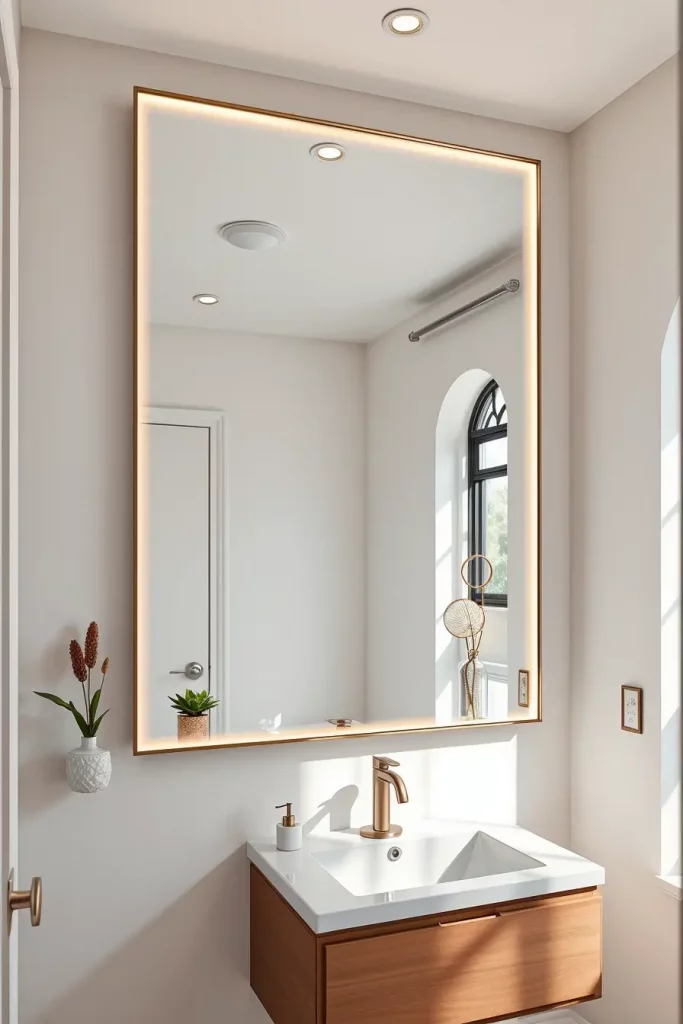
At one of my past assignments on a condo, we placed two mirrors on two different walls making the area to appear open at all the corners. Martha Stewart living urges a person to put mirrors opposite windows or source of light when possible so that the effect can be maximized.
To simply enhance this area I would incorporate mirrored cabinet doors or even a tall mirrored panel right beside the entry door to reflect even more and serve it as a decorative purpose.
Select Pocket or Sliding Doors
As we know it, conventional swing doors consume a lot of space. It will be smart to replace them with pocket and/ or barn-style sliding doors in any small bathroom. I have suggested it in many a renovation where the clearance is limited in a hall or where there is to be a better flow.
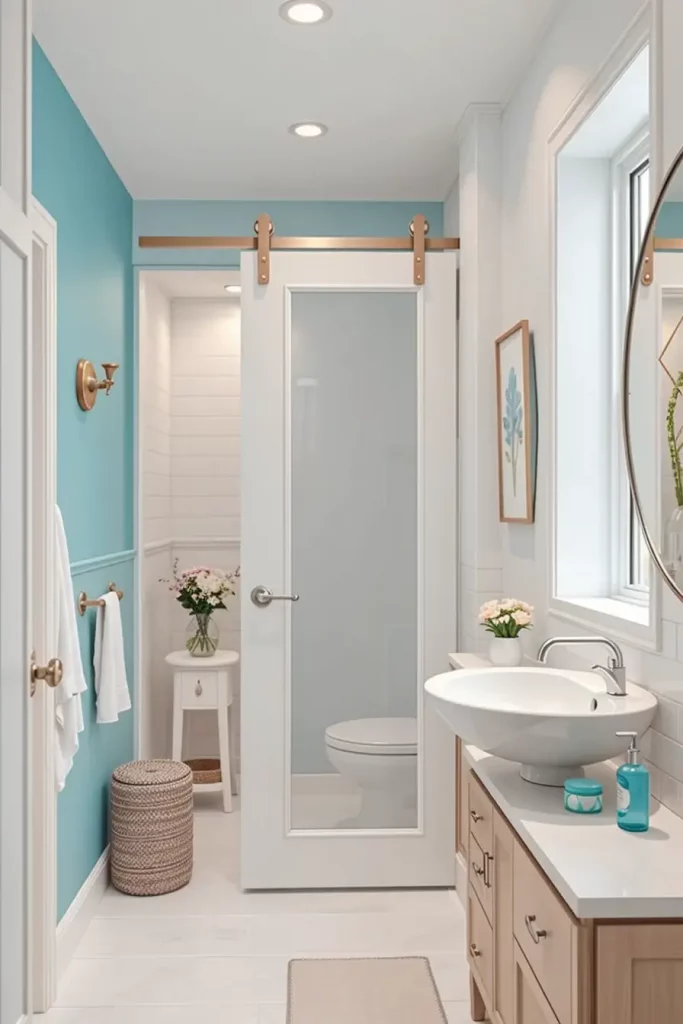
Pocket doors enter directly into the wall cavity, which gives more space on the floor. Otherwise, I would recommend a soft-close sliding door (with tracks mounted to the surface). I prefer frosted or textured glass so it is private, but the light still enters. It gives it a dose of elegance and saves important inches.
The bathroom shared by one client felt tight because of the awkwardly swinging-inwards door it had. When it was changed to clean white sliding panel, we got the impression of the room becoming two times larger. It is also among the switches that Apartment Therapy recommends as one of the key ways to save space in small houses.
The only thing, I would put in this design would be a matching door handle or lock component to bring the rest of the bathroom hardware together, to not feel disjointed.
Opt for Wall-Mounted Fixtures and Toilets
Small bathrooms can be immensely decluttered by means of wall-mounted sinks, toilets, and faucets. I would advise them frequently in a slim layout owing to their capacity to reveal greater ground area and provide the room with a streamlined appearance. And they are also less pain to clean below.
What I generally do is to nail on wall mounted toilets with the tank behind the wall-they are very advanced and do not take space. Sinks can use floating basins which are suitable and can even be combined with wall mounted taps in order to free a section of the counter. Hand soap in a soap dish mounted on the wall or a toothbrush rack can be regarded as a variation.
I used this product to a miraculous effect during one of my recent remodels (a guest bathroom that was boxy was transformed to sleek over a weekend). These are some of the substances featured on Dwell and Dezeen when it comes to luxury compact homes.
Other than that, I would recommend the inclusion of under-cabinet motion-sensor lighting or a recessed waste bin to carry through the clean, off-the-floor effect.
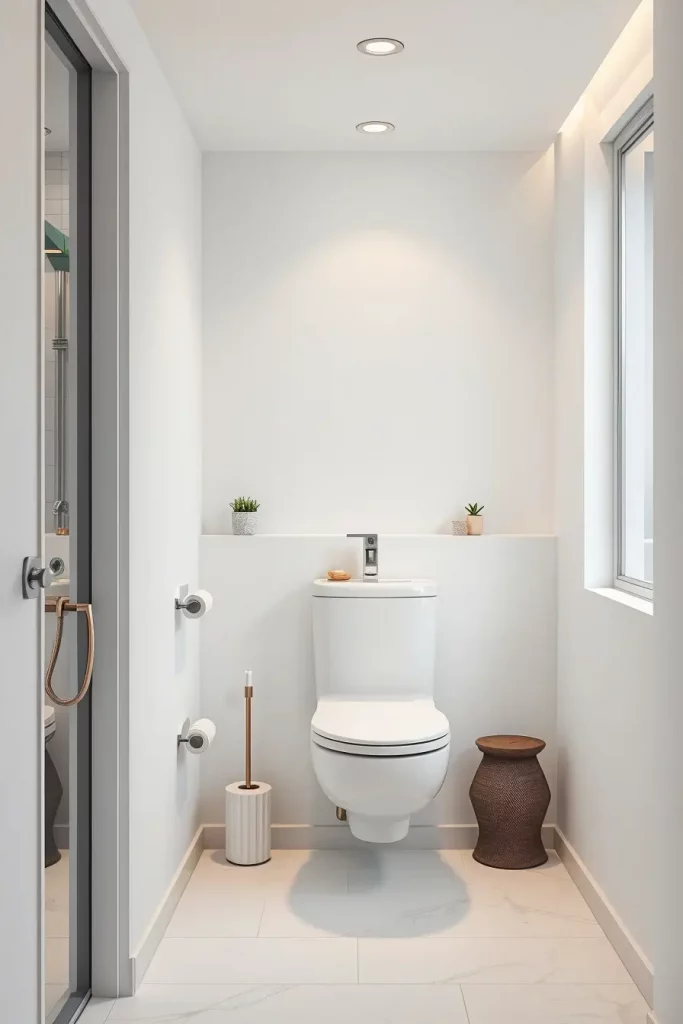
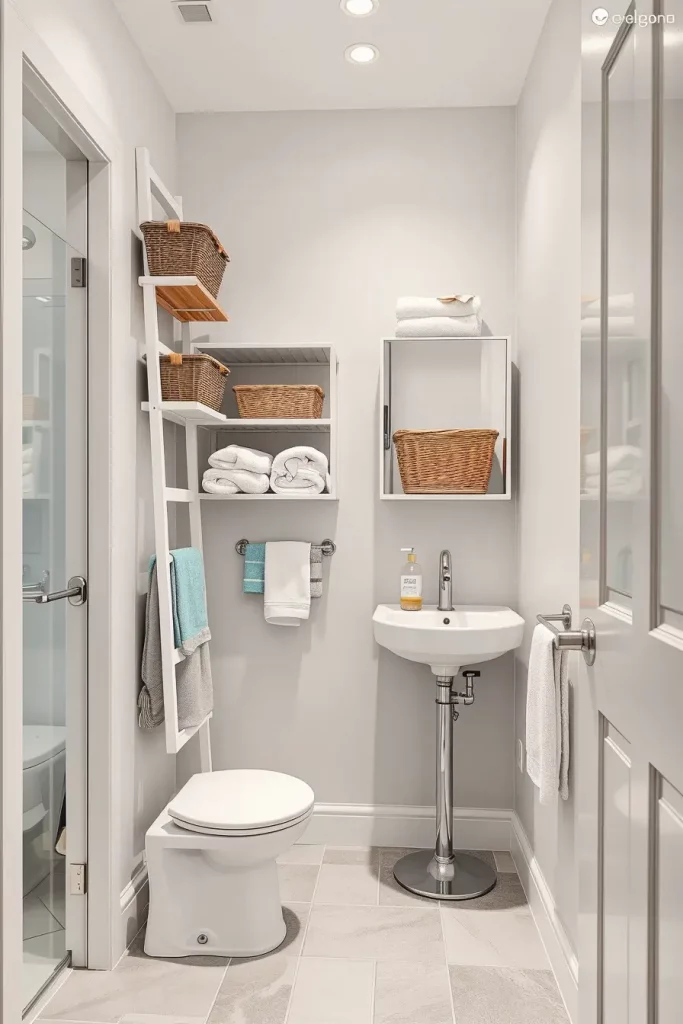
Utilize Over-The-Toilet Shelving Ideas
Regarding small bathroom design, the area above the toilet is one of the most ignored ones yet very valuable. I always encourage people to utilise this vertical space which can be done by installing shelving or cabinets that are functional to the cause. It is an ideal position to keep towels, toilet rolls or anything to decorate that place but not to overcrowd the floor.
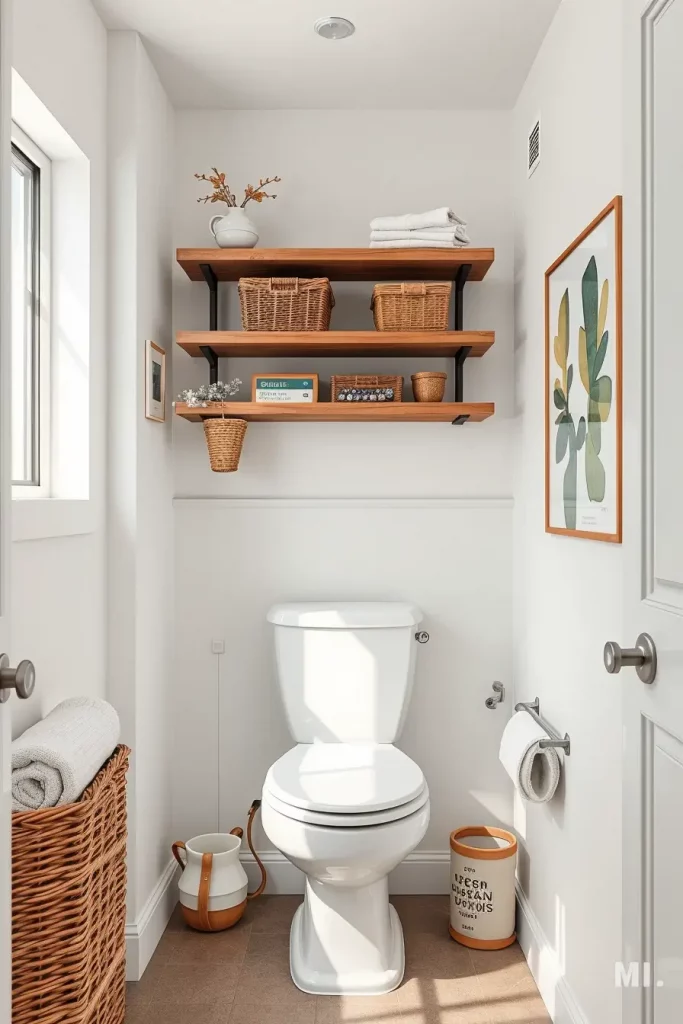
In the case of these shelves, my personal preference is to use floating wood or metal brackets together with baskets or labeled bins. Alternatively, a full length over-the-toilet cabinet can present covered storage of hiding necessities. What matters is the selection of materials which coordinate with the rest of the bathroom design, i.e. using white lacquer to obtain clean appearance or wood tones to get warm. I tend to leave the styling sparse so that it does not look cramped.
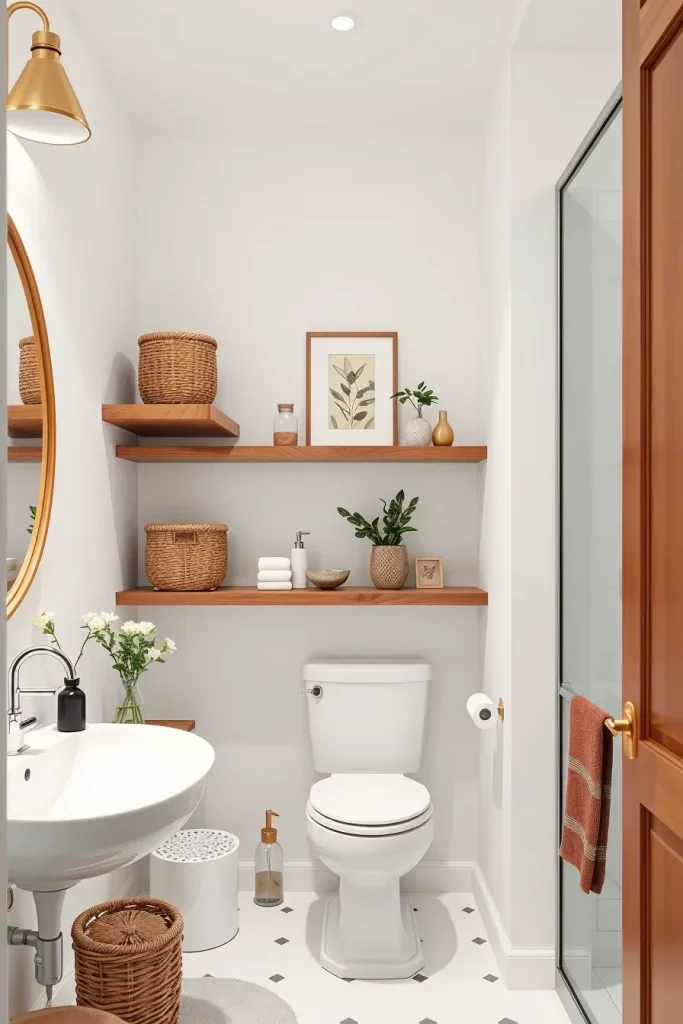
I can testify that such trick can be magic in staggered bathrooms that do not have much space on walls. Over-the-toilet storage recently was picked up by Real Simple as one of the top vertical products to make the most of small bathrooms. I have witnessed it giving a video projection a boost in functionality without sacrificing anything to aesthetics.
The only thing I might suggest here to add is a narrow-framed mirror or art over the top shelf to direct the eyes up and create the feeling of high space.
Choose Bright Lighting for a Spacious Feel
The role of lighting in a small bathroom is enormous. I have discovered that overlaying various light sources serves to get rid of shadows and makes the area look larger. An open well washed bathroom that is well lit provides an impression of freshness, cleanliness, and welcomes more people in store; regardless of the size.
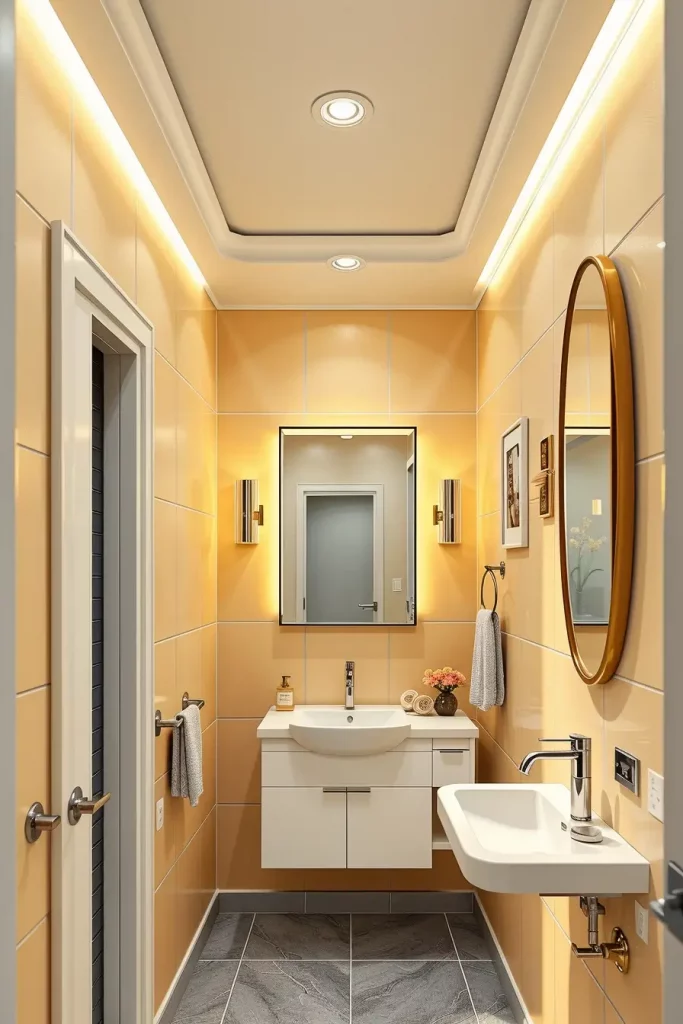
My usual advice is to use recessed ceiling lights together with wall sconces or wall mounted backlit mirrors. A day-type LED bulb behaves similarly to natural light which is perfect to grooming activities. I since enjoy laying down accent lighting as well, toe-kick lights in the vanity, or even inside shelves, add dimension but are subtle and do not distract as much as a headlight in the open.
In a remodel that I did, I changed an older single bulb overhead light to three layers of lights. The contrast was startling,–instead of dark and narrow it was light and airy. When bathrooms are small, The Spruce recommends brighter lights, which would help to emphasize the architectural elements and reduce the obstacles to visual perception.
Another concept in this area could be the installation of a dimmer switch, so that one could regulate the amount of lights in accordance to different times of the day or the mood, bringing an extra measure of comfort and luxury to the process.
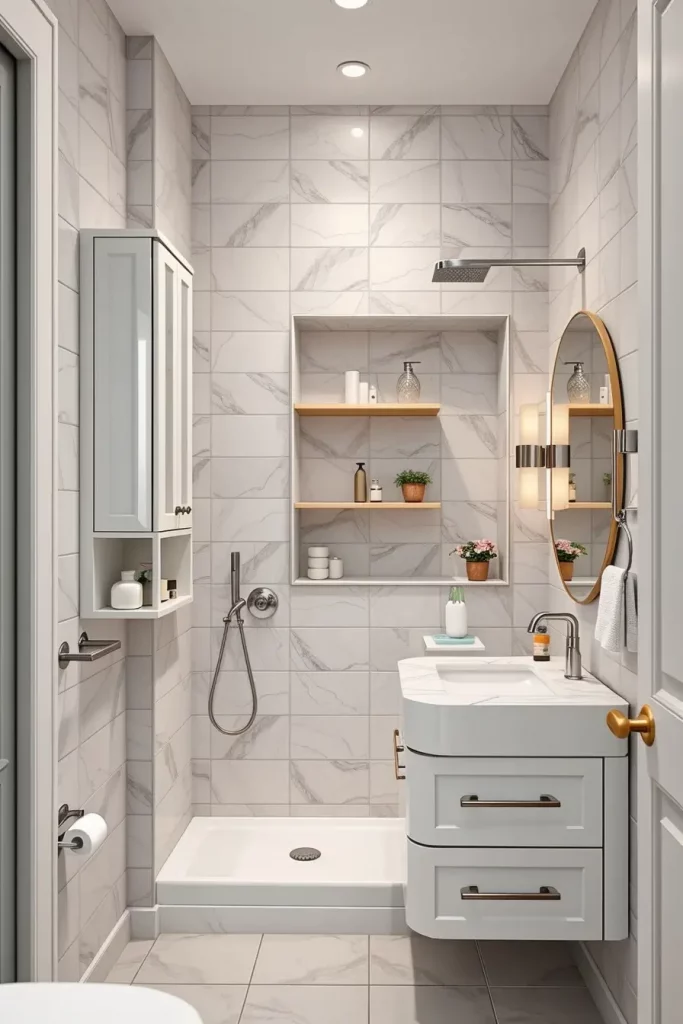
Incorporate Recessed Shelving and Niches
Recessed storage is a revolution in the field of small bathroom design. It enables me to use some more space without infringing in the room. Cut-outs in walls are a good place to have a sleek storage, particularly in showers or above vanities, as it is not bulky in comparison to regular shelving.

I prefer to incorporate tile-lined niches on shower stalls in which there would be shampoo, soap, and candles. In dry locations recessed cubbies can contain rolled towels and even ornamentals. These built ins are making themselves invisible and keeping flat. They are always planned with light in mind, just to have small LED light bars inside the niche to create function and ambiance.
One of the clients had a shallow wall between the studs and we used them to add three vertical niches–stylish, functional and absolutely out of the way. Better Homes & Gardens declares recessed niches as one of the brightest ideas to create storage on the narrow way and I completely vouch on it.
Another thing I would recommend is to make sure the niches are at ergonomic levels- the minor attention can lead to better ease of usage and stream of the bathroom.
Use Monochromatic Color Palettes
The limited color scheme in a monochromatic set of colors gives a smaller room a calmer look, simpler, and wider. In my designs of small bathrooms, I tend to use different shades of the same color. This removes harsh breaks and texture and brings about calm and cohesive space.
An example is the bathroom that I was working on; here, taupe colours were used in layers: light taupe as tiles, medium tone of the cabinetry, and darker taupe on accessories. The minor tonal variations are not contrasting. It is an excellent tactic especially with whites, grays and beiges, as well as muted greens.
At least I find this method relaxing. It is a minimalist design that is devoid of being cold. House Beautiful is in support of monochromatic schemes since they help to merge surfaces and make small rooms appear larger than their size.
The only thing I would put here is the texture contrast Inserting the matte, glossy, or even brushed effects with the same color palette to make everything interesting and dynamic.
Install Corner Sinks or Vanities
A small bathroom has to have every inch as usable as possible and nearest corners are usually unused. When it comes to the flow of traffic, I always suggest that corner sinks or vanity should be installed to clear the central space. This dual tank arrangement fares well especially in half baths or poorly designed bathrooms.
Curvature of corner vanities makes transition easier and avoid bumping off the furniture. There are even frames that come with under-storage or shelf (open). To have a slim look, I prefer to get a floating or thin legs design that maintains a light and contemporary foot print.
I remember doing a makeover on a couple that was going to have the powder room altered by replacing the regular vanity with a corner sink. It did not only release the floor area but also provided a better way out via the door. This plan has been commended by Bob Vila to be a practical solution to small spaces with high optical accountability.
The only finish that I would have added here is a small triangular mirror or light over the sink in order to finish the design and make everything proportional.
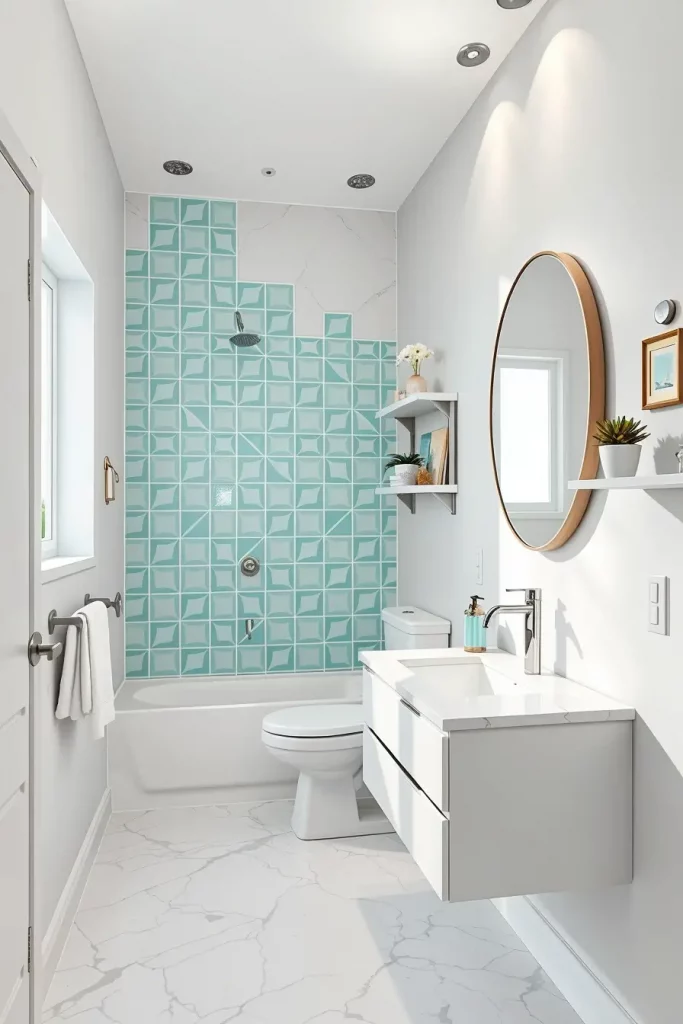
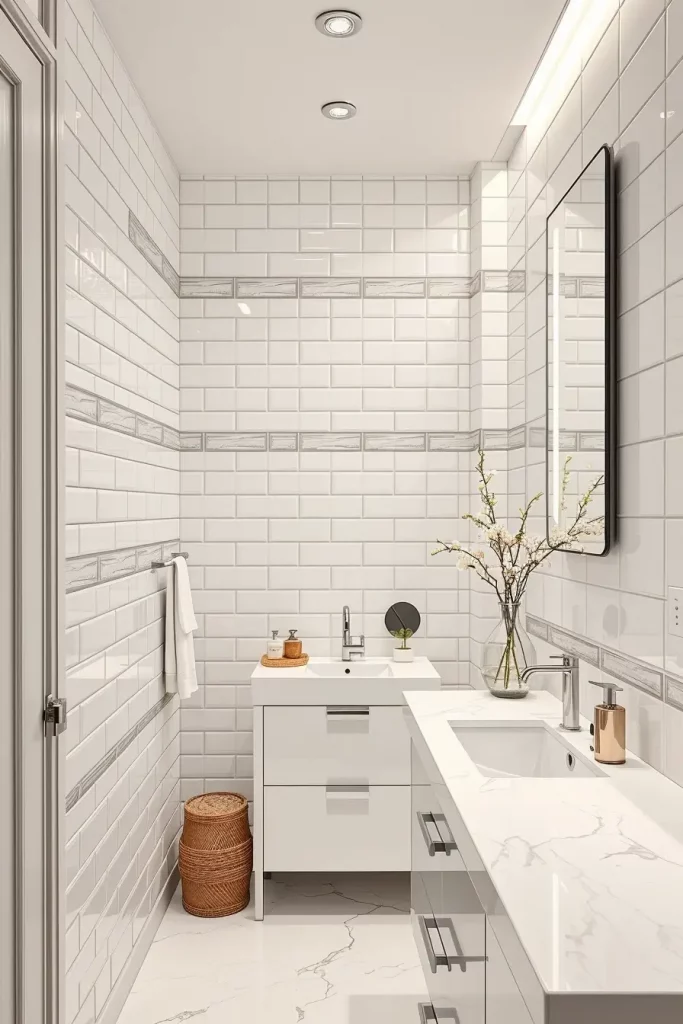
Create the Illusion of Space With Tiles
Tile has a knack of twisting perception. Whenever possible, I always prefer to stretch a small bathroom with large format tiles and straight line designs. When placed on floors or on walls, a proper tile arrangement could be all that is needed to make a place seem relatively spacious.
When I use large tiles, I usually have very thin grout lines to make the area less busy to the eye. Using horizontal designs will make a room appear broader, and vertical shapes at the same time can be used to add height through the use of stripes, tiles etc. Walls covered with glossy tiles can reflect light and lighten up. Particularly in showers, I like stacking (vertically) rectangular tile, to create an airy contemporary appearance.
In a renovation, the floor was covered with pale gray plank tiles arranged in herringbone pattern, which is very impressive and spacious to look at. Interior Design Magazine can make use of tile as a strategic element to make small bathrooms appear bigger, particularly when they are accompanied with minimal color schemes.
Another trick I would suggest is to make the grout the same color as the tiles. This does not break the surface and makes the illusion of space even more thoroughly.
Avoid Clutter With Hidden Storage
A packed area is always small. This is the reason why I pay a lot of attention to hidden storage in any design of small bathroom I undertake. Recessed cabinets, drawer organizers and other hidden compartments keep the overall look open and clean.
My preference is normally the vanities with deep drawers with dividers inbuilt. Mirrored medicine cabinets and under-sink rollouts or even the toe-kick drawers are great spots where the daily essentials can be stored. A storage does not have to be visible to always be practical it simply has to be accessible and well organized.
One of my client wanted to incorporate a custom vanity, with a built in hair tool kitchen, heat proof lining, plugs concealed into the cabinets. The check remained clean and the room was more spacious. In Domino Magazine, there is always the display of brilliant secret storage which is functional and beautiful.
There is one more thing that can be added including labeling and interior lighting. Such minor details may be the difference between making your storage devices usable and intuitive.
Play With Patterns on One Feature Wall
My favorite design trick when it comes to small bathrooms is to use a patterned tile or wallpaper on one wall only; adding the interest of pattern to the room but not going overboard. This solution attracts attention and gives depth, creating the impression of a room that is bigger. I usually use the technique at the back of the vanity or the shower where people normally take attention. This is not only the maximization of impact but also the control and cohesiveness of the design.
Usually, I prefer geometric tiles, soft botanical prints or stripes (vertical). The designs have the condensed effect of lengthening the room which is highly essential in compact spaces. Combining them with neutral colors in the remaining part of space help to keep the room down-to-earth. As an example, I usually prefer the combination of black and white hex tiles to light grey walls and floating vanities to achieve a compelling contrast.
Personally, I have known this feature-wall technique to work effectively. One day one of my designer friends who works at architectural digest who suggested going bold once, only once, and I can swear that I fully agree. It is just a matter of balance. There ought to be restraint as a crowded bathroom is confined and restrictive in a short period.
I would say also that this feature wall concept goes well with the least amount of accessories, and plain shelving. In that manner, the pattern will be the statement but not an ally with clutter.
Combine Functionality and Decor With Hooks and Rails
The less space you have time to spare, the more the small things need to serve two purposes. I usually place decorative functional hooks and rails where I can store clothing items in a beautiful way. A rail and brass finishing or matte black fixtures can immediately characterize and bathroom, along with providing you with a place to hang towels or baskets. Such accessories are not just space-saving but they are functional and good in appearance.
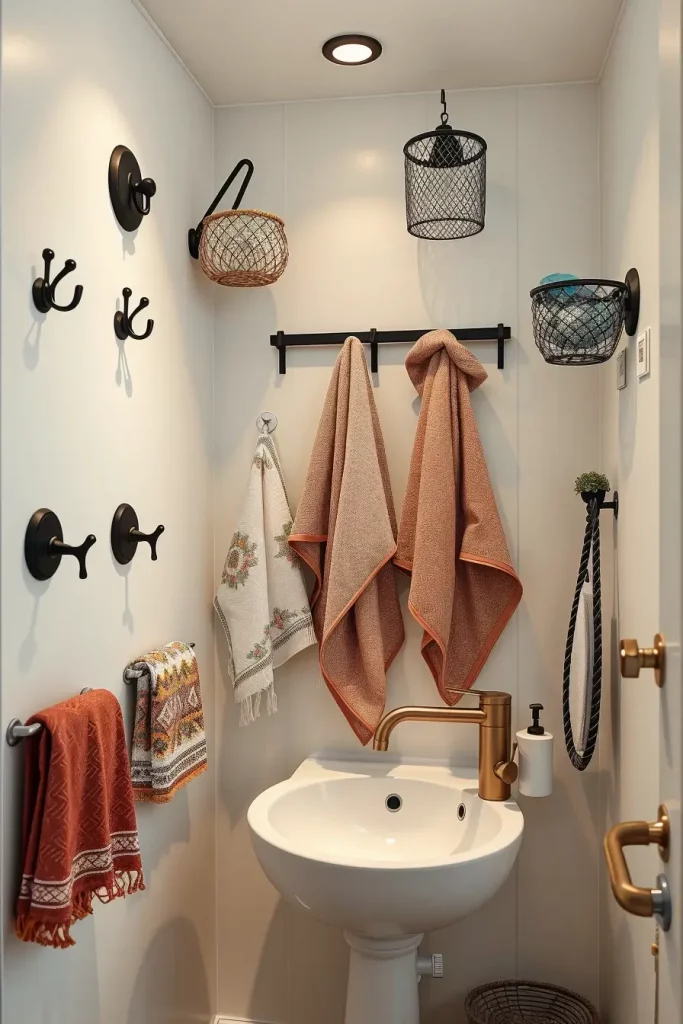
I prefer to put a rail over the toilet/ next to the sink. This leaves necessities in reach without having to have bulky furniture. Add some variety to it by hanging planters or textured hand towels or even hanging artwork to make it curated. There was a particular remodel when I placed hooks that had leather straps and the entire room changed the atmosphere of the room–classy and rustic simultaneously.
In my case, functional decor is worth investing in. I can never hear complaints about these things even in the smallest bathrooms that I have renovated. House Beautiful lists integrating form and function as one of the best strategies to use on small spaces.
You might also consider adding a lower rail for kids’ towels or hanging organizers. I believe that adding various amounts of heights makes it more versatile without modifying the design.
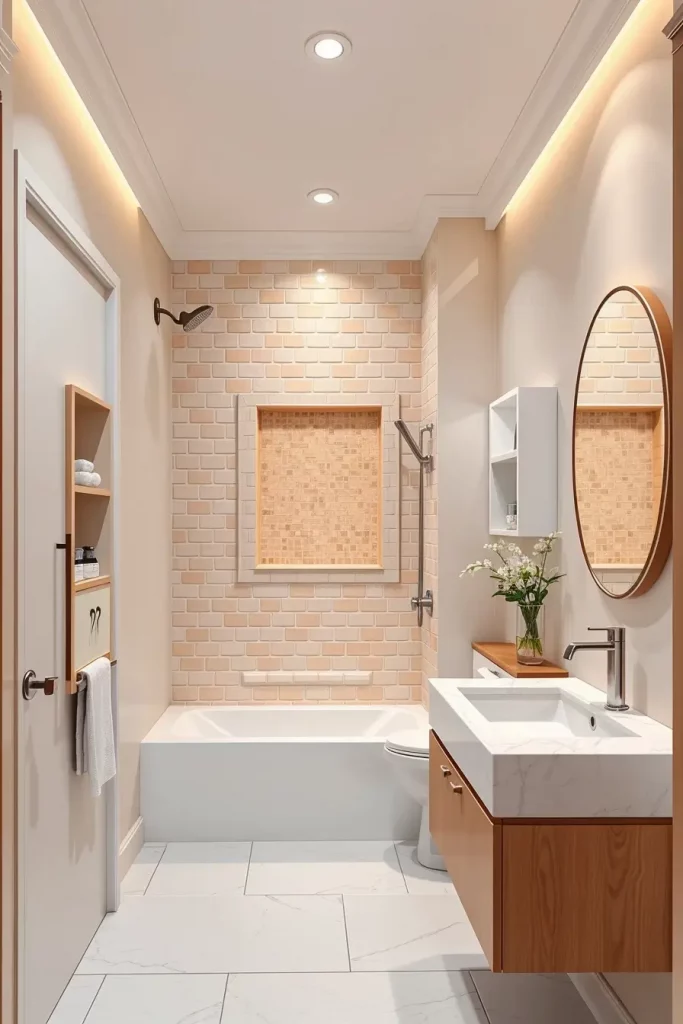
Keep Flooring Continuous Throughout the Space
In the case of small bathrooms, continuity is the key. Every time I would tell someone that it is always better to continue the same flooring all through to the other end of the room, including into the shower when you are able to do so. This visual similarity causes the space to look big and unified. The situation with contrasting tiles may make the room appear cut and look smaller.
I tend to apply luxury vinyl or big porcelain tiles in neutral colors. Not only are they durable, water-resistant; these materials also create a smooth appearance. Soft marbles or light grays and beigs serve the purpose of reflecting the light back and brightening the room. In one project, we laid matte marble-look tile over the door looking like it went into the shower, and that literally gave the feel of doubling the area.
What many clients often tell me is whether they should use tile borders or mosaics. Somehow my answer tends to be no–unless you want a design statement. It is more effective to have it clean and simple when it comes to small bathrooms. HGTV says that without lines in the floor it will allow more space.
To take this design tip to a higher level, I would recommend the matching of your tile grout to your tile. It makes the flow smoother and the eye does not come to a halt as opposed to the sharp edges.
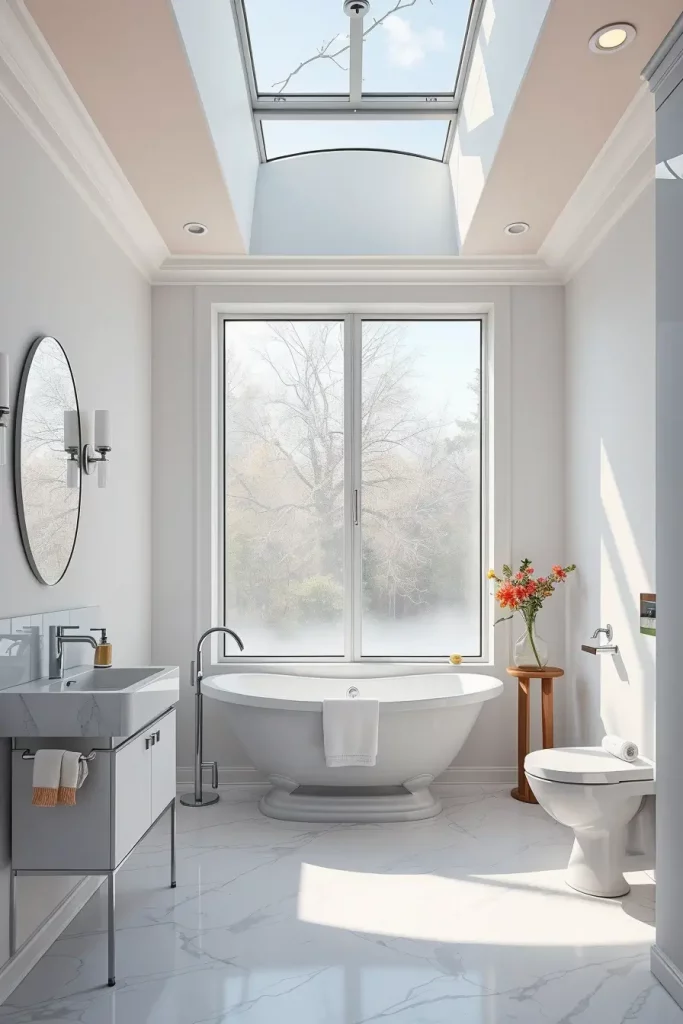
Add a Skylight or Use Translucent Window Film
Unique and simple, one of the most effective improvements to a small bathroom could be using more natural light. Depending on the space available, skylight is highly recommended, as it not only brightens up the room but it also gives an open feel to the room, something that lacks in many small rooms. In the case of non-windowed areas and bathrooms, I frequently use the window film that gives translucency to obtain privacy and at the same time allow sunlight to fill the area.
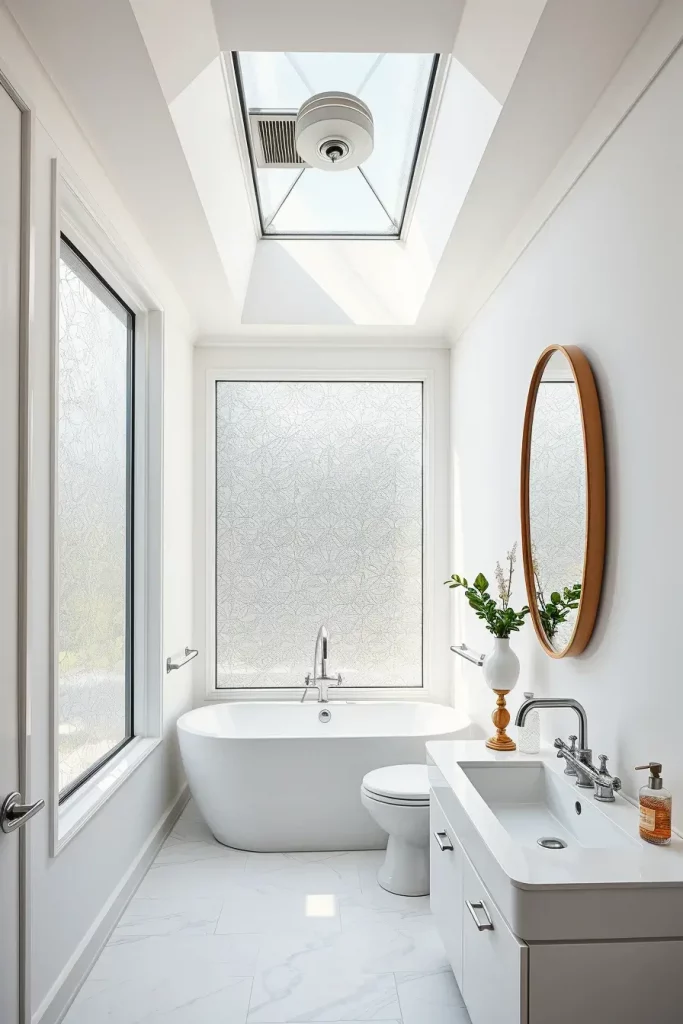
Bathrooms with vaulted ceilings or that are located on the top floor are fit well with skylights. However, in case it is not feasible, there is nothing to worry about since window film is also cost-effective and, at the same time, fashionable. I have put on frosted or etched films that help in diffusing the harsh daylight. It looks like a spa although it is only a fancy design.
A solar tube skylight is a cheaper option to a full skylight, so I did the installation of a solar tube skylight one time in the dark bathroom of a client and the effect was amazing. Recently, Better Homes & Gardens touted these light-benefiting tools as one of the best expends on small bathrooms.
In case I needed to improve this design recommendation, I would advise to combine natural lighting solutions with some kind of reflections, i.e. mirrors, high-gloss tiles, or even accessories made of chrome. They reflect light and enlarge the area.
Select Compact or Multi-Functional Furniture
In small-sized bathrooms furniture should not be an entitlement. I can always recommend such furniture as small, built-in (mounted on the wall), or versatile ones. These accessories take up less space and they also provide the space as well as style. My favorite is floating vanities clean lines, open floors, and out-of-the-way necessities.
A small example would be a narrow vanity that has drawers rather than having a cabinet door that gathers clutter- it is easier to organize as well. Another popular is a combo unit: a mirror, equipped with shelves, or a bench that has hidden storage. These products are handy without being bulky.
I believe this strategy is one of the best personally. An IKEA small vanity once cost one client nearly 2 ft of floor space and we utilized said space to place a towel hook and a small stool. Real Simple attributes the most important item in small bathroom furniture being the footprint usage and storage maximization.
Given that it can work in your layout, I would also recommend custom-cut furniture into awkward corners. There is also the odd layout design that accompanies small bathrooms and fitted relating to this can maximize on every inch of space.
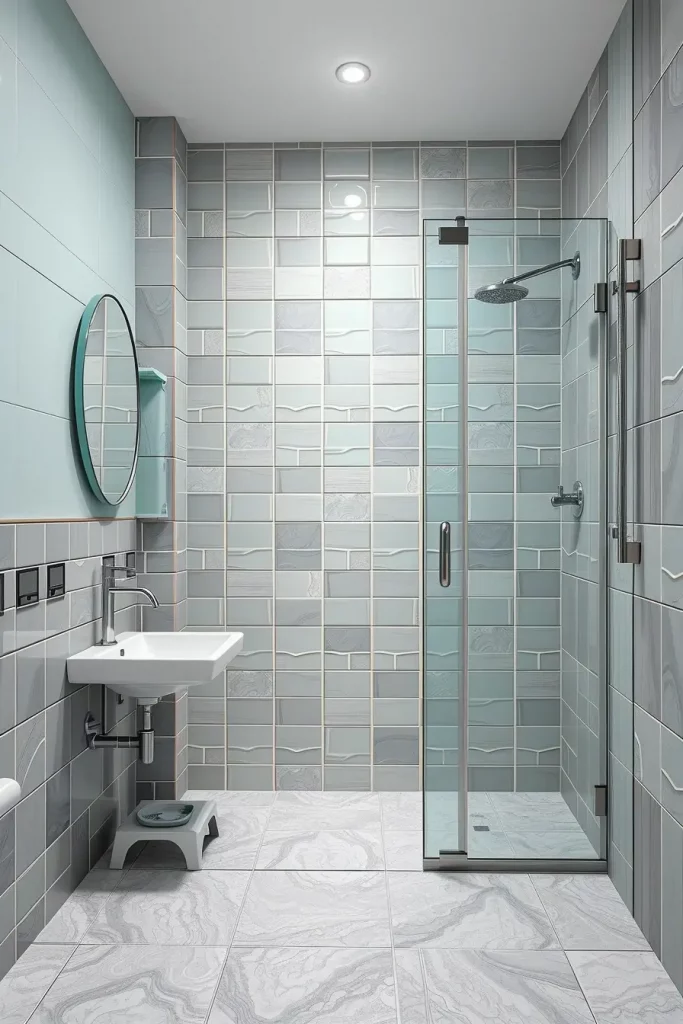
Choose Frameless Shower Doors for Continuity
Frameless shower doors can be another recommendation to keep the appearance of your little bathroom and not break it with the installation of the framed doors. These clear screens help one to get the feel of the room being less enclosed and more open as compared to framed and frosted walls since they provide a hard break in a line of sight.
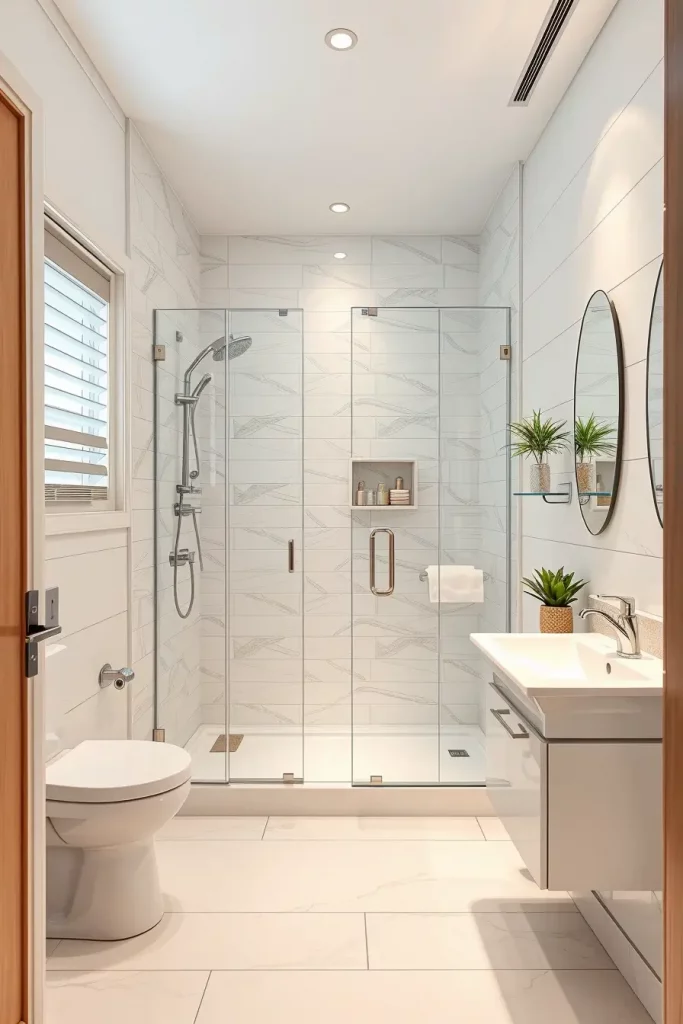
I usually apply frameless doors of tempered glass with very little hardware. They are complementary to any design style and have an excellent way of displaying your tiles. This not only makes the bathroom look bigger but extensive as well.
In one of the projects, we used pivoting frameless door of polished chrome hinges. The effect created was smooth spa aesthetic that immediately upleveled the area. Even Elle Decor suggests to have frameless glass in continuation of the small bathroom.
To go the extra step, one can consider using the frameless shower along with a linear drain and curbless entry. The two enhancements will build a flat and open surface that works best in contemporary or minimalistic bathrooms.
Opt for Transparent or Lucite Accessories
My design of a small bathroom usually focuses on using transparent or Lucite accessories in order not to over-fill it visually. Crystal shelves, boxes, or stools appear to blend into the background and make the eye concentrate on the room itself and not the item inside.
They all take the form of such accessories as towel bars, soap dispensers, even drawer pulls. I discover that clear designs enhance the feeling of something elegant without losing the feeling of light and airy. They come in handy in bathrooms that have bold tiles or patters on the walls.
One client told me that she did not believe how expandable their bathroom was after we had changed a metal shelving system to a transparent Lucite type. I have also noticed that a number of key designers have applied this tactic in smaller spaces of less than 30 feet. Domino Magazine states that transparent design is one of the best choices in terms of the small urban life.
You may also think about using these obvious elements with chrome/ brushed nickel hardware to have contrast. It defines sparingly and yet does not overwhelm the space.
Try a Minimalist Approach to Fixtures
Everything has weight in the eye in small bathrooms. That is why I tend to stick to minimalism in fixtures (in terms of both style and functionality). Minimalist finishes, simple beautiful lines and lines without embellishments make the room remain open and unobstructed. Minimalist fixtures don’t compete for attention, which allows other elements, like tiles or mirrors, to shine.
I would usually opt for wall mounted taps, small sinks cavity sink and smooth handles. My favourite finishes are matte black or brushed nickel- they are not flashy, yet highly elegant. I also suggest the use of simplified showerheads and small-size towel bars which do not stick out the way too much. These pieces contribute to saving on the valuable wall space and maintaining the design being neat and seamless.
The given strategy assists me in developing a relaxing and clutter-free atmosphere, which is critical in a small room. I once used a wall-mounted mixer tap from Kohler in a 4’x6′ bathroom—it freed up counter space and looked stunningly clean. Architectural Digest is fond of minimalist bathrooms, and the repetition in fixtures is the factor that makes the difference.
In case I had an opportunity to improve this section once more, I would consider to install built-in soap dispensers or graceful wall-mounted toothbrush rails. All these contribute to the aesthetic flow and give it a tidy appearance.
Use Bold Accents in Small Quantities
Less is sometimes more and this applies most when using bold shades of colors or anything that makes a statement in a small bathroom. I have understood that little amounts of daring features can be an enormous impression without overworking the design. Bold elements, whether a brightly coloured towel, a vivid element of wall art or a stripe of one single colour of tile, should be selected and in limited amounts.
My standard accent colors are mustard yellow, navy blue or emerald green. These tints can be used within the line of accessories, such as soap dishes, rugs, or an impressive frame of a mirror. Recently, a client hired me to decorate her new house, and I applied a coral ceramic vase in a floating shelf, and it now turned out to be the greatest highlight of the room. These accents add character without making the whole impression heavy and stuffy.
Large touches ought to never be thoughtless. Elle Decor claims that placement of color works strategically to attract the eye where you intend it and not give the place the impression of a complete mess. I do absolutely agree. The key is placed wisely, and not excessive.
A bold pendant light or a distinct piece of art can also be used in case you feel adventurous. All you have to do is ensure it does not cram your layout or disrupt necessary functionality.
Elevate With High-Mounted Curtains or Shower Drapes
Curtains or shower drapes that are near ceiling is one trick I do regularly to have a small bathroom look taller. This makes vertical lines that are seen to move upward and that give an illusion of depth. It has a wide visual payoff, it is an easy way to solve it, and it can be paired and applied even where there are no high ceilings in the bathroom.
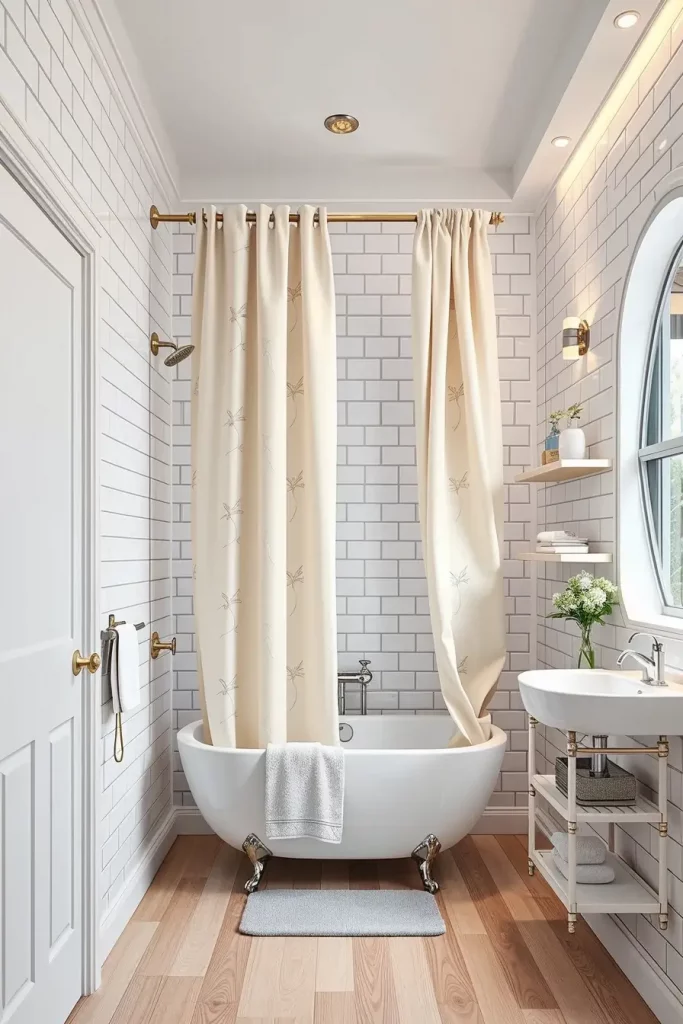
I hang the curtain rods instead of the usual height – I hang them 6 inches to 12 inches above. This is paired with floor-length shower curtain made of solid colored or slightly patterned fabrics, which extend the rooms extensively. I also like to use ceiling mounted tracks, where I can, it is cleaner and more custom.
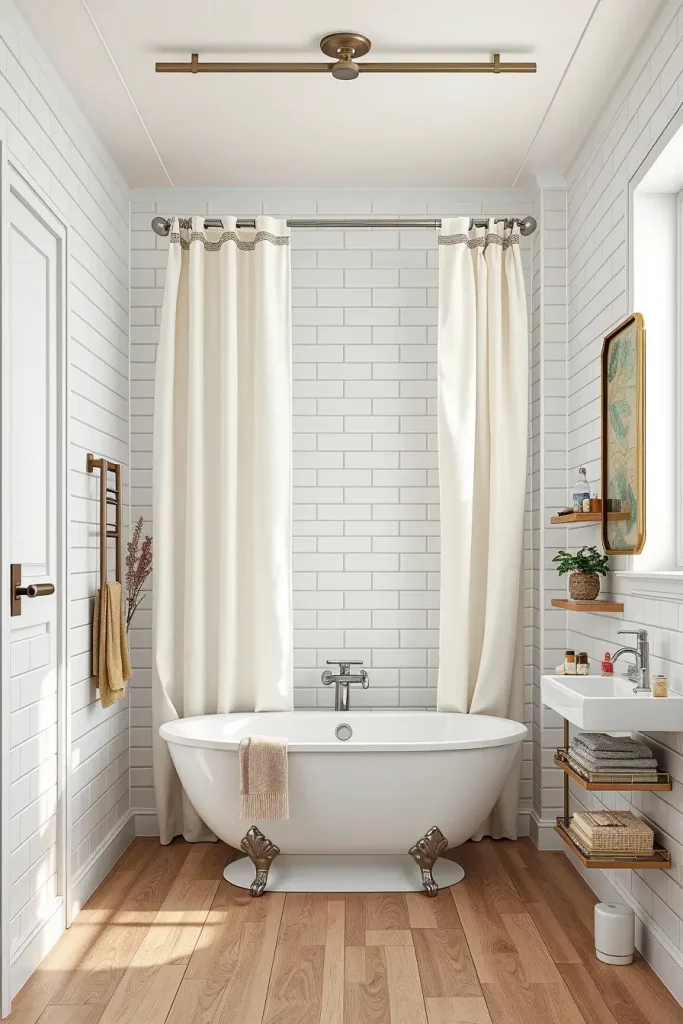
This method serves as a memory of me on how designers use full length curtains on small apartments. Better Homes & Gardens states that when vertical accents in a small area, it creates the impression of air and lightens up the atmosphere. It is applicable to the bathrooms as well – especially the ones who are equipped with tubs or wet areas requiring soft partitions.
I would also recommend using lighter resources such as linen or polyester mixes. Bulky materials may be a thing of the past since heavy materials cannot breathe and may hold water, in which case, wearing and washable materials will be a more intelligent substitute in a humid climate.
Customize Storage With Built-In Cabinets
The solution to tight spaces is usually the custom solution. I often create a cabinet that is built-in or a niche that uses an awkward corner, a recess in the wall or underused vertical areas. They are perfect when it comes to keeping your toiletry and towels in one place without having to mess up your room.
My favorite design is a vertical cabinet that fits next to the mirror, that is, it is narrow and just 6 inches deep, but includes a dental floss, skin care products, and grooming tools. The shower wall has also built-in cubbies that are very helpful in storing bottles as well as making sure that the surfaces are clean. The design is simple and the finishing and the handles are aligned.
One time I assisted a client to install recessed mirrored medicine cabinet between studs and they found it their favorite. It appeared elegant and did not require storage of items on a counter top. House Beautiful has recently touted this as one of the best trends in urban apartment bathrooms and everyone should do so.
To add to this, I would recommend that one use adjustable shelves in these built-ins. In that manner, they can adjust to your demands and be flexible without compromising shape.
Layer Lighting for Function and Ambience
In a small bathroom, lighting should not be focused on one bulb on the ceiling. I would always advise that lighting is done in layers, including ambient, task and accent. This brings out depth into space, makes the space more functional and more stylish.
Most of the time, I start with a ceiling-type of lighting fixture or in-line ceiling spots. Then I put sconces on each side of mirror to give a favorable, concentrated light when grooming. Lastly, I can add LED strip lights under shelving or around mirrors to give a soft glow in the form of ambience.
Based on my experience, the layered light does not only render the space more functional but also makes it more luxurious. I always go to a statement pendant light with soft white sconces. The lighting layers were recently qualified as one of the most essential items in terms of beauty and performance in compact bathrooms, by Domino Magazine.
I would also think of using dimmers in case the wiring permits it. The possibility to regulate the brightness throughout the day will increase comfort and turn your bathroom into a more versatile one.
Make Use of the Back of the Door
There is no room to lose in such small space and the backside of the door is valuable space. I tend to keep the hooks, over-the- door hangers, or even skinny organizers in this space to store bathrobes, towels, or hair tools. It comes in handy when dealing with powder rooms that lack sufficient ordinary cabinets.
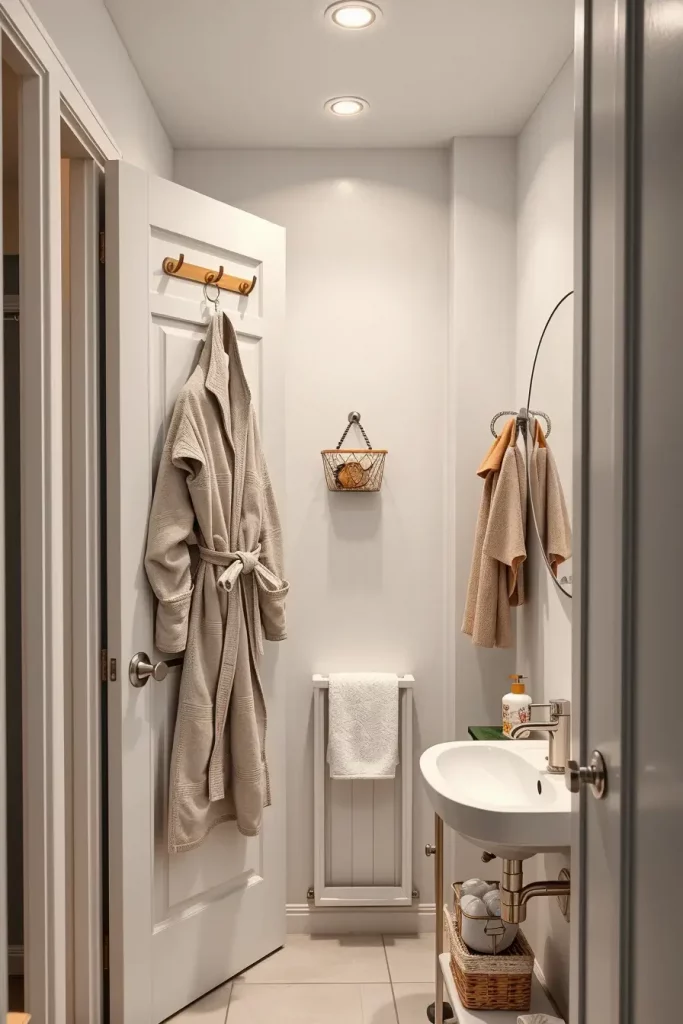
My all-time favorite arrangement is that of a thin rail, and several hooks and a fabric pocket organizer. This removes clutter on the counters and allows a simple rotation of your seasonal or personal items. Moreover, it is a solution that needs no redesigning but clever positioning.
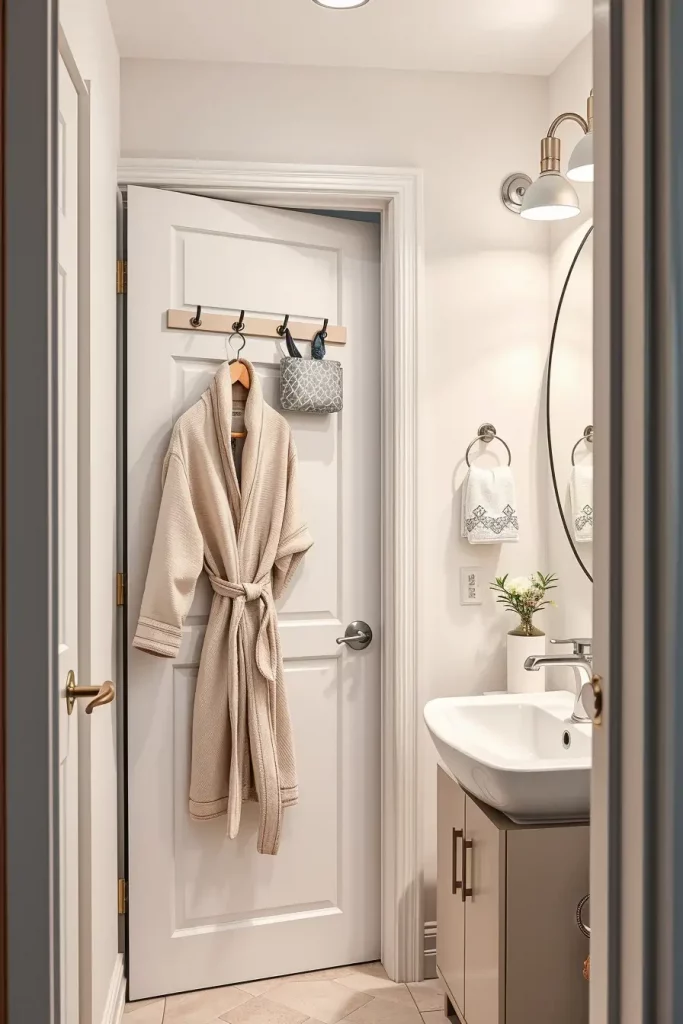
I have actually witnessed this tactic even in the design of the high-end in Real Simple. It does not matter the space that you have, it is how to utilize it. I have a towel warmer on the door of my own bathroom and it works very effectively.
Another potential upgrade I would recommend (although it has to be admitted this is a minor one at that) is to choose matte-finishing hooks or a wooden rack that would go with your particular decor. These minor features can make the appearance higher without sacrificing functionality.
Go Vertical With Ladder Shelving
It is one of the most brilliant ideas to create storage without gaining bulkiness by means of installing the ladder shelving. These narrow, vertical units lean against the wall and offer tiered storage that doesn’t overwhelm the room. I can use them many times in little bathrooms where cabinets simply will not fit.

Ladder shelves may accommodate baskets, towels folded, skincare, plants or other decorative objects. The wide layout makes it open and spacious. To accompany these color schemes I like finishes that are made of wood, preferably white, oak or black. They can work on a sink side or behind a door.
My favorite makeover was one in which a bamboo ladder shelf was utilized to organize daily needs and to relieve the vanity. Customers are crazy about diversity. HGTV itself has mentioned ladder shelving as one of the coolest organizational means of small spaces.
Add stickers or little containers to your ladder shelf sides as long as it has broader steps I recommend. To deduce the mess, visualization of the same item can be combined to make your routine much easier.
Pick Reflective or Glossy Finishes
Applying shiny or glossy materials is one of the best bathroom hacks that make a small bathroom feel larger than it is. These finishes reflect the light all over the place which creates an immediate impression of a bigger and open room. I have dealt with everything; shimmering ceramic wall tiling to high gloss vanity units to increase natural and artificial light in the small bathrooms. The shiny, light-reflective surface will help to make a dull place lively and bright.
This is all true in my case as in my house and in my experience the wall tiles that are made with the glossy finish, the lacquered cabinets and even with the mirrored back splash all contribute to this optical illusion of space. My walls are usually painted in highly reflective paint and I complement them with smooth porcelain tiles and the counter top is usually polished quarts. Even the ceiling, with a glossy finishing, may also help to lend a brightening effect.
As an individual, I enjoy working with a white or light gloss tiles to supplement modern view. The room looks clean and streamlined when combined with a minimalist design approach and built-in lighting. As said by Elle Decor this is one of the main techniques used by the interior designers inside the apartment/condos in major cities where they just want to increase the level of brightness and improve the design.
To enhance this design further I would recommend including soft LED lighting under wall cabinets or mirrors in order to enhance even further the reflections. This would also contribute to the slenderness of the grout lines as well as the consistency that would give the aesthetic feeling of a smooth unbroken surface.
Add Plants or Green Accents for Freshness
The delicate use of plants and accents in a shade of green is one of the methods that I use to bring life to a small bathroom. It can be a mini succulent on the vanity or a thick fern in the corner of the room, but the greenery gives that necessary freshness to the room that can be implemented immediately. The high tones of green form contrast and neutralize the hard surfaces more visible in the bathroom, such as tiles or stones.
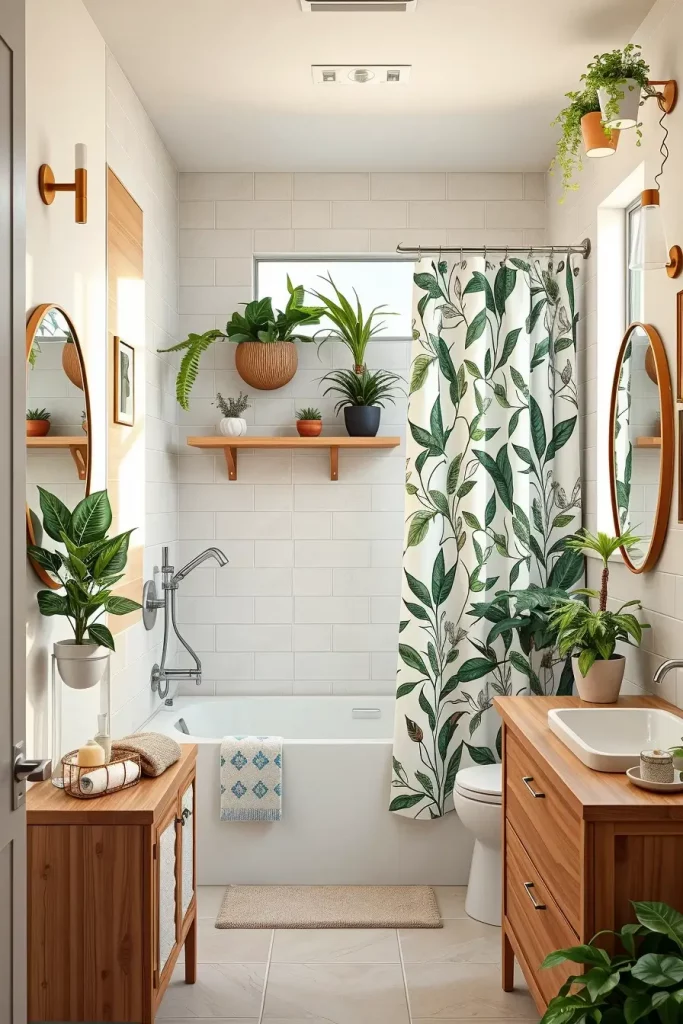
I normally add wet-loving plants that include pothos, Boston ferns, or ZZ plants that do well in the moist air of a bathroom. My choices are to put an trailing plant in a floating shelf, a potted plant in the windowsill or even a vertical garden feature on one wall. In times where I wish to cut down on maintenance I will use high quality artificial plants which still exude that kind of organic warmth.

As experienced by me, I feel more relaxed and close to nature, even in a congested area, through greenery. Better Homes and Gardens specialists are in a consensus that houseplants also enhance air quality and affect emotional welfare- a nutritious bathroom atmosphere.
To boost this idea, it would be important to introduce green color textiles such as a leafy bathing screen, forest green carpet, or towels with floral print. These minor details add to the natural effect without crowding the tiny space.
Use Mirrored Cabinets for Dual Purpose
Mirrored cabinets are widely used and I suggest them to be considered the main option in small bathroom design. They provide storage capacity that is hidden and reflect surface which helps to reflect the light and use the space efficiently. The combination can be faced above the sink or along a side wall and both are practical and elegant, best of all they go hand in hand.
I prefer pull-down medicine cabinets with soft close-doors and inbuilt LED strips. With layout particularly tight, I make use of recessed mirror cabinet in order to ensure flat appearance. They are ideal in storing personal things, first aid kits and make-up, thus keeping the counter clean and decongested.
I have never been wrong in my personal renovation when I applied this two-use design. There was an old 3×5 spare room I wanted to upgrade as well with a pair of mirrored and skinny cabinets together–it created an illusion of a wider wall. HGTV states that mirrored cabinet is among the cleverest storage solutions in contemporary small-space remodels.
To expand on this concept I would add some side lighting panels on either side of the mirror to eliminate shadows and help in making the grooming process easier to see. The fact that it is selected with a mirrored surface and anti-fog technology also makes it workable under steamy conditions.
Highlight One Wall With Textured Tiles
To accentuate a small space, I prefer to attract the eye and add depth by focusing on one of the walls made of textured tiles. The method leaves a light but strong design statement and does not dominate the room. In case of a small bathroom, I like the place behind the sink or the shower enclosure as a location.
There are endless varieties of textured tiles, such as geometric to ripple effects. I usually incline to 3D ceramic tiles on matte white or soft neutrals to make it look posh. Not only do these give dimension, but also pleasant tactile relief to the nearby smoothness. It turns out a visual focal point without being cluttered.
In my home, I prefer combining them with a clean vanity and clear shower panel to make highlights on the texture. According to the Architectural Digest, having a single accent wall in a small room will allow creating a balance of images and make elements visually interesting.
To elaborate on this point and how I would like to do it, I would also suggest adding under-cabinet LED strips that would help gently highlight the texture. Warm backlight would be used to bring the atmosphere in the evening, and underline the design even more.
Planning a small bathroom does not obligate cutting out style, comfort and functionality. Even the most modest place may become splendid with the help of reasonable measures: glossy finishes, the presence of plants, the preferences of mirrored storage, or textured tiles. A top tip or a success story of your own? What do you think? Leave a suggestion in the comments, please, share how you renovated your small bathroom to be gorgeous.